...........................................deletedVery nice set up.
You are using an out of date browser. It may not display this or other websites correctly.
You should upgrade or use an alternative browser.
You should upgrade or use an alternative browser.
taper bar
- Thread starter chumscustoms
- Start date
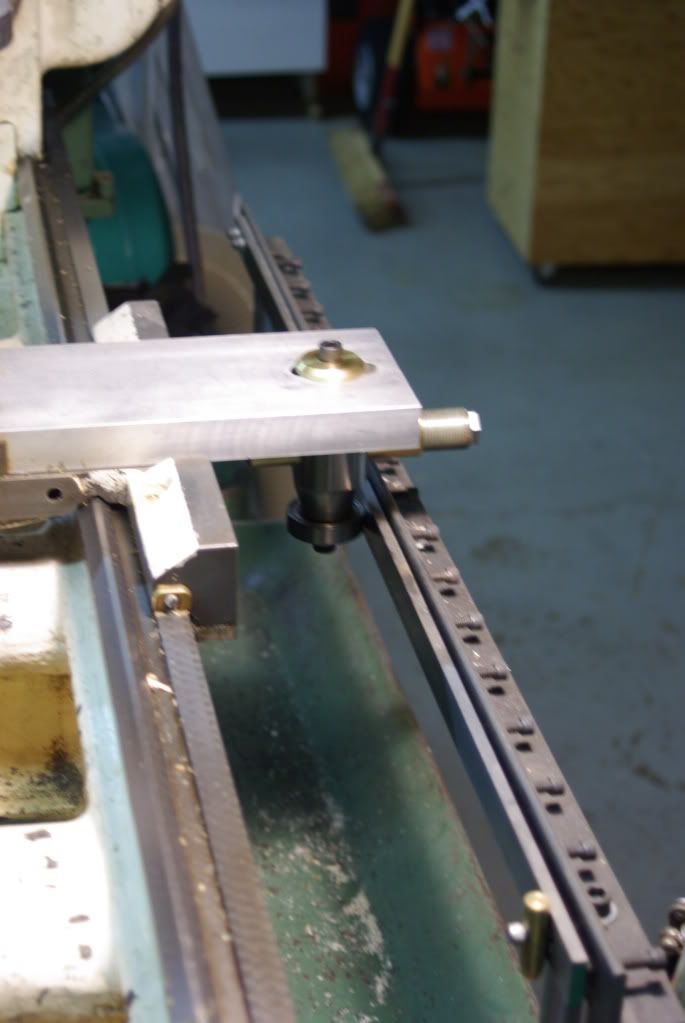
I finally got out to my shop with a camera and took some pics of the taper bar I made. The first pic (the out of focus one) is of the bar that attaches to the cross slide. I have been playing around with brushes and covers to keep dust off the bearing. The others show the taper bar Assembly which is overall 48" long. The actual taper bar is 36" long with 32" of bearing track. The cool thing about the setup is I can go from regular turning to cutting tapers in about 3 to 4 minutes. Also I have mounting holes already in the main bar for another taper bar that I am having made that has 2 tracks: 1 for straight taper 1.25" butt to .850" joint and another track with a compound taper for the shafts. You can see the additional bearing mounting holes on the cross slide bar. The bad thing so far is the dust getting in the track. I am currently working on this with better vacuum setup and a clear acrylic shield. One of the pics also shows the rear chuck which is a must, huge time saver. If you are buying a new lathe I would suggest no smaller than 13" x 40". Better to have a little extra than be a little to small.
This is an Enco 13" x 40" lathe I have had since 1987. I believe the casting is still used on a Grizzly lathe as well as some others.
Oh I just noticed on more thing: The quick change to post with router mount is a must for us one lathe guys.
Good luck,
Troy Mckune


just one question
hooooooooooooooooowwwwwwwwwwww in the world do you keep your lathe so clean???????????????????
:thumbup:
")
I finally got out to my shop with a camera and took some pics of the taper bar I made. This is an Enco 13" x 40" lathe I have had since 1987. I believe the casting is still used on a Grizzly lathe as well as some others.
Troy Mckune
Thanks to Troy for some good ideas. I modified my taper bar after seeing his clever design. I particularly like the way he mounted his bar to the ways. I've been using the new setup for a while now & it is reliable & accurate.
See it halfway down this page.
I'm a little late in showing my gratitude but thanks again, Troy.
Last edited:
These may be somewhat hard to see and some parts are covered in glue as I also use this lathe to glue my 6-pie shafts and butts. The lead screw is out of the carriage and is tensioned by springs. The bearing rides on the bottom bar for cutting straight tapers, on the top bar for cutting shafts. The top bar is removable with 2 allen bolts which allows the use of 4 different cnc'ed tapers on 2 different bars. No trouble with chips and a little dust pushes the bearing and cutter away from the part not towards it. Putting the roundstock between the carriage and the screws for holding the springs allows me to cut straight lines. The router, when installed, is vertical for cutting. I also have another horizontally mounted router for making the final cuts on the wrap area.
Bob Danielson
www.bdcuesandcomix.com
Bob Danielson
www.bdcuesandcomix.com
Attachments


This lathe is set up for shafts. when I build something I try not to modify any of the original equipment.


Very nice set up.
I'm confused here:sorry:
Did you disable lead screw in this setup?