LED Pool table lighting

Stryder

Registered
LED Pool table lighting project

I have a Diamond Pro Am on order now, walnut stained, and unfortunately not the Dymondwood rails that we all love. Oak rails, because the only other option at this time is (PRC) black, and that just won't work for my home decor.

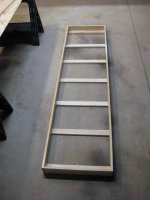
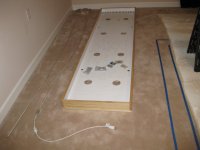
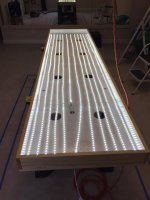
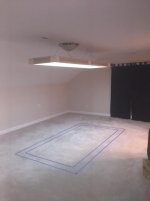
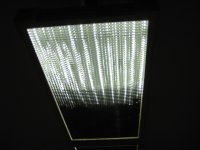
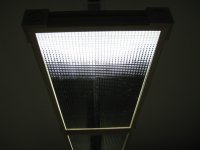
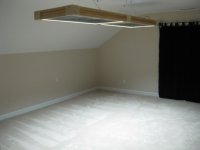
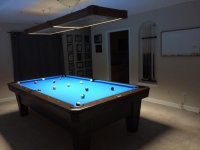
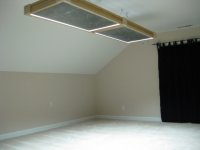
So while awaiting the Pro Am from Diamond, I saw a couple threads by DeadStick with his LED table light. I love the sleek slim look and decided to build one myself to help mitigate the wait. Props to DeadStick for the idea. The first couple pics are the finished product. For those interested in building one yourself, I'm including more details of light, issues that arose, and how they were resolved.

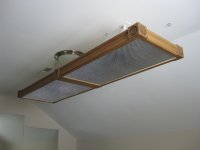
One pic is the light prior to staining.
Geek info overload to follow.
 

Attachments

  • 25.JPG
    25.JPG
    110.1 KB · Views: 2,679
  • 24.JPG
    24.JPG
    87.1 KB · Views: 2,445
  • 23.JPG
    23.JPG
    119.9 KB · Views: 2,424
Last edited:

Stryder

Registered
I designed the frame for the LED light set up so that I could use the Diamond lighting reflectors they use in their own table lights. This is built to nearly the same specs.

For those of you wanting to do the same, the Diamond light grid reflector is 23 1/2" by 47 1/2". Plan your width accordingly.

Framed with 1x4 boards, I installed cross bars every 16" so that I would have something sturdy to screw the LED light strips to. The 3/8" plywood panel backing I chose would be too easy to strip screws in. I also drilled large holes in the plywood backing for air circulation. Contrary to popular belief, high intensity LED lights do generate heat. Not as much as an incandescent, but better to not chance shortening the lifespan on the strip lights.

The dimensions of this project are 24 1/8" x 100" inside measurement, and between 4 3/4" - 5" tall after trim work added.

The weight of this finished light is right at 55 lbs.
You can cut down on the weight (and save $$$) by not adding the additional trim work (I used glue and brad nails), the plywood backing panel is not needed if you have thge cross pieces to hold the strip brackets to, and use standard pine boards rather than furniture grade. The furniture grade is MUCH denser and heavier, so much so that it even curled some of my brad nails when adding the trim pieces.
 

Attachments

  • 02.JPG
    02.JPG
    170.5 KB · Views: 2,327
  • 04.JPG
    04.JPG
    135.6 KB · Views: 2,298
Last edited:

gxman

AzB Silver Member
Silver Member
Nice build. Two 2x4' panels? Having the mesh over the led will be good.

I had just put up a single bare 2x4' over a 9ft pro-am. Been busy working nights, so haven't had much playing time. Plus my first one I hung was defective.

Lights up real good now. I would love to add a 2x2', but too much hassle now.
 

Stryder

Registered
Now for the education I had to get on LED lighting.

This is by no means a comprehensive list of what is available 'out there'. This is just the main types I came across over a couple days of trying to understand what was available and what I needed for my project.

It seems there are 3 main types of LED strip lights in my brief investigation.
There are ones that use 12v DC, and often have a set short limit on how long (if any) they can be daisy chained. From what I saw, most of the 12v DC were 1.5 lumens in brightness. Some were dim-able, but the ones I found had to be dimmed using a remote that came with them versus a wall switch. These were what were typically found at the local Home Improvement centers. I didn't look at the actual prebuilt LED lights because the cost of them seemed a bit much.

The other 2 main types I came across were SMD (Surface mount diode?) directional strips found online, and they used the 110-120v wall outlet power, and in most cases were also dim-able if an LED compatible dimmer switch was used.

The SMD3528 LED strips were single diode and put out 4-6 Lumens per bulb.
The SMD5050 LED strips were triple diode and put out 12-14 Lumens per bulb.

Each of the latter two strip lights can be cut at 19.5 inches.
After doing the math on the SMD5050 LEDs, I figured that 3 strips of 8' 1.5" would put out the equivalent of a single 5700 lumen fluorescent bulb. So I would need 12 rows of LED lights using the SMD5050 to get the equivalent of 4 fluorescent tube lights typically found in the tournament lighting.

I went with the Bright White 6000k instead of the warmer 3000k lights because I was afraid the golden lighting would not be bright enough.

High gloss white spray paint on the inside sides to reflect light, flat on the back.

I also had to improvise my own power manifold by modifying the T-connectors that are purchased separately. I needed to put the strip lights closer than 19.5" as was intended by the default manufacturer design. Make sure you buy the correct components to mach the different type of LED strip lights (SMD3528 or SMD5050). They are not interchangeable.
 

Attachments

  • 10.JPG
    10.JPG
    54.9 KB · Views: 2,275
  • 11.JPG
    11.JPG
    51.6 KB · Views: 2,266
Last edited:

Stryder

Registered
I added a dimmer switch to the wall outlet because this thing was BRIGHT.

Here are a couple pics before the Diamond grid arrived.
The tape was so I would know the dimensions of the table for placement of the light.
 

Attachments

  • 12.JPG
    12.JPG
    35.6 KB · Views: 2,277

Stryder

Registered
Once the Diamond light grid arrived and I installed them, I was unhappy about the shadowing they caused. :(

These grid reflectors were supposed to eliminate the shadows, NOT create them!!
I was kinda pissed. :confused:

...and it was even worse when I brought in the saw horses and fabric to see if they were still there at the correct pool table height.
 

Attachments

  • 16.JPG
    16.JPG
    122 KB · Views: 2,243
  • 17.JPG
    17.JPG
    124.9 KB · Views: 2,224
  • 18.JPG
    18.JPG
    128.1 KB · Views: 2,237
Last edited:

Stryder

Registered
The secret wound up being the addition of a light diffuser panel from the home improvement store.

They didn't have these in the Diamond lights at the local pool hall. It seems the fluorescent tubes act the same for a light diffuser as these panels provide for the raw LED lighting. Before and after panel pics below.
 

Attachments

  • 19.JPG
    19.JPG
    118.4 KB · Views: 2,254
  • 20.JPG
    20.JPG
    128.3 KB · Views: 2,291
  • 21.JPG
    21.JPG
    138.6 KB · Views: 2,250

Stryder

Registered
The end result looks great.

The Diamond light grid tones down the perceived light output enough that I don't think the dimmer is necessary now. I'll leave it in place, but I was amazed at how they toned it down.
 

Attachments

  • 22.JPG
    22.JPG
    109.7 KB · Views: 2,225
  • 23.JPG
    23.JPG
    119.9 KB · Views: 2,208

Stryder

Registered
I borrowed a FLUKE 1730 power meter to get an idea of the actual power draw from the LED pool table light.

The actual power draw for the system using the dimmer is:

House wiring = 111v

Listed by Dimmer slider position (not power draw):

FULL on - 92w .913A *
At 3/4 - 54w *
At 2/3 - 45w .62A
At half - 31w .495A
Lowest = 10w .250A

* Most likely settings that I will use.

This means that the entire ~96 ft. of LED SMD5050 strip lighting at FULL brightness (22800 lumens) will use less power than a single 100w light bulb.

This is good because I'm going to spend a LOT of time on this table. :wink:
 
Last edited:

Stryder

Registered
Table

Finally arrived and set up.:)
The room is NOT this dark, it's just the camera adjusted for the bright table light.
 

Attachments

  • IMG_0184a.jpg
    IMG_0184a.jpg
    56.1 KB · Views: 2,553
Last edited:

Linwood

AzB Silver Member
Silver Member
Thank you for the details. I'm not doing that for a pool table, but I have been putting up a lot of LED strip lighting for somewhat related purposes (we did a lot of rearranging furniture and room purpose to make room for a new table).

I'm curious how you mounted the ribbons, did you rely on the glue on the back? I've been finding it just does not last long, and I've tried variously tiny nails, epoxy, even a hot glue gun.

Some of mine are pretty difficult to access and replace later, so I also wonder how long these things REALLY last, since there's a new LED/PCB combination every few months it seems.

I'm also finding that a lot of the provided power supplies and wiring pretty questionable. After I disassembled some to rearrange, I found some connectors pretty heat damaged from use. Not "almost caught on fire" but close enough to give me pause. The last set I did I divided up in parallel, used much heavier interconnect wiring and drove with a PC ATX power supply I had lying around. Runs cooler, also much more efficient than those really cheap LED drivers that come with the ribbons.

Now just put a Raspberry pi in there with a camera, and you can get from-above video of the game. :rolleyes:
 

Stryder

Registered
Linwood,

I actually used the plastic mounting brackets that came with the strip lights (In Post #4 they are visible, held in place by a screw on either side). The LED housing is insulated in soft plastic all the way around, so no paper backing or glue on the back. Manufacturer recommended to place the brackets every 12", but I did every 16" instead and found this adequate. This style rope light plugs directly into the wall outlet without having to use the DC converter bricks that I also found to be questionable for both wiring and limited length of light run.

Link to site I got my LED rope light from:
http://www.cbconcept.com/120VLEDSMD5050Rope-White.aspx

Brackets and "T" connectors:
http://www.cbconcept.com/120VSMD5050Accessories.aspx

That was a great idea for the overhead cam shots of your games.
 
Last edited:

Linwood

AzB Silver Member
Silver Member
I actually used the plastic mounting brackets that came with the strip lights

Ah... yes, I see now. You have what I think are the waterproof versions, a lot of places are selling bare strips, no covering (and in retrospect I have seen those plastic mounts for those as well, though in my case they were too wide, as I was putting the lights into a 10mm groove).

Thanks for that pointer, it's good to have an alternative. The ones I was using were here ( being amazon that might disappear quickly as new ones come out, but they are 8mm strips with 300 SMD 5050's in 16.4' for $10 with 5A power supply; I also used a similar RGB version that is a bit less dense where I wanted color).

Because these are just a printed PCB and LED, they are really thin, easy to damage, but can fit in tiny spaces thin spaces.

It's really amazing how much light you can get now pretty cheaply. These ribbons are BRIGHT, and you can make them really, really dense since they run pretty cool.

Thanks for sharing this and responding. I can't do this for my pool table due to arrangement, but I have some other places I might experiment with.
 

homey123

Registered
I am glad you got this working well. It looks nice. The type of diffuser it looks like Diamond was using is what the industry calls parabolic cells. They are still seen in some older officer buildings. They were used primarily in the late 80's as standard fluorescent flat panel lights seemed to project a lot of light on those round CRT screens we all used. The idea was to diffuse the light to reduce as much horizontal lights as possible to reduce glare on the screens . Now the industry has changed to either flat panel or direct or indirect basked style fixtures as we no longer use round screens and that LED's are directional and you can direct the light where you want it. Your projects looks very nice and is hard to tell there are LED's under the reflector so excellent job!
 

Nick B

This is gonna hurt
Silver Member
I probably wouldn't have gone the light-rope method but it seems to have come out nice. Good thinking painting the interior white. A lot of people would have missed that step. For quicker and probably similar results I would have probably gone with 3 x 8 array of A19-9W conventional bulb style LED's. Each 9W bulb is the equivalent of a 60W incandescent. More than you need but you could always tune it down via dimmer.
 
Top