You are using an out of date browser. It may not display this or other websites correctly.
You should upgrade or use an alternative browser.
You should upgrade or use an alternative browser.
The Pivot Triangle : Find angles and the Contact Point - NO MATH
- Thread starter Vorpal Cue
- Start date
The Pivot Triangle : Find angles and the Contact Point - NO MATH
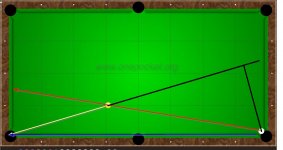
This method is a way to accurately approximate the shot angle. I use it to locate the correct visual to use with a pivoting technique, that's why it has the name. It can be used with different aiming techniques to double check on unsure shots. It gives a good approximation of the contact point (CP) for CP2CP, also the angle and CP can be useful for quarter system players. As a bonus I found it's easy to set up any angle cut at various distances for practice.
The three lines of the triangle are made using the pocket opening, cue ball and object ball centers as reference points. Once you see how one is made you shouldn't have any problem seeing them on the table yourself. All the math you need is the sequence 15,27,37,45,55,65,75,90 which is very close to 15,25,35,45,55,65,75,90. The true values are 14,27,37,45,53,64,76,90 if you want more accuracy.
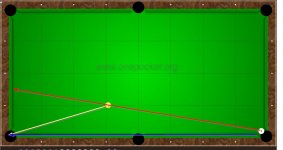
I used a back cut as an example because some players are uneasy with them. This is the place to use the method, when you're unsure. Member bbb sent this diagram and it's a good place to start, with an uncomfortable or troublesome shot.
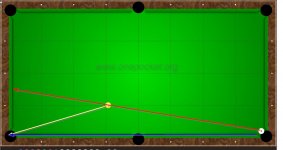
Draw a line from the Cue Ball Center, (CBC) to Object Ball Center (OBC). This line is ALWAYS the longest line in the triangle.
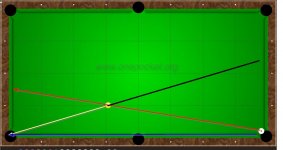
The next step is to draw a line from the center of the pocket through OBC down the table and past the cue ball. The angle of the intersection of these lines gives the cut angle needed.

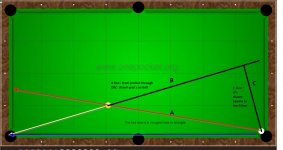
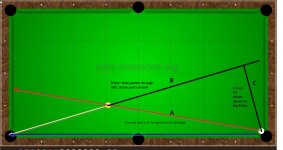
The third line is drawn from CBC to make a square angle with second line. This makes a right triangle which 'sets up the math' so the lines can be compared to find an angle.
A quick caution: It's possible to draw the triangle wrong the first few times so be careful. Been there, done that. The square angle should be a naked angle, hanging out in bare space, not clothed in the cue ball. If you get strange results make sure the right angle is in the right 'space' and the line through the CB and OB is the longest line.
Let's call the line through the balls A, the line through the pocket B, and the 'square' line C. To find the angle the length of a short line is compared to a long line. When C is compared to A it will show the CP and the angle. When C and B are compared to each other they give a more accurate measurement for larger angles.
To measure the angle some form of 'ruler' and it's units or 'scale' has to be used. The ruler is the long line and the units are quarter lengths of the line. Most people can divide a line in half accurately enough. The scale of the B and C lines is where the 14,27,37,.. is used. The A line is scaled differently and it will be looked at later after the use of C and B are explained.
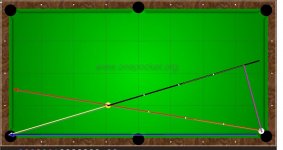
The A and B lines are divided into approximate quarters. C is the shortest line so it will be compared to the other ones. The diagram shows the C line 'laid over' lines A and B which have quarter marks on them.
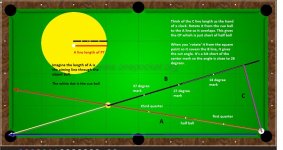
When C is shorter than B, the quarters on B mark the angles 14, 27, 37, 45. When B is shorter than C, C is divided into quarters to mark the angles 53, 64, 76, 90. (I'm going to use the true values for accuracy)
The A line is useful to the half mark, beyond there the scale becomes compressed and it's not useful to measure large angles accurately. The first quarter mark on A is 15* or quarter ball, the center is 30* or half ball. (Can you find the Contact Point now with the hint?)
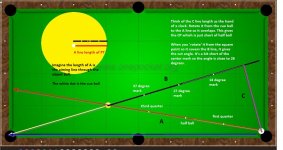
The overlaid length of C stops a little short of the center marks of A and B. Since the center is 27* on B, a good guess would be 26*. The center mark on A is 30*, so a good guess would be 27*. The actual measured angle is 26* so both guesses get you close to the true angle. All the marks on this diagram were eyeballed. You can usually approximate the angle to a few degrees.
If you haven't guessed, the end of line C on A shows the contact point. The yellow circle shows the CP location as a red dot on the black line through the center of the object ball. Imagine the length of line A is half of the OB. The CP is a little short of a half ball hit.
That's the method in a nutshell. If you're interested in the math behind the system have a look at the last post. It provides the math if you're curious. And there's the original thread, and I'll warn you it's a bit hard to read because of the terms and labels I used the first time. If you understand the basics from this thread you should be able to struggle through it.
If there's enough interest I'll post some more examples and discuss what to do when the info from line A and line B don't agree. (Hint: usually the C line isn't square)

This method is a way to accurately approximate the shot angle. I use it to locate the correct visual to use with a pivoting technique, that's why it has the name. It can be used with different aiming techniques to double check on unsure shots. It gives a good approximation of the contact point (CP) for CP2CP, also the angle and CP can be useful for quarter system players. As a bonus I found it's easy to set up any angle cut at various distances for practice.
The three lines of the triangle are made using the pocket opening, cue ball and object ball centers as reference points. Once you see how one is made you shouldn't have any problem seeing them on the table yourself. All the math you need is the sequence 15,27,37,45,55,65,75,90 which is very close to 15,25,35,45,55,65,75,90. The true values are 14,27,37,45,53,64,76,90 if you want more accuracy.
I used a back cut as an example because some players are uneasy with them. This is the place to use the method, when you're unsure. Member bbb sent this diagram and it's a good place to start, with an uncomfortable or troublesome shot.

Draw a line from the Cue Ball Center, (CBC) to Object Ball Center (OBC). This line is ALWAYS the longest line in the triangle.

The next step is to draw a line from the center of the pocket through OBC down the table and past the cue ball. The angle of the intersection of these lines gives the cut angle needed.

The third line is drawn from CBC to make a square angle with second line. This makes a right triangle which 'sets up the math' so the lines can be compared to find an angle.
A quick caution: It's possible to draw the triangle wrong the first few times so be careful. Been there, done that. The square angle should be a naked angle, hanging out in bare space, not clothed in the cue ball. If you get strange results make sure the right angle is in the right 'space' and the line through the CB and OB is the longest line.
Let's call the line through the balls A, the line through the pocket B, and the 'square' line C. To find the angle the length of a short line is compared to a long line. When C is compared to A it will show the CP and the angle. When C and B are compared to each other they give a more accurate measurement for larger angles.
To measure the angle some form of 'ruler' and it's units or 'scale' has to be used. The ruler is the long line and the units are quarter lengths of the line. Most people can divide a line in half accurately enough. The scale of the B and C lines is where the 14,27,37,.. is used. The A line is scaled differently and it will be looked at later after the use of C and B are explained.

The A and B lines are divided into approximate quarters. C is the shortest line so it will be compared to the other ones. The diagram shows the C line 'laid over' lines A and B which have quarter marks on them.
When C is shorter than B, the quarters on B mark the angles 14, 27, 37, 45. When B is shorter than C, C is divided into quarters to mark the angles 53, 64, 76, 90. (I'm going to use the true values for accuracy)
The A line is useful to the half mark, beyond there the scale becomes compressed and it's not useful to measure large angles accurately. The first quarter mark on A is 15* or quarter ball, the center is 30* or half ball. (Can you find the Contact Point now with the hint?)

The overlaid length of C stops a little short of the center marks of A and B. Since the center is 27* on B, a good guess would be 26*. The center mark on A is 30*, so a good guess would be 27*. The actual measured angle is 26* so both guesses get you close to the true angle. All the marks on this diagram were eyeballed. You can usually approximate the angle to a few degrees.
If you haven't guessed, the end of line C on A shows the contact point. The yellow circle shows the CP location as a red dot on the black line through the center of the object ball. Imagine the length of line A is half of the OB. The CP is a little short of a half ball hit.
That's the method in a nutshell. If you're interested in the math behind the system have a look at the last post. It provides the math if you're curious. And there's the original thread, and I'll warn you it's a bit hard to read because of the terms and labels I used the first time. If you understand the basics from this thread you should be able to struggle through it.
If there's enough interest I'll post some more examples and discuss what to do when the info from line A and line B don't agree. (Hint: usually the C line isn't square)
Last edited:
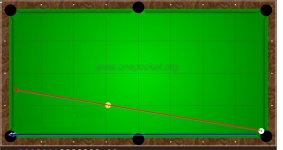
Sometimes a PT can't be drawn the regular way, it runs off the table. This post shows how to get around that problem. A PT can be made on either side of the intersection line. Let's imagine the 8 ball is hanging in the pocket and you must shoot across the table. If this shot is for the money, you may want to double check.
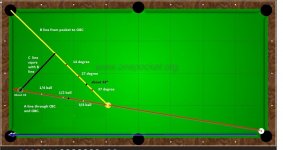
It's drawn the same way but on the other side of the crossing point of the A and B lines. You must be sure that the C line is square to B, the pocket line. It's a bit harder since the CB doesn't fix the size of the PT. So how large do you make it? Any size you want. Just pick a length of the A line you like and make the square angle on line B, the pocket line. When you pick the length of A imagine you're putting the CB down at that point. Simple? I still get them wrong sometimes so be careful.
Solution : About 33* and a bit more than a half ball. Since the CP is between the second and third marks, I'd use a C visual, pivoting away from the pocket (CCW).
Last edited:
thanks for sharing but I'm lost.
Is there anyway you can label a,b,c lines and put comments on the pics?
Is there anyway you can label a,b,c lines and put comments on the pics?
thanks for sharing but I'm lost.
Is there anyway you can label a,b,c lines and put comments on the pics?
Thanks for the idea. It make them easier to understand. I'll start using text on the following diagrams. I've gone back to the last post and did the same thing, have a look if you haven't seen it yet.
thanks, i think i get it now.
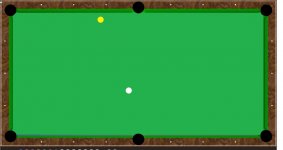
Let's take a look at larger cut angles. The above shot and ones similar to it show up often. Using a PT is one way to figure out the CP and cut angle.
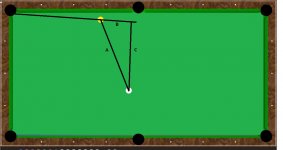
Here's the PT with no markings on it. It's there if you want to try your hand at estimating the CP and shot angle.
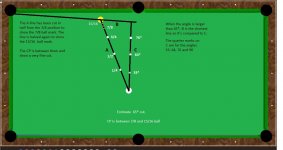
The marks on the C line are for the angles of 53, 64 , 76, and 90. In this example the B line is shorter than C so it will be 'rotated' around the square angle and it's length compared C. The red spot on C shows the estimated location. It's just over the 64 position, so I'd estimate the cut angle to be about 65*.
Remember that C is always compared to A to find the CP. It's 'rotated' around the CB. On the A line the red spot shows the CP which is close to the end of the line. Notice the white marks on the A line above the 3/4 ball mark. That section has been halved twice. They show the 7/8 and 15/16 ball locations. They make it easier to locate the CP as a ball fraction. The red spot shows the CP is between the 7/8 and 15/16 position.
If anyone has any questions feel free to ask.
I'll use the thin cut in the previous post to show how you can be sure of your estimation of 60*+ angles. You don't NEED to know this bit of information.
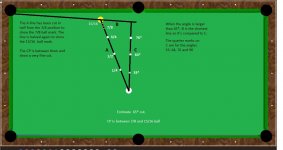
So far we've only compared the A line to C. When the A line is compared to B we'll find the other angle in the triangle. When this angle is subtracted from 90* the result should match the amount we got previously with B to C.
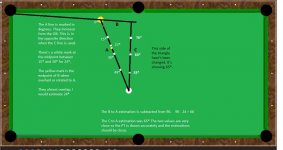
The quarter marks on A, starting from the OB, show 15* at the first quarter and 30* at the center. Notice the numbers run backwards from usual when using the B line. There's also a mark midway between 15* and 30* to mark the angle 23*. The yellow mark on the A line shows the end point when B is 'rotated' around the OB. It's a bit past the 23 point, about 24* or 25*. Doing the math of 90* - 24*, we get the angle of 66*. Close enough to the first value to be sure the PT is made accurately.

So far we've only compared the A line to C. When the A line is compared to B we'll find the other angle in the triangle. When this angle is subtracted from 90* the result should match the amount we got previously with B to C.

The quarter marks on A, starting from the OB, show 15* at the first quarter and 30* at the center. Notice the numbers run backwards from usual when using the B line. There's also a mark midway between 15* and 30* to mark the angle 23*. The yellow mark on the A line shows the end point when B is 'rotated' around the OB. It's a bit past the 23 point, about 24* or 25*. Doing the math of 90* - 24*, we get the angle of 66*. Close enough to the first value to be sure the PT is made accurately.
Last edited:
Finding the thickest and thinnest.
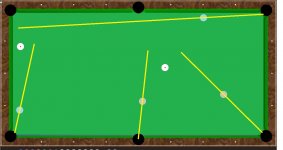
For this post we'll have a look at some thinner shots.
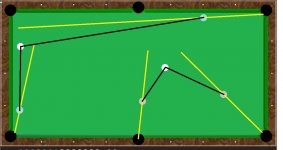
I've drawn in the PTs for various cuts.
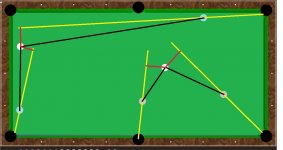
The final solutions.
I didn't include the angles on the lines. Supplying the values was left as an exercise for the student. If you've come this far you should know them by now. If not, scroll back a few posts where they're labeled.
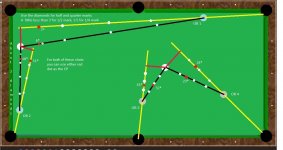
I want to point out a few things before I wrap up the thread.
The first part of B can be used to find the CP for 15* and smaller angles. With these angles you can use the overlap point of C as the CP on A or B. There's 15* in the first quarter of the A line and 14* on B. The difference is small enough to ignore. This ONLY works on angles 15* and below when using B.
If one of the lines is close to the rail, the diamonds can be used to help divide the lines when they get long like the shot on OB 1.
Hope you found it interesting and picked up a different method to estimate the cut. If there's any questions, ask away.

For this post we'll have a look at some thinner shots.

I've drawn in the PTs for various cuts.

The final solutions.
I didn't include the angles on the lines. Supplying the values was left as an exercise for the student. If you've come this far you should know them by now. If not, scroll back a few posts where they're labeled.

I want to point out a few things before I wrap up the thread.
The first part of B can be used to find the CP for 15* and smaller angles. With these angles you can use the overlap point of C as the CP on A or B. There's 15* in the first quarter of the A line and 14* on B. The difference is small enough to ignore. This ONLY works on angles 15* and below when using B.
If one of the lines is close to the rail, the diamonds can be used to help divide the lines when they get long like the shot on OB 1.
Hope you found it interesting and picked up a different method to estimate the cut. If there's any questions, ask away.
PT Innards
Before I finish the subject of pivot triangles, I'll touch on the math behind the method. If you've come this far and are curious about the 'wheels within wheels' of the PT, I'll explain the method with as little math as I can.
By setting the intersection of the B and C lines at 90* it makes a PT a right triangle. This allows using the lengths of B and C to find the angles of the triangle. I use ratios in the description so I'll explain the term before moving on. In this post a ratio is just another name for a fraction. A ratio of 1 : 2 is the same as the fraction of 1/2. It's another way of saying that the short line is half the length of the long line.
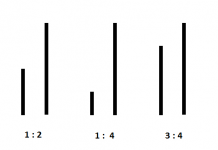
Comparing C : B and B : C
When overlaying B and C, a PT is solving a division problem. The division is made when B or C is divided into quarters. Each quarter is a .250 'piece' of the original length. If C is the same length as the first quarter mark on B, it's a .250 length of B. If C is half way between the first and second quarter marks the value will be half way between .250 and .500 or .375 . The result of the division (.375) can be used with a little trig to identify the angle in the triangle.
Let's start by looking at an angle where the ratio of C : B is 1 : 2. The ratio can also be expressed as C/B, 1/2, or .5. The trig term for the ratio of C/B is the tangent (tan). The value of .500 is the tan of the cut angle. Once the tan is known it's simple to look in the trig tables and find the angle that has that value. This method of working 'backwards' is defined as finding the arctan of a value. It's the button labeled tan with a little -1 on calculators if you want to check the results. Solving arctan(.500) the result is about 27*. This is value at the center mark of B after it's divided into quarters.
Using the ratios of 1 : 4, 3 : 4, and 1 : 1 , the results are 1/4 , 3/4 and 1 which are .250 , .750 and 1. Taking the arctan of the values, the angles are 14 , 37 , and 45 to the nearest degree. Knowing that arctan .250 = 14* and etc. , the ratios of 1/4 , 1/2 , 3/4 and 1 can be used to create a small 'lookup table' of the angle values up to 45* on the quarter marks of B. This allows the values of the division C/B to be read as angles along the side of the PT. This is how I set the scale for the line segments on B. If you know the sequence of 14, 27, 37, 45, they can be used to 'compute' the angle.
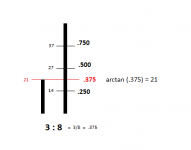
When C becomes larger than B a switch is made to a different trig function in order to keep comparing a short line to long one. When B is compared to C, (B/C) the cotangent (cot) is used the same way. The logic used to 'set up the table' is the same as the tangent technique above. This gives the sequence: 53, 64, 76, 90 for angles larger than 45* on the C quarter marks.
Comparing C : A
The ratio of C/A is 'trig' for the sine (sin). The value of the sin varies between 0 to 1.000 , 0 for a 0* cut angle and 1.000 for 90*. By using a one inch ball radius it's easier to explain how the sin = CP. Divide the radius into 1,000 pieces. Each .001 step in the sin value would equal a .001 inch step across the ball. A half ball hit would be at 1/2 inch on the ball or .500 inch. At half ball the sin value would be .500. Checking through the arcsin trig table for .500 the result equals 30*, the cut angle for a half ball hit. If .250 or quarter ball is used, arcsin(.250) = 15* and etc. The sin is the 'step' distance from the center of the ball, so is the contact point. The CP = sin.
The A line is divided into quarters to make it easier to visualize the CP's relative position to the OB's quarters. It helps identify which quarter the CP is in and how close it is to the next or last quarter line.
The sin 'scale' is harder to set up for reading angles above 30*. The technique used for the tan and cot works fine to estimate angles until half ball. After that point the angles start to become compressed. When reaching the edge of the ball (getting close to the end of A) they're so tightly packed it's very hard to read individual angles with any accuracy. The first 1/6 of the ball has 10* in it. The last 1/6 ball has 34*. That's over three times as many angles packed into the last 1/6. The scale isn't linear, the .001 steps don't give the same angle ratio past half ball so it's not useful for large angles.

Comparing B : A
The B/A ratio is the cosine (cos). This is used for double checking angles over 60*. It gives the other (or complimentary) angle of the triangle. It's of no other use in the aiming process that I can find.
A PT is a method to graph the division of two legs in a right triangle and 'decode' the result of that division into an angle. It will also show the location of the contact point. It's a 'slide rule' on the table you can use to get shot information if you know it's there and care to use it.
Before I finish the subject of pivot triangles, I'll touch on the math behind the method. If you've come this far and are curious about the 'wheels within wheels' of the PT, I'll explain the method with as little math as I can.
By setting the intersection of the B and C lines at 90* it makes a PT a right triangle. This allows using the lengths of B and C to find the angles of the triangle. I use ratios in the description so I'll explain the term before moving on. In this post a ratio is just another name for a fraction. A ratio of 1 : 2 is the same as the fraction of 1/2. It's another way of saying that the short line is half the length of the long line.

Comparing C : B and B : C
When overlaying B and C, a PT is solving a division problem. The division is made when B or C is divided into quarters. Each quarter is a .250 'piece' of the original length. If C is the same length as the first quarter mark on B, it's a .250 length of B. If C is half way between the first and second quarter marks the value will be half way between .250 and .500 or .375 . The result of the division (.375) can be used with a little trig to identify the angle in the triangle.
Let's start by looking at an angle where the ratio of C : B is 1 : 2. The ratio can also be expressed as C/B, 1/2, or .5. The trig term for the ratio of C/B is the tangent (tan). The value of .500 is the tan of the cut angle. Once the tan is known it's simple to look in the trig tables and find the angle that has that value. This method of working 'backwards' is defined as finding the arctan of a value. It's the button labeled tan with a little -1 on calculators if you want to check the results. Solving arctan(.500) the result is about 27*. This is value at the center mark of B after it's divided into quarters.
Using the ratios of 1 : 4, 3 : 4, and 1 : 1 , the results are 1/4 , 3/4 and 1 which are .250 , .750 and 1. Taking the arctan of the values, the angles are 14 , 37 , and 45 to the nearest degree. Knowing that arctan .250 = 14* and etc. , the ratios of 1/4 , 1/2 , 3/4 and 1 can be used to create a small 'lookup table' of the angle values up to 45* on the quarter marks of B. This allows the values of the division C/B to be read as angles along the side of the PT. This is how I set the scale for the line segments on B. If you know the sequence of 14, 27, 37, 45, they can be used to 'compute' the angle.

When C becomes larger than B a switch is made to a different trig function in order to keep comparing a short line to long one. When B is compared to C, (B/C) the cotangent (cot) is used the same way. The logic used to 'set up the table' is the same as the tangent technique above. This gives the sequence: 53, 64, 76, 90 for angles larger than 45* on the C quarter marks.
Comparing C : A
The ratio of C/A is 'trig' for the sine (sin). The value of the sin varies between 0 to 1.000 , 0 for a 0* cut angle and 1.000 for 90*. By using a one inch ball radius it's easier to explain how the sin = CP. Divide the radius into 1,000 pieces. Each .001 step in the sin value would equal a .001 inch step across the ball. A half ball hit would be at 1/2 inch on the ball or .500 inch. At half ball the sin value would be .500. Checking through the arcsin trig table for .500 the result equals 30*, the cut angle for a half ball hit. If .250 or quarter ball is used, arcsin(.250) = 15* and etc. The sin is the 'step' distance from the center of the ball, so is the contact point. The CP = sin.
The A line is divided into quarters to make it easier to visualize the CP's relative position to the OB's quarters. It helps identify which quarter the CP is in and how close it is to the next or last quarter line.
The sin 'scale' is harder to set up for reading angles above 30*. The technique used for the tan and cot works fine to estimate angles until half ball. After that point the angles start to become compressed. When reaching the edge of the ball (getting close to the end of A) they're so tightly packed it's very hard to read individual angles with any accuracy. The first 1/6 of the ball has 10* in it. The last 1/6 ball has 34*. That's over three times as many angles packed into the last 1/6. The scale isn't linear, the .001 steps don't give the same angle ratio past half ball so it's not useful for large angles.

Comparing B : A
The B/A ratio is the cosine (cos). This is used for double checking angles over 60*. It gives the other (or complimentary) angle of the triangle. It's of no other use in the aiming process that I can find.
A PT is a method to graph the division of two legs in a right triangle and 'decode' the result of that division into an angle. It will also show the location of the contact point. It's a 'slide rule' on the table you can use to get shot information if you know it's there and care to use it.
