I wanted to post a CTE experiment (challenge?) of my own, but Dr. Dave beat me to the punch. In an effort to avoid distracting from his efforts, I'm keeping mine in a separate thread. My understanding of CTE is that the following are true:
1. You don't need to know where the pocket is to use it. Determining the CTE line, planting your bridge, and pivoting can all be done without referencing the pocket.
2. There are multiple edges to the OB, and multiple centers to the CB, so it's possible for a pair of balls (one OB, one CB) to have multiple CTEL's depending on your perspective.
3. Once you determine the CTE line, you pivot the exact same way for most shots (as long as the bridge length is 10-12 inches and the balls aren't closer than 1 diamond apart)
4. You don't need to make judgment calls or estimations when determining the CTE line. While a player is not supposed to sight down the CTE line... if he did, it should look like the cue is pointing to the exact middle of the cue ball, and at the same time it will be pointing to the exact edge of the OB.
If any of these is incorrect, please let me know.
-------
I have some diagrams for those who understand CTE and can use photoshop or a similar program. The diagrams are created on a 3D rendered pool table. The balls have a real location in 3D space. If I owned a table I'd just photograph it.
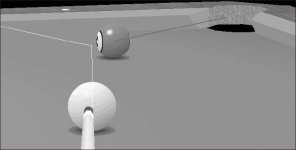
#1: Draw the CTEL line between the cue ball and the 9 ball. Then draw a 2nd line showing your line of aim after a correct pivot. I can plug this line of aim into my program and see if the result will go in or very near the pocket.
Info you need: You want the left edge (the cut is going to the right). It's a thin hit.

#2. This second diagram is the same pair of balls, and both have been moved 1 foot in the same direction. This really is a different rendering than the first picture, you can see the lighting has changed. Because the balls moved, the angle to the pocket moved. Draw the CTEL line for this new shot, and the resulting line of aim.
Info you need: Same left edge, and it's still a thin hit.

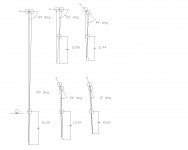
#3. Not related to the first two shots: choose any edge of the OB, and draw a line through the center of the CB. Then choose a 2nd edge on the same side of the OB, and draw a line through the new center of the cue ball. Both lines, when viewed in 3D, should visually seem to go through the exact edge of the OB and exact center of the CB.

1. You don't need to know where the pocket is to use it. Determining the CTE line, planting your bridge, and pivoting can all be done without referencing the pocket.
2. There are multiple edges to the OB, and multiple centers to the CB, so it's possible for a pair of balls (one OB, one CB) to have multiple CTEL's depending on your perspective.
3. Once you determine the CTE line, you pivot the exact same way for most shots (as long as the bridge length is 10-12 inches and the balls aren't closer than 1 diamond apart)
4. You don't need to make judgment calls or estimations when determining the CTE line. While a player is not supposed to sight down the CTE line... if he did, it should look like the cue is pointing to the exact middle of the cue ball, and at the same time it will be pointing to the exact edge of the OB.
If any of these is incorrect, please let me know.
-------
I have some diagrams for those who understand CTE and can use photoshop or a similar program. The diagrams are created on a 3D rendered pool table. The balls have a real location in 3D space. If I owned a table I'd just photograph it.
#1: Draw the CTEL line between the cue ball and the 9 ball. Then draw a 2nd line showing your line of aim after a correct pivot. I can plug this line of aim into my program and see if the result will go in or very near the pocket.
Info you need: You want the left edge (the cut is going to the right). It's a thin hit.

#2. This second diagram is the same pair of balls, and both have been moved 1 foot in the same direction. This really is a different rendering than the first picture, you can see the lighting has changed. Because the balls moved, the angle to the pocket moved. Draw the CTEL line for this new shot, and the resulting line of aim.
Info you need: Same left edge, and it's still a thin hit.

#3. Not related to the first two shots: choose any edge of the OB, and draw a line through the center of the CB. Then choose a 2nd edge on the same side of the OB, and draw a line through the new center of the cue ball. Both lines, when viewed in 3D, should visually seem to go through the exact edge of the OB and exact center of the CB.

Last edited:

