Excerpt From Lessons in 9 Ball
Diagram Provided along with Wei table stream
When to Play Safe
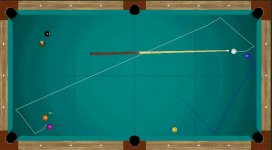
Knowing when and when not to play safe is half of the battle. Many players play safe in different situations, and it depends on their skill level, shotmaking ability, and their confidence. As I touched on earlier, many younger players tend to "go for everything" and rarely play safe, and when they do, execute it poorly. Familiarizing yourself with the different factors of when and when not to play safe is essential to making the proper choice. One of the classic examples is after the break. Your opponent has broke the balls and has left you no shot on the two ball as the result of pushing out. The two ball is stranded on the end rail. There is a very low percentage bank shot on the two ball cross table. (See diagram below) That is the only pocket availability option we have on the one, and even then we need some help from the 8 ball. There is also a cluster in the lower left corner of the table caused by the 4, 5, & 6. There is also a mini-cluster caused by the 7 and the 8. We have the choice to:
a) Go for the bank shot, and hope to get position on the four ball
b) Pass the shot back to our opponent
c) Control the cue ball, and place it behind a cluster
d) Control the object ball and place it behind a cluster
START(
%A[5B3%Bq8K3%CB7B7%DI7Z2%EI1X0%FJ1V7%GI2I2%HJ5G3%Ic2Z1%Pm7J5
%Wq9I9%Xn1J6%Yi4C9%Zs4H3%[D4S5%\h1C8%]G2Z1%^C5T2
)END
So what is the correct choice? Let's break it down by looking at each available option and make our decision by choosing the shot that holds the best percentages for success. We will first identify whether or not there is a good chance for a run out. To do this, we imagine that we have ball in hand on the two ball. We look to see if any ball is in trouble. The 5 causes a problem, but if we get right on the four ball and stay on the lower rail, the 5 goes in the top left corner pocket. The key to running this rack is getting straight on the 4 ball for a stop shot so that we can pocket the 5 ball. With the five gone, the six is a duck in 4 of the 6 pockets. The 7 and 8 are a mini-cluster, but both pass into the top left corner pocket very easily. Evaluating this layout tells me two important things:
1) There is a possibility for a run out
2) Whoever maintains control of the game can and will get out
3) My opponent should have played safe as opposed to rolling out- he just made an error
4) I am in control of the table now, and I need to make it count and maintain control
Notice that I mentioned "maintaining control". By that I mean that we need to be the "actor" as opposed to being the "reactor" during this game. He has pushed out and left us a lousy shot on the two. We can hit the two, and we have two separate safety options caused by a three ball cluster and a two ball wall. The 7 and 8 are more of an obstacle option than a cluster as the balls are pocketable from where they are. The 4-5-6, though classified as a cluster, can be dealt with if handled with care. The 4-5-6 is also our largest obstacle on the table. Do we bank the two ball? Pocketing the two ball by banking it cross table relies on many factors. We first have to determine if the two will pass the 8 ball. We can obviously see that it won't get by the 4 ball. The two does pass the 8 ball, so we must now look at the position we will need to make the four. The bank on the 2 ball will send our cue ball to the bottom rail, and the side rail, and out towards the center of the table. This will be unavoidable, as we will have to surrender the cue ball to the elements of the table due to the angle we have on this bank shot. That is unavoidable. This will leave us too much angle on the four, thereby eliminating and easy shot on the five. Already, we can see the chances of a run out slipping away fast. By evaluating this option, we have determined that there are too many problems ahead of us if we take this option, therefore it should be avoided.
Do we pass the shot back to our opponent? What if he has discovered the safety option as well? I'm not going to hand it to him on a silver platter. He just made a tactical error and I should make him pay for it. We can eliminate that option as well.
This leads us to a cross roads that we come to with each safety option. We can either control the cue ball or the object ball. Always choose either one or the other. Avoid controlling both at the same time. By our evaluation we can see two walls. We should look at the largest obstacle and see what our options are. Can we successfully place the 2 ball behind the 4-5-6? Not very likely. From where we are, we can place it in front of the cluster, which does cause problems, but that is not the wisest choice. Why? If the two is placed in front of the 4-5-6- cluster, it can be used as the lead combination ball, or if we fail to execute it properly, we can leave our opponent a clear shot at the two in the lower left pocket, and he will be able to possibly break up the cluster quite easily with the ensuing cue ball action. Eliminate that option. Now let's look at the shot that is illustrated. It is a makable safe that is executed. Also, if we are unsuccessful, we have our opponent shooting AWAY from the required position on the 4 ball. The rule to follow in this situation is to keep him shooting away from the straight position required on the four. This means that he should be shooting towards the upper left or right hand pockets. Even if our execution varies slightly from the illustration, the 2 ball becomes a locking mechanism, rather than the key that opens the rack for him. Even if the two ball is behind the 9 ball and he can make it, his chances will be slim as long as you have his "natural" cue ball angle going away from the 4 as he pockets the 2. This situation occurs very frequently during safety battles. As long as he is shooting away from the required position, YOU remain in control of the situation as the actor, not the reactor. If we lock him up behind the cluster, he will be forced to kick two or three rails to make contact with the 2 ball. Ensuring that cue ball gets close to the cluster, you will have taken away the jump from him. By simply evaluating our options, we have eliminated the poor choices, and found the percentage option, and identified its advantages. Why not go behind the 7 and the 8? That is explained in "Going to Jail" where we revisit this shot and evaluate it again.
During this shot, we evaluated the situation and took into consideration everything that could go right and wrong with every option that we had. Never eliminate an option. Weigh each option carefully, and after time you will amass a large inventory of knowledge and experience that will aid you in your future endeavors. Many situations revisit us from time to time. Though no two layouts are exactly the same, there are situations that are similar. The more experienced you are at thinking things through, the more apt you will become to making the correct choice when faced with difficult situations.
Diagram Provided along with Wei table stream
When to Play Safe
Knowing when and when not to play safe is half of the battle. Many players play safe in different situations, and it depends on their skill level, shotmaking ability, and their confidence. As I touched on earlier, many younger players tend to "go for everything" and rarely play safe, and when they do, execute it poorly. Familiarizing yourself with the different factors of when and when not to play safe is essential to making the proper choice. One of the classic examples is after the break. Your opponent has broke the balls and has left you no shot on the two ball as the result of pushing out. The two ball is stranded on the end rail. There is a very low percentage bank shot on the two ball cross table. (See diagram below) That is the only pocket availability option we have on the one, and even then we need some help from the 8 ball. There is also a cluster in the lower left corner of the table caused by the 4, 5, & 6. There is also a mini-cluster caused by the 7 and the 8. We have the choice to:
a) Go for the bank shot, and hope to get position on the four ball
b) Pass the shot back to our opponent
c) Control the cue ball, and place it behind a cluster
d) Control the object ball and place it behind a cluster
START(
%A[5B3%Bq8K3%CB7B7%DI7Z2%EI1X0%FJ1V7%GI2I2%HJ5G3%Ic2Z1%Pm7J5
%Wq9I9%Xn1J6%Yi4C9%Zs4H3%[D4S5%\h1C8%]G2Z1%^C5T2
)END
So what is the correct choice? Let's break it down by looking at each available option and make our decision by choosing the shot that holds the best percentages for success. We will first identify whether or not there is a good chance for a run out. To do this, we imagine that we have ball in hand on the two ball. We look to see if any ball is in trouble. The 5 causes a problem, but if we get right on the four ball and stay on the lower rail, the 5 goes in the top left corner pocket. The key to running this rack is getting straight on the 4 ball for a stop shot so that we can pocket the 5 ball. With the five gone, the six is a duck in 4 of the 6 pockets. The 7 and 8 are a mini-cluster, but both pass into the top left corner pocket very easily. Evaluating this layout tells me two important things:
1) There is a possibility for a run out
2) Whoever maintains control of the game can and will get out
3) My opponent should have played safe as opposed to rolling out- he just made an error
4) I am in control of the table now, and I need to make it count and maintain control
Notice that I mentioned "maintaining control". By that I mean that we need to be the "actor" as opposed to being the "reactor" during this game. He has pushed out and left us a lousy shot on the two. We can hit the two, and we have two separate safety options caused by a three ball cluster and a two ball wall. The 7 and 8 are more of an obstacle option than a cluster as the balls are pocketable from where they are. The 4-5-6, though classified as a cluster, can be dealt with if handled with care. The 4-5-6 is also our largest obstacle on the table. Do we bank the two ball? Pocketing the two ball by banking it cross table relies on many factors. We first have to determine if the two will pass the 8 ball. We can obviously see that it won't get by the 4 ball. The two does pass the 8 ball, so we must now look at the position we will need to make the four. The bank on the 2 ball will send our cue ball to the bottom rail, and the side rail, and out towards the center of the table. This will be unavoidable, as we will have to surrender the cue ball to the elements of the table due to the angle we have on this bank shot. That is unavoidable. This will leave us too much angle on the four, thereby eliminating and easy shot on the five. Already, we can see the chances of a run out slipping away fast. By evaluating this option, we have determined that there are too many problems ahead of us if we take this option, therefore it should be avoided.
Do we pass the shot back to our opponent? What if he has discovered the safety option as well? I'm not going to hand it to him on a silver platter. He just made a tactical error and I should make him pay for it. We can eliminate that option as well.
This leads us to a cross roads that we come to with each safety option. We can either control the cue ball or the object ball. Always choose either one or the other. Avoid controlling both at the same time. By our evaluation we can see two walls. We should look at the largest obstacle and see what our options are. Can we successfully place the 2 ball behind the 4-5-6? Not very likely. From where we are, we can place it in front of the cluster, which does cause problems, but that is not the wisest choice. Why? If the two is placed in front of the 4-5-6- cluster, it can be used as the lead combination ball, or if we fail to execute it properly, we can leave our opponent a clear shot at the two in the lower left pocket, and he will be able to possibly break up the cluster quite easily with the ensuing cue ball action. Eliminate that option. Now let's look at the shot that is illustrated. It is a makable safe that is executed. Also, if we are unsuccessful, we have our opponent shooting AWAY from the required position on the 4 ball. The rule to follow in this situation is to keep him shooting away from the straight position required on the four. This means that he should be shooting towards the upper left or right hand pockets. Even if our execution varies slightly from the illustration, the 2 ball becomes a locking mechanism, rather than the key that opens the rack for him. Even if the two ball is behind the 9 ball and he can make it, his chances will be slim as long as you have his "natural" cue ball angle going away from the 4 as he pockets the 2. This situation occurs very frequently during safety battles. As long as he is shooting away from the required position, YOU remain in control of the situation as the actor, not the reactor. If we lock him up behind the cluster, he will be forced to kick two or three rails to make contact with the 2 ball. Ensuring that cue ball gets close to the cluster, you will have taken away the jump from him. By simply evaluating our options, we have eliminated the poor choices, and found the percentage option, and identified its advantages. Why not go behind the 7 and the 8? That is explained in "Going to Jail" where we revisit this shot and evaluate it again.
During this shot, we evaluated the situation and took into consideration everything that could go right and wrong with every option that we had. Never eliminate an option. Weigh each option carefully, and after time you will amass a large inventory of knowledge and experience that will aid you in your future endeavors. Many situations revisit us from time to time. Though no two layouts are exactly the same, there are situations that are similar. The more experienced you are at thinking things through, the more apt you will become to making the correct choice when faced with difficult situations.
")