In plastic?
That takes talent!
")
OK, this is a serious question, i know how to make the part on a lathe and DH.
But keep thinking of sidling towards cnc and know nothing about it.
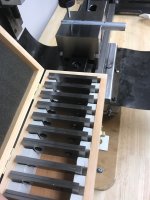
Did you do all ops on the mill or was a lathe involved as well?
Does head tilt on that mill? IOW, how did you make the chamfer - interpolation or form tool or ?
Willing to say aprox time involved including programming?
Thanks!
smt
I crashed into the screw in the middle
I thought I would clear it, and was too lazy and tired to go to my CAM computer to check the height. I was off about 30 thou and it slammed into the top of it. Lesson learned.
Everything was on the mill. I used a ball end mill that traced around the bevel and stepped down 3 thou per revolution. When its done, its not perfectly flat, but good enough for what I was making.
This part was very difficult for me. It took me all day, maybe 8 hours total. The learning curve on the CAM is the biggest time sink for me. I spent 1 min on the CAD (I use it every day for my day job for the past 20 years so I'm very proficient at it).
Thinking about how to machine the part with the work holding took me a while. I tried several ways in my head and in the CAM and had to keep re-thinking it. And then the CAM itself I was having issues figuring out some steps because I'm new to it.
The part itself took I think 90 sec to cut the top side of it, and maybe 3 min to cut the bottom side of it. Most of that time was spiraling around the bevel.
I took a video during part of the machining but its hard to make out the details. I will try to post a video of the CAM simulation instead later. Its much clearer to see the details.
I'm certain someone well versed in CAM and CNC could have taken the original CAD, done the CAM in 5 min, and done the machining with setup in 10 min
I worked in a real machine shop 20 years ago for 2 years, so I have intermediate manual machining experience. But the CNC and CAM I'm definitely a beginner at.
Each new part I make on the cnc forces me to learn something new on the CAM and cnc side, so its a fun but sometimes frustrating process.


.jpg")
.jpg")


