I see I can only have 10 IMG's per post....so I just linked the construction pics if you want to see and left the table pics tagged.
Well, as I said in my intro thread last week, I've been out of 'the pool' so-to-speak for almost 20 years..... I was planning an addition to my place of business, and decided thius was a golden opportunity to make the addition a little bigger and add a pool room (the fringe benefit and still a tax deduction). The entire addition was 1200sq ft, making my facility just a touch over 5000sq ft of usable space.... I had the concrete already, it was a huge loading dock....I had no use for a loading dock that large, so why not put some building over it, which I can use.... I hired a crew of Mennonites to put the shell up, as working alone, I couldnt have it done as fast, and with the building opened up like that.....they had the shell up in 6 days. Anyway, here we go!!
The facing torn off the south and east sides of the building:
http://www.zmods.org/images/shop_remodel/2013-06-10/shop_4502.JPG
http://www.zmods.org/images/shop_remodel/2013-06-10/shop_4506.JPG
Framing the new exterior walls:
http://www.zmods.org/images/shop_remodel/2013-06-11/shop_4512.JPG
http://www.zmods.org/images/shop_remodel/2013-06-11/shop_4515.JPG
http://www.zmods.org/images/shop_remodel/2013-06-11/shop_4539.JPG
Trusses arrived
http://www.zmods.org/images/shop_remodel/2013-06-12/shop_4542.JPG
trusses being set
http://www.zmods.org/images/shop_remodel/2013-06-12/shop_4545.JPG
http://www.zmods.org/images/shop_remodel/2013-06-13/shop_4574.JPG
Framing done and roof going on
http://www.zmods.org/images/shop_remodel/2013-06-13/shop_4574.JPG
No need for that 7' exterior door between 2 interior rooms, so it got removed and relocated to a different exterior location
http://www.zmods.org/images/shop_remodel/2013-06-17/shop_4609.JPG
They're just about done...
http://www.zmods.org/images/shop_remodel/2013-06-17/shop_4622.JPG
http://www.zmods.org/images/shop_remodel/2013-06-17/shop_4621.JPG
Here's where that 7' door got placed:
http://www.zmods.org/images/shop_remodel/2013-06-18/shop_4633.JPG
....and done.... I took over construction after this.
http://www.zmods.org/images/shop_remodel/2013-06-18/shop_4634.JPG
Railings and some steps:
http://www.zmods.org/images/shop_remodel/2013-06-28/shop_4772.JPG
The raw 32x52 interior room
http://www.zmods.org/images/shop_remodel/2013-06-18/shop_4641.JPG
Walled up where that 7' door used to be
http://www.zmods.org/images/shop_remodel/2013-06-21/shop_4669.JPG
http://www.zmods.org/images/shop_remodel/2013-06-21/shop_4670.JPG
http://www.zmods.org/images/shop_remodel/2013-06-22/shop_4687.JPG
I added some porch lights
http://www.zmods.org/images/shop_remodel/2013-06-21/shop_4674.JPG
Framed in the interior walls
http://www.zmods.org/images/shop_remodel/2013-07-28/shop_4922.JPG
HVAC installed
http://www.zmods.org/images/shop_remodel/2013-08-07/shop_4971.JPG
http://www.zmods.org/images/shop_remodel/2013-08-07/shop_4972.JPG
http://www.zmods.org/images/shop_remodel/2013-08-07/shop_4973.JPG
With the walls crammed full of R-19 insulation, drywall time came....ceiling first
http://www.zmods.org/images/shop_remodel/2013-09-03/shop_5020.JPG
The holy grail of drywalling a ceiling
http://www.zmods.org/images/shop_remodel/2013-09-03/shop_5022.JPG
http://www.zmods.org/images/shop_remodel/2013-09-03/shop_5023.JPG
http://www.zmods.org/images/shop_remodel/2013-09-03/shop_5035.JPG
yours truly from the back side....I dont post pics of myself online....but if someone really wants to look at this one, I'd have to wonder!!
http://www.zmods.org/images/shop_remodel/2013-09-04/shop_5050.JPG
ceilings done
http://www.zmods.org/images/shop_remodel/2013-09-05/shop_5071.JPG
now for the walls, and another load of drywall...
http://www.zmods.org/images/shop_remodel/2013-09-09/shop_5100.JPG
http://www.zmods.org/images/shop_remodel/2013-09-14/shop_5158.JPG
http://www.zmods.org/images/shop_remodel/2013-09-14/shop_5159.JPG
then came my most hated task in construction....taping and mudding...
http://www.zmods.org/images/shop_remodel/2013-09-18/shop_5172.JPG
http://www.zmods.org/images/shop_remodel/2013-09-18/shop_5173.JPG
sanded
http://www.zmods.org/images/shop_remodel/2013-09-22/shop_5193.JPG
http://www.zmods.org/images/shop_remodel/2013-09-22/shop_5194.JPG
Textured the ceiling
http://www.zmods.org/images/shop_remodel/2013-09-22/shop_5197.JPG
http://www.zmods.org/images/shop_remodel/2013-09-22/shop_5190.JPG
another task I'm not overly fond of....painting..
http://www.zmods.org/images/shop_remodel/2013-10-06/shop_5233.JPG
http://www.zmods.org/images/shop_remodel/2013-10-06/shop_5235.JPG
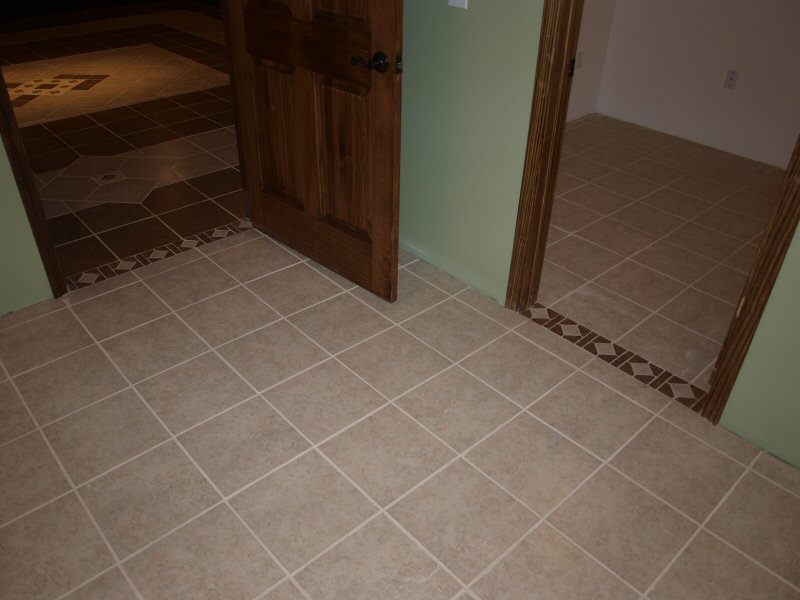
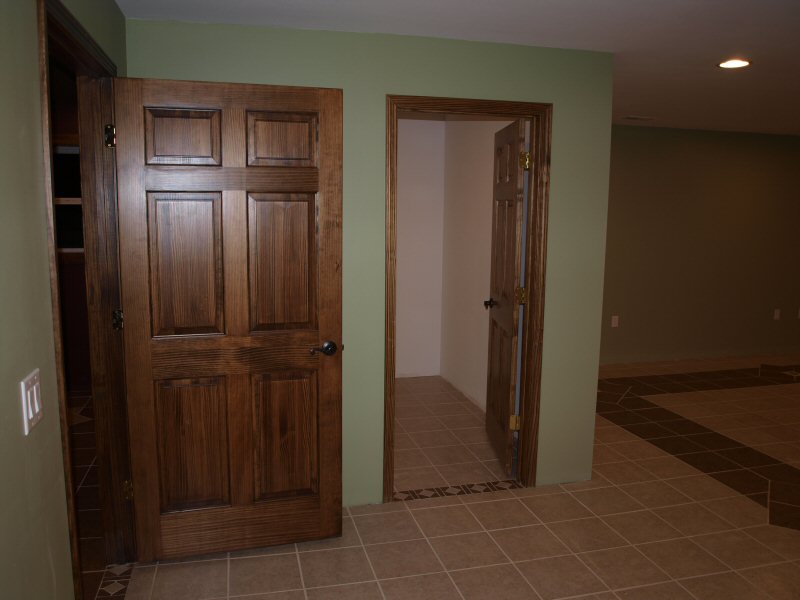
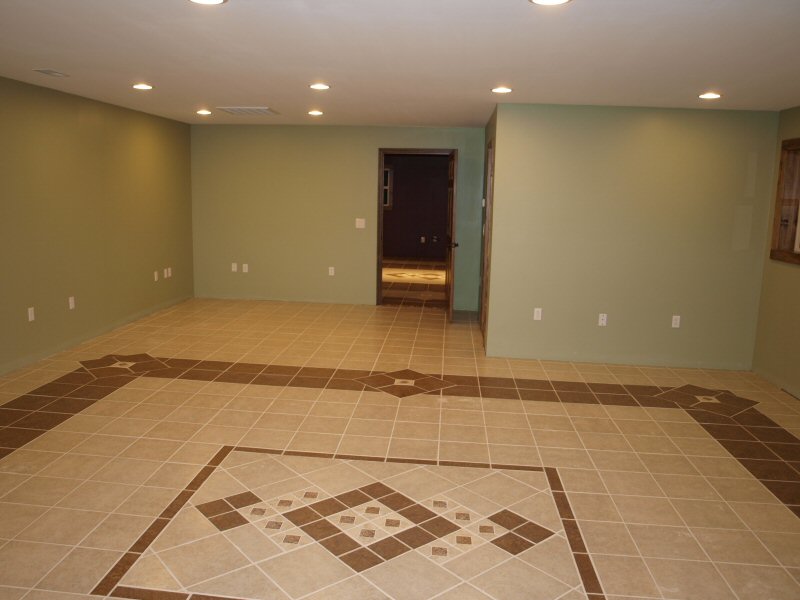
Now for the flooring
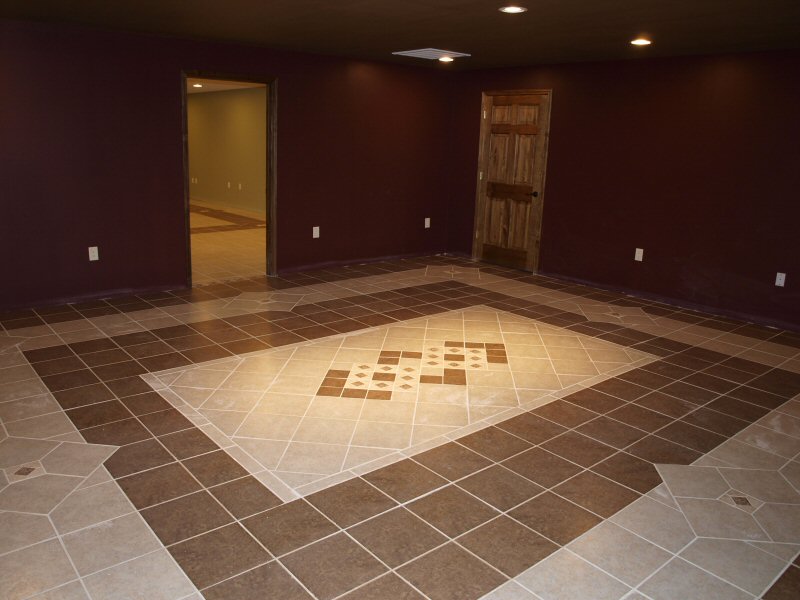
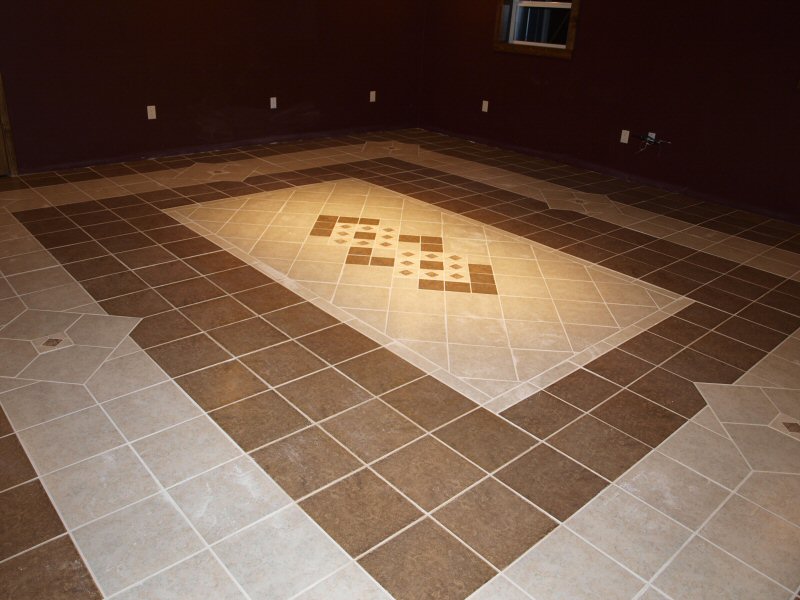
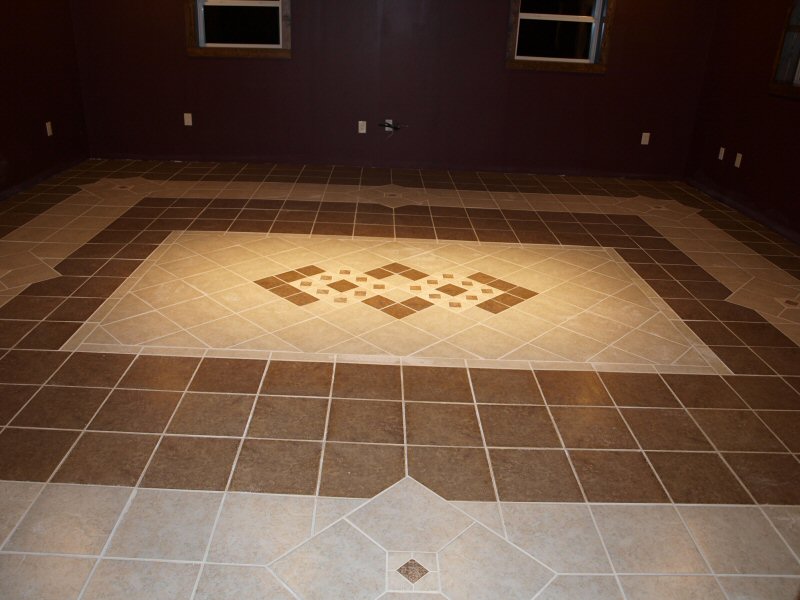
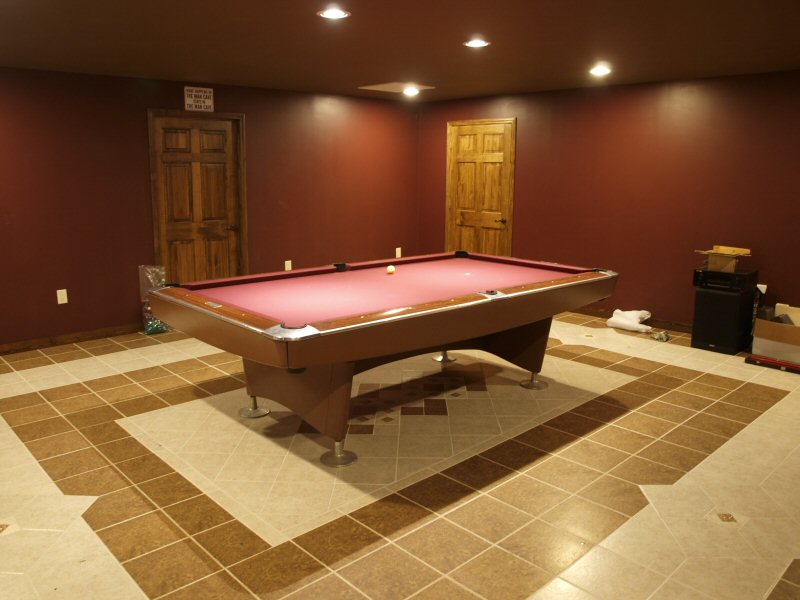
now the part you've all been waiting for!!!
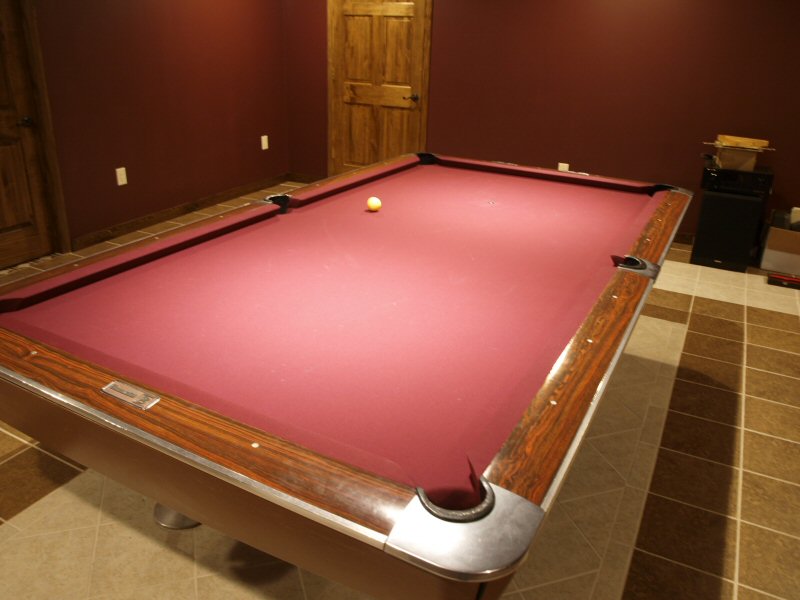
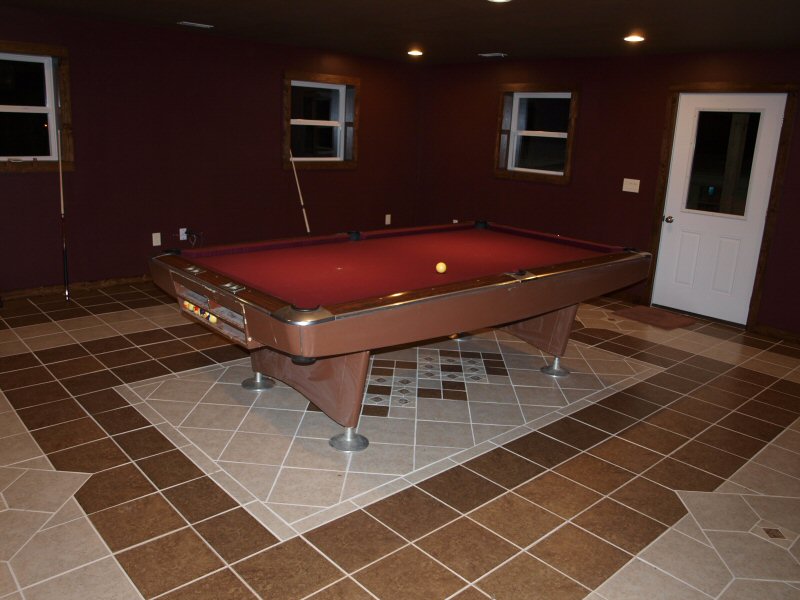

I will be adding some track lighting with some smaller LED floods to light the table better. I will have a TV between the two windows soon.....the last thing I want is the view of a football game obscured from the the other side of the room by some obnoxiously big table light.....just never liked them anyway.
I know I'm the renegade anyway, I already caught hell for my non-standard cloth color....but after playing on it a couple days, I really do like it. Blue chalk isn't too bad on it....the red chalk was really bad. I did find some wine/burgundy colored chalk, I'll see what that looks like....but blue didn't make as big of a mess as I thought it would. it cleans up easily with a vacuum.
Now to get my game back......I am playing embarrassingly poor....but improving with every game. I will also be refinishing the wood skirts on the table. The table was originally blue....then red....then someone painted it brown..... I'll strip them and redo them natural.
That's all for now....thanks for stopping by.
Well, as I said in my intro thread last week, I've been out of 'the pool' so-to-speak for almost 20 years..... I was planning an addition to my place of business, and decided thius was a golden opportunity to make the addition a little bigger and add a pool room (the fringe benefit and still a tax deduction). The entire addition was 1200sq ft, making my facility just a touch over 5000sq ft of usable space.... I had the concrete already, it was a huge loading dock....I had no use for a loading dock that large, so why not put some building over it, which I can use.... I hired a crew of Mennonites to put the shell up, as working alone, I couldnt have it done as fast, and with the building opened up like that.....they had the shell up in 6 days. Anyway, here we go!!
The facing torn off the south and east sides of the building:
http://www.zmods.org/images/shop_remodel/2013-06-10/shop_4502.JPG
http://www.zmods.org/images/shop_remodel/2013-06-10/shop_4506.JPG
Framing the new exterior walls:
http://www.zmods.org/images/shop_remodel/2013-06-11/shop_4512.JPG
http://www.zmods.org/images/shop_remodel/2013-06-11/shop_4515.JPG
http://www.zmods.org/images/shop_remodel/2013-06-11/shop_4539.JPG
Trusses arrived
http://www.zmods.org/images/shop_remodel/2013-06-12/shop_4542.JPG
trusses being set
http://www.zmods.org/images/shop_remodel/2013-06-12/shop_4545.JPG
http://www.zmods.org/images/shop_remodel/2013-06-13/shop_4574.JPG
Framing done and roof going on
http://www.zmods.org/images/shop_remodel/2013-06-13/shop_4574.JPG
No need for that 7' exterior door between 2 interior rooms, so it got removed and relocated to a different exterior location
http://www.zmods.org/images/shop_remodel/2013-06-17/shop_4609.JPG
They're just about done...
http://www.zmods.org/images/shop_remodel/2013-06-17/shop_4622.JPG
http://www.zmods.org/images/shop_remodel/2013-06-17/shop_4621.JPG
Here's where that 7' door got placed:
http://www.zmods.org/images/shop_remodel/2013-06-18/shop_4633.JPG
....and done.... I took over construction after this.
http://www.zmods.org/images/shop_remodel/2013-06-18/shop_4634.JPG
Railings and some steps:
http://www.zmods.org/images/shop_remodel/2013-06-28/shop_4772.JPG
The raw 32x52 interior room
http://www.zmods.org/images/shop_remodel/2013-06-18/shop_4641.JPG
Walled up where that 7' door used to be
http://www.zmods.org/images/shop_remodel/2013-06-21/shop_4669.JPG
http://www.zmods.org/images/shop_remodel/2013-06-21/shop_4670.JPG
http://www.zmods.org/images/shop_remodel/2013-06-22/shop_4687.JPG
I added some porch lights
http://www.zmods.org/images/shop_remodel/2013-06-21/shop_4674.JPG
Framed in the interior walls
http://www.zmods.org/images/shop_remodel/2013-07-28/shop_4922.JPG
HVAC installed
http://www.zmods.org/images/shop_remodel/2013-08-07/shop_4971.JPG
http://www.zmods.org/images/shop_remodel/2013-08-07/shop_4972.JPG
http://www.zmods.org/images/shop_remodel/2013-08-07/shop_4973.JPG
With the walls crammed full of R-19 insulation, drywall time came....ceiling first
http://www.zmods.org/images/shop_remodel/2013-09-03/shop_5020.JPG
The holy grail of drywalling a ceiling
http://www.zmods.org/images/shop_remodel/2013-09-03/shop_5022.JPG
http://www.zmods.org/images/shop_remodel/2013-09-03/shop_5023.JPG
http://www.zmods.org/images/shop_remodel/2013-09-03/shop_5035.JPG
yours truly from the back side....I dont post pics of myself online....but if someone really wants to look at this one, I'd have to wonder!!
http://www.zmods.org/images/shop_remodel/2013-09-04/shop_5050.JPG
ceilings done
http://www.zmods.org/images/shop_remodel/2013-09-05/shop_5071.JPG
now for the walls, and another load of drywall...
http://www.zmods.org/images/shop_remodel/2013-09-09/shop_5100.JPG
http://www.zmods.org/images/shop_remodel/2013-09-14/shop_5158.JPG
http://www.zmods.org/images/shop_remodel/2013-09-14/shop_5159.JPG
then came my most hated task in construction....taping and mudding...
http://www.zmods.org/images/shop_remodel/2013-09-18/shop_5172.JPG
http://www.zmods.org/images/shop_remodel/2013-09-18/shop_5173.JPG
sanded
http://www.zmods.org/images/shop_remodel/2013-09-22/shop_5193.JPG
http://www.zmods.org/images/shop_remodel/2013-09-22/shop_5194.JPG
Textured the ceiling
http://www.zmods.org/images/shop_remodel/2013-09-22/shop_5197.JPG
http://www.zmods.org/images/shop_remodel/2013-09-22/shop_5190.JPG
another task I'm not overly fond of....painting..
http://www.zmods.org/images/shop_remodel/2013-10-06/shop_5233.JPG
http://www.zmods.org/images/shop_remodel/2013-10-06/shop_5235.JPG
Now for the flooring
now the part you've all been waiting for!!!
I will be adding some track lighting with some smaller LED floods to light the table better. I will have a TV between the two windows soon.....the last thing I want is the view of a football game obscured from the the other side of the room by some obnoxiously big table light.....just never liked them anyway.
I know I'm the renegade anyway, I already caught hell for my non-standard cloth color....but after playing on it a couple days, I really do like it. Blue chalk isn't too bad on it....the red chalk was really bad. I did find some wine/burgundy colored chalk, I'll see what that looks like....but blue didn't make as big of a mess as I thought it would. it cleans up easily with a vacuum.
Now to get my game back......I am playing embarrassingly poor....but improving with every game. I will also be refinishing the wood skirts on the table. The table was originally blue....then red....then someone painted it brown..... I'll strip them and redo them natural.
That's all for now....thanks for stopping by.
Last edited:
")