Refinish a vintage Rich Q cue

billsey

Registered
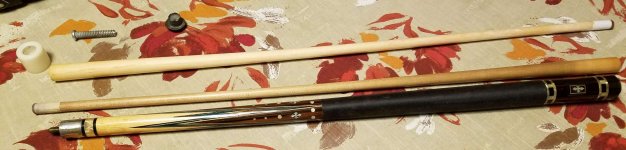
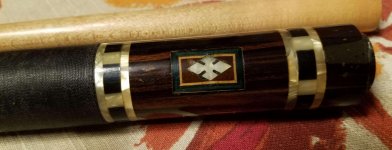
I've got a mid 70s Rich Q cue that has seen better days. The lacquer finish is pretty yellow and has been abraded away in places, enough so the joint is starting to corrode. I's like to refinish well enough to make a playable cue that looks more like it did when new.

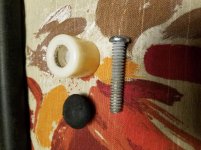
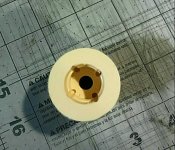
The yellowed lacquer on the butt cap came off quite easily with just the side of a screwdriver and I just plan on doing a polish after reinstalling it. The bolt was a bit of a bear to get out even though it wasn't fully seated (the butt cap could rotate), should I plan on doing more than just cleaning the threads a bit with a wire wheel? Should I maybe use a bit of paste wax on the threads before it goes back in? What about gluing the butt cap, or is it supposed to just be seated by the bolt?

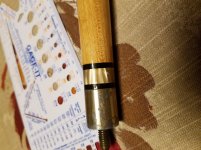
I'm thinking of masking the wrap, chucking up in the lathe and taking of the current finish with sand paper, then using finer and finer grit sandpaper until the surface is fully smooth, the re-shooting a clear coat. I might want to go with a finer polish on the stainless joint if it doesn't shine up to a brushed look with the sandpaper.

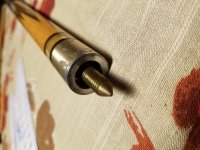
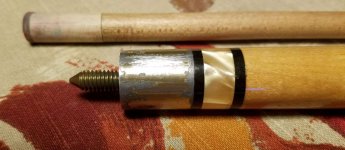
I don't have the original shaft for this cue, the one that came with it is off a plane jane sneaky pete. I do have a blank shaft though and judging by the cues offered in the 1976 brochure I should have a black band, then mother of pearl, then another black to match the other side of the stainless. Where is a good place to source that material? I assume you turn the shaft to an interference fit for the three bands then glue them. The thread on the butt side of the joint is 5/16-18, I assume I'll want an insert on the shaft side? At first glance they seem to be relatively easy to find.

I'm a bit of a newbie at this, as is probably obvious, and I'd appreciate any thoughts or pointers you can waft my way. :)
 

Attachments

  • 20190105_191026.jpg
    20190105_191026.jpg
    193 KB · Views: 510
  • 20190105_191035.jpg
    20190105_191035.jpg
    201.7 KB · Views: 473
  • 20190104_194712.jpg
    20190104_194712.jpg
    201.2 KB · Views: 477

Michael Webb

AzB Silver Member
Silver Member
The joint looks like it has finish on it. Uncommon today but not yesteryear from some makers. I would like to see pictures of the rest of the cue please.
 

billsey

Registered
I'm out of town this week, my wife had heart surgery yesterday, but there are a couple more pictures in my ID post in the main forum. I'll take some better shots when I get home, this weekend or early next week.
 

Chopdoc

AzB Silver Member
Silver Member
I am very sorry to hear that. I hope she has a speedy and complete recovery.

I finally identified the cue in your thread in the main forum. https://forums.azbilliards.com/showpost.php?p=6303720&postcount=24


I will link your pictures from your original thread for the cue makers to have a look here. I am sure they will give you good advice/direction.

I think it likely will not be too big of a deal to get a shaft made/matched and get the cue refinished.

If your chosen repair man wants/needs close-ups of another Rich Q from that era to match the pilot style, I can get that and post it.

The pics from your original post:

attachment.php


attachment.php


.
 

billsey

Registered
OK, I'm back at home and can take some pics, sorry for any quality issues, I'm just using the phone. The one showing the joint is the biggie, I'll want to duplicate the black, pearl, black combo on the shaft. My original questions all still hold though, in regards to tips for refinishing it.
 

Attachments

  • 20190112_160948.jpg
    20190112_160948.jpg
    243.9 KB · Views: 330
  • 20190112_160957.jpg
    20190112_160957.jpg
    210.1 KB · Views: 333
  • 20190112_161006.jpg
    20190112_161006.jpg
    207.3 KB · Views: 325

Michael Webb

AzB Silver Member
Silver Member
Good morning
I hope your wife is recovering well.
Restorations are fun but very challenging. You don't get to many shots at making them right without replacing parts so caution should be taken. This Palmer was in simular shape. A little time and patience with some experience can do the trick. Concerns before you start removing the finish. What if those M. O. P. Inlays fall out? That's a big concern to be aware of. The rings at the joint are the easy part.

IMG_20190111_084833.jpg
 

billsey

Registered
I'm not quite ready to start on this one, I've got a trash cue to play with for a bit first, I'm going to redo the clear coat and add a wrap to it in order to verify my skills. :) I'm having a tough time trying to find a match for the pearl rings on the Rich Q though. I believe once the finish is off they'll be white instead of yellowed, but the white pearl examples I find online at places like Atlas don't have good enough images to help me think they'll be close. If anyone has a suggestion for a source, please PM me. I believe the black should be easy, though there seem to be a lot of material choices. ABS, Deltrin, Phenolic and PVC are all options on Atlas I'm leaning toward Deltrin.
 

Michael Webb

AzB Silver Member
Silver Member
I'm not quite ready to start on this one, I've got a trash cue to play with for a bit first, I'm going to redo the clear coat and add a wrap to it in order to verify my skills. :) I'm having a tough time trying to find a match for the pearl rings on the Rich Q though. I believe once the finish is off they'll be white instead of yellowed, but the white pearl examples I find online at places like Atlas don't have good enough images to help me think they'll be close. If anyone has a suggestion for a source, please PM me. I believe the black should be easy, though there seem to be a lot of material choices. ABS, Deltrin, Phenolic and PVC are all options on Atlas I'm leaning toward Deltrin.

Well Sir:
If your leaning towards Delrin. Lean in another direction.
Step 1
Learn about the different materials. Machining properties and gluing options. Epoxies!
I could yell you but you wouldn't learn anything.
 

j2pac

Marital Slow Learner.
Staff member
Moderator
Gold Member
Silver Member
Well Sir:
If your leaning towards Delrin. Lean in another direction.
Step 1
Learn about the different materials. Machining properties and gluing options. Epoxies!
I could yell you but you wouldn't learn anything.

I would be leaning towards sending that old beauty to you Mike. ;)
 

Chopdoc

AzB Silver Member
Silver Member
There are a number of pearl type materials. Some that were used long ago for cues are not available anymore.

When trying to replace/replicate, I recommend looking outside cue material suppliers as there are still a number of current materials that might do well that simply are not not supplied by cue parts suppliers.

We all know that delrin does not adhere well, thought there are specialty adhesives for it. I am unfamiliar with delrin pearl though so I am not sure about that.

Just google "pearl plastic" and you will find several materials. Acrylic would be one, but I have no idea how it might glue or finish.

IMHO a cue man with experience is the way to go. But nothing wrong with experimenting yourself. It ain't the Mona Lisa or a Bushka.

In any case, I think it is a great project. Cool looking cue. Classic design and materials.

If anything pops out fix it. The inlays are crooked/off center to start with so I doubt you could mess it up too badly.

I would love to see it when it is done. Please post pics! :thumbup::thumbup::thumbup:
.
 

billsey

Registered
No, if I didn't want to learn I wouldn't be asking questions. :)

I was just working off the pictures, it looked like a nicer surface than the phenolic. I'll have to turn whatever I use down to fit the shaft, after I've turned that down as well. With a little Googling I think I see that Delrin is an acytal resin thermoplastic which I would think be workable with an epoxy. My experience with plastics are likely more in the 3D printer world, where melt temperatures and shrinkage while cooling are more of a factor than machinability and glue types.

What should I be using? I believe I'm looking for something I can put a nice polish on that will also allow me to cut cleanly and not heat up or deform while turning. What else should I look for?
 
Last edited:

billsey

Registered
Heheh, searching for "Pearl plastic" was an eye opener. Lots of plastic surgery hits and even more tampons. :) "Plastic pearl" of course gives bazillions of round beads. I had tried pearlescence rods with a bit more luck... Maybe Opalescence?
 

Michael Webb

AzB Silver Member
Silver Member
No, if I didn't want to learn I wouldn't be asking questions. :)

I was just working off the pictures, it looked like a nicer surface than the phenolic. I'll have to turn whatever I use down to fit the shaft, after I've turned that down as well. With a little Googling I think I see that Deltrin is an acytal resin thermoplastic which I would think be workable with an epoxy. My experience with plastics are likely more in the 3D printer world, where melt temperatures and shrinkage while cooling are more of a factor than machinability and glue types.

What should I be using? I believe I'm looking for something I can put a nice polish on that will also allow me to cut cleanly and not heat up or deform while turning. What else should I look for?

Good answer.
For black and for playabilty and strength, I prefer phenolic. For the Pearlite, you already mentioned a source. Avoid Delrin at all cost except for butt caps. Finish will just pop off it. IF you use it for a butt cap, thread it on so you don't need a bolt to hold it in place.
 

Attachments

  • IMG_20180916_210541.jpg
    IMG_20180916_210541.jpg
    105 KB · Views: 264
Last edited:

Kimmo H.

AzB Silver Member
Silver Member
I'm no cuemaker, rather a hobbyist, but I will side with mr. Webb, stay clear of delrin on applications where it needs to be finished over or glued on.
It is a great material to work with, easy to machine, cheap, durable and has very little shrinkage/expansion after cutting wich makes it a popular material choice on many mechanical applications. I use the material a lot at work as a machinist for all kinds of uses.
The downside is that it is incredibly difficult to adhere anything to it. Clearcoat peels right off, epoxies wont hold either and so on. If you want to try it out for yourself I suggest finishing a piece of it and handling that like a cue would be used. Knock the finished piece on a table, scratch it a little and so on before you use it on your refinish project :rolleyes:
 
Top