With all the interest in 14.1 on the board lately, I figured I'd try to contribute. So here's some more tips and ideas I'd like to share. This might not be as well presented as some of my other threads on this (and threads by blackjack and sjm, in particular), because it's more just a collection of various ideas I want to convey.
1) Faced with a tough shot
From this position, you simply must take two fouls by tapping the cueball. The beauty of it is that your opponent is doing the right thing by taking them right back. You are faced with a very, very difficult shot, with a make-percentage definitely under 50%. There is no safe.
You are essentially conceding to eventually taking the shot, but at least you've built in the equity that if you make it, you have an opponent on two fouls.
I am going from memory here, so I'm assuming that a make-percentage on something like this would be about 30%. If I'm wrong and upon setting it up on a real table it looks like my percentage would be significantly under that, I'd consider taking the third foul. But with chances of around 30%, taking the third foul is a little too conservative for me, especially with the added equity of having an opponent on two if I were to make it.
If your opponent elects to shoot this, well, tell him to have at it. You've gotten your opponent to shoot a shot he's going to miss more than half the time. Nothing wrong with that. This is why it's right for him to pass the shot back to you. Even when faced with a dire situation, you can make the best of it with this strategy.
This is an especially useful play when you have just run a bunch of balls. Your opponent has been getting cold in his chair; there's no way he's getting up and making this. He'll give you the two fouls in a heartbeat.
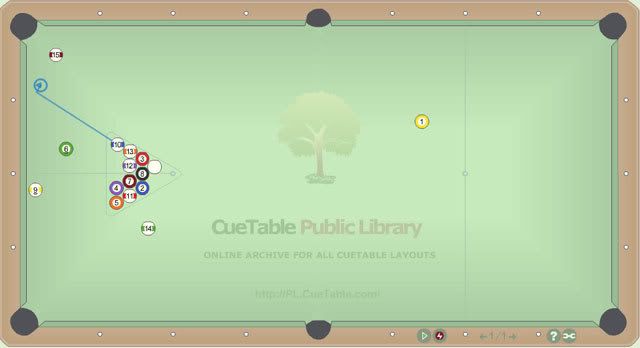
2) Sculpting the table
In this situation, you want to shoot the 10 and then the 15. But look at that 3 ball. It could be used as a key ball for your eventual break shot on the 13, but it has to be moved. Shooting the 10 and going off the rail with some low right should do it perfectly. And with the 15 right there, there are no worries of not having another shot. You should be able to get the 3 to somewhere around the "A" on a very consistent basis.
When I see my opponent do something like this, I know he can play. I know he is shooting and moving balls with a purpose.
3) Secondary break shot, choosing a side
You're in a great spot here, position on the 9 so you can get to the 6 on either side to break the little mini-cluster by the rack area.
Which side is best? A or B? Because of the arrangement of the cluster, you want to be at B. There are two huge reasons that B is the clear choice here. The first is situational; the tangent of the 7 off the 8 means that when you split the 7/4, the 7 is going to roll naturally off the 8 and give you a shot at it in the same corner you just made the 6. The second reason is more of a general rule, and it's that when making a soft secondary break shot, you don't want to hit the cluster full. If you elected to shoot the 6 from A, you will hit the 7 totally full. You may end up frozen on it, and even if not, you are pushing the 8 and the 4 uptable.
Breaking a cluster where you are splitting a couple of balls like this is an overwhelmingly better choice in almost all situations than one in which you have to hit the first ball full.
I don't know how helpful this one will be to intermediate-level players and above, but if you are a beginner and initially couldn't decide which side was better, study this diagram. You have to be able to look at a situation like this and know which side is better.
4) Look for balls that won't figure into any end-pattern, won't be used to break anything, aren't necessarily huge problem balls, AND let you pocket them now without sacrificing the position at all.
In this situation, you have a number of shots. In my opinion, the clear winner is the 11 up in the corner. It opens the position nicely without sacrificing anything; you'll pretty much have exactly the same shots after you make it as you did before you shot it. But you've removed another ball, a ball which doesn't belong in any end pattern. In effect, it's a free chance to remove a ball without having to rethink anything.
5) Look for balls that open the position
Again, a multitide of shots from which to choose. But look at that luscious four ball. If you don't take your time through the mid-rack, you can overlook a ball like this. But examine how the position completely opens upon making it. You could play the 4 to the 2 to the 5, and from there, it's difficult not to get out of the rack. You've opened everything.
6) Sculpting a rack - advanced
OK, you have some problems here. The important thing to notice here is that you can't comfortably use the 8 as an insurance ball when you break the 10/15, because you'll be on the wrong side of the 8 to use it to get to the 13. And that 8 must be used in conjunction with the 13. So how to get an insurance ball on that cluster?
Look at the 11 and the 5. You have an angle to make the 11 in the side and move the 5 all the way down table (hitting rails at A and B). This will also leave you a good angle on the 7 to break the 10/15 (probably having to go off the end rail first). But now you've manufactured an insurance ball to go with it, so that you don't have to use the 8 as the insurance ball. You can now keep the 8 for use with the 13 later.
This may seem like an overly complicated example, and in many ways it is. But its intent, of course, isn't to show you what to do if this exact situation arises. Its intent is to spur you to think of creative solutions to problems you face, and to look at the table as a whole.
7) A simple no-no
This example is only to show the 13 and the 5. These balls are problems, though they don't look it. I learned this one from Danny Barouty a long time ago and I've never forgotten it. You don't want to get towards the end rack with two balls aimed into the same side pocket like this. Since you won't want to play these combinations (the first ball is likely to end on a rail somewhere), you have to get rid of one of the balls from each side before the end rack. But since good 14.1 play dictates often getting to the center of the rack area, you'll find yourself unable or unwilling to play any of these four balls over and over. MAKE A PLAN to remove these balls during the midrack, or even earlier; do not simply wait for an opportunity to arise just because they look like such hangers. I have seen a lot of runs end by this one mistake.
OK, that's it for now. Hope this helps some of you.
- Steve
1) Faced with a tough shot
From this position, you simply must take two fouls by tapping the cueball. The beauty of it is that your opponent is doing the right thing by taking them right back. You are faced with a very, very difficult shot, with a make-percentage definitely under 50%. There is no safe.
You are essentially conceding to eventually taking the shot, but at least you've built in the equity that if you make it, you have an opponent on two fouls.
I am going from memory here, so I'm assuming that a make-percentage on something like this would be about 30%. If I'm wrong and upon setting it up on a real table it looks like my percentage would be significantly under that, I'd consider taking the third foul. But with chances of around 30%, taking the third foul is a little too conservative for me, especially with the added equity of having an opponent on two if I were to make it.
If your opponent elects to shoot this, well, tell him to have at it. You've gotten your opponent to shoot a shot he's going to miss more than half the time. Nothing wrong with that. This is why it's right for him to pass the shot back to you. Even when faced with a dire situation, you can make the best of it with this strategy.
This is an especially useful play when you have just run a bunch of balls. Your opponent has been getting cold in his chair; there's no way he's getting up and making this. He'll give you the two fouls in a heartbeat.
2) Sculpting the table
In this situation, you want to shoot the 10 and then the 15. But look at that 3 ball. It could be used as a key ball for your eventual break shot on the 13, but it has to be moved. Shooting the 10 and going off the rail with some low right should do it perfectly. And with the 15 right there, there are no worries of not having another shot. You should be able to get the 3 to somewhere around the "A" on a very consistent basis.
When I see my opponent do something like this, I know he can play. I know he is shooting and moving balls with a purpose.
3) Secondary break shot, choosing a side
You're in a great spot here, position on the 9 so you can get to the 6 on either side to break the little mini-cluster by the rack area.
Which side is best? A or B? Because of the arrangement of the cluster, you want to be at B. There are two huge reasons that B is the clear choice here. The first is situational; the tangent of the 7 off the 8 means that when you split the 7/4, the 7 is going to roll naturally off the 8 and give you a shot at it in the same corner you just made the 6. The second reason is more of a general rule, and it's that when making a soft secondary break shot, you don't want to hit the cluster full. If you elected to shoot the 6 from A, you will hit the 7 totally full. You may end up frozen on it, and even if not, you are pushing the 8 and the 4 uptable.
Breaking a cluster where you are splitting a couple of balls like this is an overwhelmingly better choice in almost all situations than one in which you have to hit the first ball full.
I don't know how helpful this one will be to intermediate-level players and above, but if you are a beginner and initially couldn't decide which side was better, study this diagram. You have to be able to look at a situation like this and know which side is better.
4) Look for balls that won't figure into any end-pattern, won't be used to break anything, aren't necessarily huge problem balls, AND let you pocket them now without sacrificing the position at all.
In this situation, you have a number of shots. In my opinion, the clear winner is the 11 up in the corner. It opens the position nicely without sacrificing anything; you'll pretty much have exactly the same shots after you make it as you did before you shot it. But you've removed another ball, a ball which doesn't belong in any end pattern. In effect, it's a free chance to remove a ball without having to rethink anything.
5) Look for balls that open the position
Again, a multitide of shots from which to choose. But look at that luscious four ball. If you don't take your time through the mid-rack, you can overlook a ball like this. But examine how the position completely opens upon making it. You could play the 4 to the 2 to the 5, and from there, it's difficult not to get out of the rack. You've opened everything.
6) Sculpting a rack - advanced
OK, you have some problems here. The important thing to notice here is that you can't comfortably use the 8 as an insurance ball when you break the 10/15, because you'll be on the wrong side of the 8 to use it to get to the 13. And that 8 must be used in conjunction with the 13. So how to get an insurance ball on that cluster?
Look at the 11 and the 5. You have an angle to make the 11 in the side and move the 5 all the way down table (hitting rails at A and B). This will also leave you a good angle on the 7 to break the 10/15 (probably having to go off the end rail first). But now you've manufactured an insurance ball to go with it, so that you don't have to use the 8 as the insurance ball. You can now keep the 8 for use with the 13 later.
This may seem like an overly complicated example, and in many ways it is. But its intent, of course, isn't to show you what to do if this exact situation arises. Its intent is to spur you to think of creative solutions to problems you face, and to look at the table as a whole.
7) A simple no-no
This example is only to show the 13 and the 5. These balls are problems, though they don't look it. I learned this one from Danny Barouty a long time ago and I've never forgotten it. You don't want to get towards the end rack with two balls aimed into the same side pocket like this. Since you won't want to play these combinations (the first ball is likely to end on a rail somewhere), you have to get rid of one of the balls from each side before the end rack. But since good 14.1 play dictates often getting to the center of the rack area, you'll find yourself unable or unwilling to play any of these four balls over and over. MAKE A PLAN to remove these balls during the midrack, or even earlier; do not simply wait for an opportunity to arise just because they look like such hangers. I have seen a lot of runs end by this one mistake.
OK, that's it for now. Hope this helps some of you.
- Steve
Last edited: