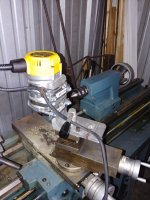
Finally started....

DaveK

Still crazy after all these years
Silver Member
Is your shaper a metal shaper or wood shaper?


smt, big fan of reciprocal machination. :thumbup:

1948 Rhodes 7" shaper (unfortunately not the model with a swivel table:mad:).

http://www.lathes.co.uk/rhodes/

It makes flat like nothing else I own. With a properly shaped/sharpened HSS bit it will leave a near mirror finish on aluminum .... not a tool mark in sight :)

Dave
 

Ssonerai

AzB Silver Member
Silver Member
Dave - Rhodes are really cool!

Always wanted a slotter. It would be ideal for some of the tasks i do on a shaper or planer.

Making a sprocket this week, for Disston 2 man, 2 cylinder chainsaw had since i was a kid. Perfect task for a slotter. Managed it on my Rockford since that is whats here. But it took a lot of bracing that would not be necessary with a vertical slotter. Still some chatter.

https://www.arboristsite.com/community/threads/3-4-pitch-chain.303557/page-2

I'm Aviacs on that site. scroll down to post #30.

:thumbup:
smt
 

Billiard Architect

AzB Silver Member
Silver Member
Better?

new.jpg

I can hang off of this.... I used one of the tool holder screws to keep it square. I left the previous mount hole so I can use it as a cord holder. What ya think of me now? :)
 

Ed P

Registered
Simply said, much much better. Now it is looking very solid. Just to reiterate and clarify, turn between centers. If you have the ability (table saw, band saw, etc) make your turning product close to size. I.E., 1.5 inches for butts and forearms. I even cut my corners off to save my router time and passes.

Best of luck and enjoy.
 

Ssonerai

AzB Silver Member
Silver Member
Much more solid looking.

Not saying you should use any specific angle on the compound; however, just per a previous note of mine, if the objective is to get 1/2 the infeed compared to the compound dial reading, the angle should be 30 to the long axis of the lathe. IOW, 60 to the crossfeed.

If it is set for threading, then 29 deg to cross feed with a 60 deg cutter.

smt
 

DaveK

Still crazy after all these years
Silver Member
I can hang off of this.... I used one of the tool holder screws to keep it square. I left the previous mount hole so I can use it as a cord holder. What ya think of me now? :)

Congratulations, it looks like you will keep all your appendages if careful :thumbup:

Dave
 

Chili Palmer

AzB Silver Member
Silver Member
You could always cut some wedges out of some hardwood and put them on each side of the router, this would also prevent it from wanting to roll. Think tire chock.
 

conetip

AzB Silver Member
Silver Member
I would have the power cord from the router facing the tailstock, Not the chuck. Another idea is to put some mould release on the router and make a fibre reinforced body filler support nest. That way it is not a point loading on the piece of Al against the side of the router. I try and suspend my cords from above the lathe and from the tailstock end. Less to get caught around controls etc or extended jaws etc.
 

3kushn

AzB Silver Member
Silver Member
So the u bolts should not be a problem. Thanks for the suggestion.

I'm not a cue builder but am a torque/assembly guy. Believe me U-Bolts are ALWAYS a problem accurately torquing both nuts. Essentially its impossible to achieve accurate clamp load using a UBolt. U Bolts are cheap and looks like they'll solve the problem but...... You likely won't find one that fits your router absolutely perfect. Sooo you're going to buy something close. When tightening the nuts with a torque wrench you're going to find neither nut torque agrees. Within an hour or 2 and days, things will change.

You're bending the "U" when you tighten it up. Within an hour or two or days it relaxes. In other words.. It's not as tight as when originally installed.

My suggestion is if you want to go this route is to cut a whole bunch of scrap for how ever long it takes to come up with consistent results. And keep tightening the nuts as you go.

All above is assuming you want repeatability and accuracy... Meaning, hitting the bull every time, rather than repeating but missing.
 
Last edited:

Ssonerai

AzB Silver Member
Silver Member
Another idea is to put some mould release on the router and make a fibre reinforced body filler support nest. That way it is not a point loading on the piece of Al against the side of the router.

Believe me U-Bolts are ALWAYS a problem accurately torquing both nuts. Essentially its impossible to achieve accurate clamp load using a UBolt.

I agree about the point loading and alignment issues of that config. Have been suggesting just offset bore the damn mount to fit. If that is scary, offset bore a pad and add it with a couple screws. He's got a lathe if not a mill, what is the resistance to a little simple machine work that easily improves the tools? All kinds of work arounds that take more effort than a simple fix.

:banghead:

Rant, grumble, grumble, etc,

:grin-square:

But as accepted after his second iteration - looks stable enough at this point, at least a great improvement. If he has a lathe and no tooling, wad of fiber filler suggestion might at least be accessible.
If it repeats, we're wrong. If it does not repeat over time, the message from the universe will eventually become clearer. :)

smt
 
Last edited:

CuesRus1973

AzB Silver Member
Silver Member
View attachment 549692Finally started my next quest. Just built out the router arm this past weekend and got to test it on some scrap poplar laying around. I am still pulling together some tooling which brings me to my question. When it comes to coring what is the minimum I can do? I purchased a 14.2mm x 430mm gun drill which is .006 larger than 9/16. Would this be sufficient for forearm/handle/butt coring?

Looking forward to learning as much as I can from you all.

Be prepared for a long and expensive hobby. Yes, it can also be rewarding, as is anything that will occasionally give you that "job well done" feeling.

There used to be a poster here (he's probably still around, I just forgot who it was) that had in his signature line:

"I build cues because I hate money".
 

Billiard Architect

AzB Silver Member
Silver Member
I agree about the point loading and alignment issues of that config. Have been suggesting just offset bore the damn mount to fit. If that is scary, offset bore a pad and add it with a couple screws. He's got a lathe if not a mill, what is the resistance to a little simple machine work that easily improves the tools? All kinds of work arounds that take more effort than a simple fix.

:banghead:

Rant, grumble, grumble, etc,

:grin-square:

But as accepted after his second iteration - looks stable enough at this point, at least a great improvement. If he has a lathe and no tooling, wad of fiber filler suggestion might at least be accessible.
If it repeats, we're wrong. If it does not repeat over time, the message from the universe will eventually become clearer. :)

smt

Never said I was resisting. I appreciate all the input. I am starting on conversions first and have not needed to use the router arm as of yet. I am still tooling up right now. I also want a router that is horizontal to the work for doing threading. I have a 1/4 router that I will probably use for that. It is much smaller and will be a bit easier to mount.
 

speedi

AzB Silver Member
Silver Member
View attachment 549692Finally started my next quest. Just built out the router arm this past weekend and got to test it on some scrap poplar laying around. I am still pulling together some tooling which brings me to my question. When it comes to coring what is the minimum I can do? I purchased a 14.2mm x 430mm gun drill which is .006 larger than 9/16. Would this be sufficient for forearm/handle/butt coring?

Looking forward to learning as much as I can from you all.

Looks like an accident waiting to happen. May I suggest you purchase a copy of Fine Woodworking Magazine, issue #90, dated Sept/Oct. 1991 entitled "Routing on the Lathe". There you will see a somewhat more complex set-up, but one that will be a whole lot more accurate and many times safer.
 
Top