Another glue Q + OD threads

Ssonerai

AzB Silver Member
Silver Member
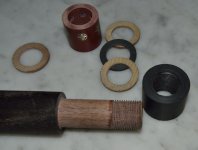
1.) For gluing LE or CE phenolic to itself, is there a consensus or tests as to whether epoxy (WEST) or cyano (from Atlas) is a better bond? I'm assembling simple trim rings. Will use WEST when gluing to the wood. This Q is about gluing up phenolic-to-phenolic parts.

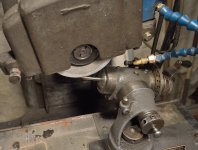
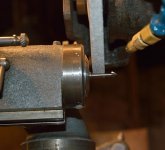
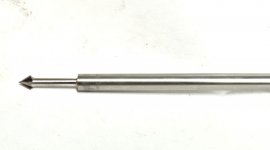
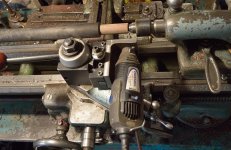
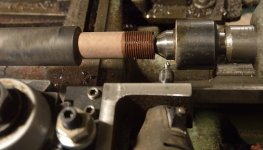
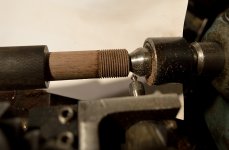
2.) for live threading wood tenon (IOW, OD thread) Do you use a wing style cutter on a long extension cutting with the router spindle axial/parallel with the cue? Or a Vee-point style on the end, coming in directly from the side. I can make either one. It seems the 60deg Vee point would be more rigid and easier to use, but slower cutting + probably not as durable over time.

Thanks!

smt
 

QMAKER

LIVE FREE OR DIE
Silver Member
CA glue and threading

CA is probably OK for what you are doing seeing that the joint pieces are probably sandwiched between parts that are epoxied .

I thread all my cues and this is my technique.
Cut the tenon, including a relief chamfer on both ends at 45 degrees, to size then coat with thin CA glue. Let air dry thoroughly. Mount the piece as close to the chuck face as possible and recut to exact size. Using a thread mill, mounted on a router, cut the threads to depth in one pass at the slowest RPM possible. Clean up with a brass brush.
 

JoeyInCali

Maker of Joey Bautista Cues
Silver Member
1. I don't think it matters much on the rings because a collar is going to push them down anyway. They just need to be air tight and glued so they don't buzz. But, I'd still use west 206/105. Thin first then thickened.

2. What length and what pitch ?
 

Ssonerai

AzB Silver Member
Silver Member
Joey -

I'm still in fly-by-the-seat-of-my-pants mode. I can't visualize "artistic" aspects of cues like it seems so many can. So "cut-n-try" and see if the wife says it't too ugly.

Here's what happened - i knew when making the 6 point blanks that the ebony butt was too short, but did not want to cut up a big plank since at that point all was an experiment. So (WEST) glued in a walnut dowel (light, stable, strong) about 4-1/2" into the butt leaving a little over 2" sticking out. 7/8" diameter. Well, till it was all done and set up to find centers again, it's down to .810"

So putting some rings on that, at .810". and will screw on the delrin butt cap reduced to 3/4"-16. to clamp it all together with epoxy. Unless i stay ambitious, in which case will just thread it .810" -16. Probably the latter. sigh.

Pretty well decided to make an end cutting threader bit for this. Fast to make and
there's only a dremel that is small enough to use on the compound. All my routers are big honkers for the millwork shop. I know in my heart Qmaker's advice is what should happen next. But eventually going to need an internal bit for 3/8 -10 joints (Use a tap i made, currently) & it is a fiddlier project.

Still aprreciating any advice and insights. :)

smt
 

JoeyInCali

Maker of Joey Bautista Cues
Silver Member
Joey -

I'm still in fly-by-the-seat-of-my-pants mode. I can't visualize "artistic" aspects of cues like it seems so many can. So "cut-n-try" and see if the wife says it't too ugly.

Here's what happened - i knew when making the 6 point blanks that the ebony butt was too short, but did not want to cut up a big plank since at that point all was an experiment. So (WEST) glued in a walnut dowel (light, stable, strong) about 4-1/2" into the butt leaving a little over 2" sticking out. 7/8" diameter. Well, till it was all done and set up to find centers again, it's down to .810"

So putting some rings on that, at .810". and will screw on the delrin butt cap reduced to 3/4"-16. to clamp it all together with epoxy. Unless i stay ambitious, in which case will just thread it .810" -16. Probably the latter. sigh.

Pretty well decided to make an end cutting threader bit for this. Fast to make and
there's only a dremel that is small enough to use on the compound. All my routers are big honkers for the millwork shop. I know in my heart Qmaker's advice is what should happen next. But eventually going to need an internal bit for 3/8 -10 joints (Use a tap i made, currently) & it is a fiddlier project.

Still aprreciating any advice and insights. :)

smt

Think about using a small palm router to thread.
I do have a used deco cue router mount for a Ryobi.
Dremels are for ferrule tenons. Not much for bigger jobs.
 

Ssonerai

AzB Silver Member
Silver Member
Wish i had a palm router.

Watched netflix with wife after dinner. Then went down cellar & ground a cutter out of a HSS round blank..
Still need to make a mount for the dremel, to hang it on the toolpost.

Had to do something, because on the bloodwood/satinwood cue, I threaded with just a regular honed lathe threading stick bit.
I'm not bad threading metal, but no doubt you guys who thread wood can imagine how bad that came out. If the blood wood was bad (with a stick tool) walnut was sure to be worse.

Cutter still needs stoned on arkansas stone to take the burrs off from grinding & cut the 1/8" shank off the 1/4" blank..
Of course no guarantees this will work, but beats sitting around.

smt
 

Attachments

  • DSC_0013.jpg
    DSC_0013.jpg
    100 KB · Views: 286
  • DSC_0014.jpg
    DSC_0014.jpg
    92.9 KB · Views: 282
  • DSC_0017.JPG
    DSC_0017.JPG
    96.9 KB · Views: 281
Last edited:

Ssonerai

AzB Silver Member
Silver Member
It can be frustrating how long the "easy" parts of a job take.:confused:

There was a rusty section of angle here that was cut off & squared up all over to use for the Dremel mount. Which has a weird .748 - 13 pitch thread. (not metric,either, checked all the taps in my box). Once that was done, it was back to the cue, which has also been fighting me all along the way, little glitches.

I'm very glad for the advice on here to soak the threads with thin cyano. Took a while to dry, but what a difference it made. Cut about 1/2 thread depth before soaking, figuring that would offer the most penetration. Most of the fuzziness in the last photo of it still on the lathe, is wax. I was afraid cutting the dried superglue would stick to the bit and burn, but it did not turn out to be a problem.

The finished thread was cleaned with naptha, to remove the wax.

smt
 

Attachments

  • DSC_0030.JPG
    DSC_0030.JPG
    154.3 KB · Views: 228
  • DSC_0031.jpg
    DSC_0031.jpg
    111.7 KB · Views: 228
  • DSC_0033.JPG
    DSC_0033.JPG
    192.6 KB · Views: 227
  • DSC_0034.JPG
    DSC_0034.JPG
    179 KB · Views: 228
  • DSC_0040.JPG
    DSC_0040.JPG
    178.6 KB · Views: 224

Kimmo H.

AzB Silver Member
Silver Member
Nice work! I really like your enginuity with tools adapted or made for cue work. Please post pics once this build is done, I can't wait to see how it all turns out when finished :cool:
 

Ssonerai

AzB Silver Member
Silver Member
Thanks, Kimmo.

This butt continued to fight me.
When i started back in pool a few years ago and made some quick sticks for myself out of scrap wood from the shop, due to being a cheapskate :grin-square:...
I targeted .875 as the joint size. Just felt that is a highly stressed area; having more area in a flat face joint could not be bad, could it?

Over the next few cues, i dropped to .870, then settled on .865". I really like that diameter. Well with lining the points up on this butt, back & forth on the centers with the dowel in the other end, etc, i blew right through that and down to .850. This feels skinny to me, but understand most people aim for .840. So made yet another sanding mandrel & finished it anyway. There's some black dust i missed in the maple grain & the points are not that sharp. As mentioned in previous emails, this series was practice. I have ideas for solving the problems next round.

On the previous bloodwood butt, i thought putting a metal trim ring in with hexes would be interesting, but it's not that great looking. Kind of "cute" but not real elegant.

All that said, esthetic problems aside. both these feel really good, wish there was somewhere to try them out.

Also need to make a batch of shafts.

There's more photos of the cues in the gallery https://forums.azbilliards.com/showthread.php?p=6634360#post6634360

The advice from you all on gluing and threading was essential for my first batch of (simple) trim rings.

More work getting to completion:
 

Attachments

  • DSC_0048.jpg
    DSC_0048.jpg
    92.2 KB · Views: 166
  • DSC_0051.jpg
    DSC_0051.jpg
    88 KB · Views: 168
  • DSC_0057.jpg
    DSC_0057.jpg
    114 KB · Views: 169
Last edited:
Top