Glue preference?

Ssonerai

AzB Silver Member
Silver Member
I use a lot of WEST epoxy most years for "other woodwork" & also Titebond extend, and some Titebond 3. All of are on hand. WEST can sometimes bleed and make a more obvious glue line, than Titebond. Titebond glues some wood better than WEST (Hard maple) unless the maple is scarified and treated like an exotic.

I've made full splice joints with both glues, but never this wood combination:
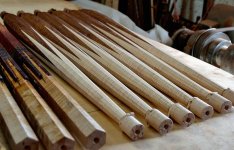
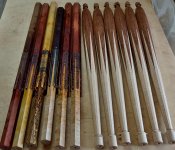
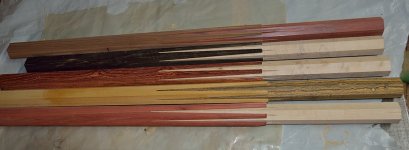
For a full splice, Honduran rosewood (or other Dahlbergia) into curly maple, who prefers which glue?
Has anyone used one, then switched, and which did you think is better?

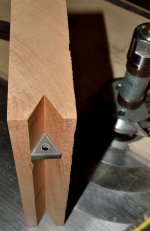
Both factories say rinse & wipe the rosewood with acetone. Practice that for other millwork. OTOH, I find it difficult to consider, for the prongs. Only takes messing up a sliver or so in the wrong place to ruin the appearance of a joint.

thanks,
smt
 

str8eight

AzB Silver Member
Silver Member
I always use West for my full splices. You can use tightbond of course but 99% I'm using veneers that were glued using West. Wood glue adheres poorly to epoxy.

Sent from my SM-N950U using Tapatalk
 

Ssonerai

AzB Silver Member
Silver Member
I was hoping you would reply - your work sets new standards!

Do you do any solvent or alcohol rinsing or prep of the rosewood? I'm really leery of doing that in a splice? Or maybe i'm over thinking it?

There's a peripheral issue that is kind of interesting: When using titebond, the splice can be clamped end-ways, release the clamp, and then rubber-wrap it, then put a clamp on again hard, to be sure it is set, the essentially release the clamp to let the blank find its own straightness.

With WEST, it will squirt the joint apart if the clamps are not put back on hard & left overnight. Alternately wrap the blanks in the lathe to keep pressure on the ends, then take out and clamp quickly. I have generally done several blanks at once, only one lathe long enough to leave over night, so end up using clamps. I'm careful, but not sure this is ideal

Maybe i just need to make a set of clamps with centers in the jaws. Hmmmm...

Thanks much for your input.
smt
 

Ssonerai

AzB Silver Member
Silver Member
Finished chopping everything up.
Guess I'll go with WEST tomorrow.

.Didn't use the smaller 10/4 x 4 piece. Had to glue maple shims on the tapered rosewood. It will disappear when taper is cut for the legs.

Thanks for the input, Shelby.

smt
 

Attachments

  • DSC_0014.jpg
    DSC_0014.jpg
    126.2 KB · Views: 621
  • DSC_0008.jpg
    DSC_0008.jpg
    130.8 KB · Views: 629
Last edited:

HQueen

AzB Silver Member
Silver Member
Very interested if you would post some pictures of your jigs for cutting these hexagonal splices.
 

GBCues

Damn, still .002 TIR!
Gold Member
Silver Member
Good looking splices - everything seems to fit nice and tight :thumbup:
 

Ernie eyocues

Ernie Omori
Silver Member
glue

I used the dark titebond for my spliced joints. I'm
satisfied with the results.

I'm happy to see someone is making the 6 point
fullsplice. Nice looking job. Supporting the points
while cutting them is a fun job. I had to put in a lot
of spacer to keep it from vibrating.

Congratulation, Ernie
 

Ssonerai

AzB Silver Member
Silver Member
Well it's all down to the fingers crossed stage. :grin-square:

Did something stupid - spread all the epoxy primer coat on 12 pcs/6 blank assemblies.
Then remembered i forgot to count the amount of rubber strips in the bag i got down from the loft. Last time i did quantity, it was 8, so was thinking i had enough, but didn't. Some always gets torn or too boogered up to keep using. So there i was, bunch of ends and short pieces of rubber but had to make it work. Used a lot of extra packing tape.

It was a bit disengenuous, though i have posted on this before: these are actually furniture legs. But most woodworkers don't know what you cuemakers know about gluing exotic wood, so figured this was the best place to ask. I do intend to make some 6 point cue blanks next week while everything is set up.

Legs in photos are just scrap mahogany/cherry/holly I was trying to work out where to put the splice for visual effect.
 

Attachments

  • DSC_0003_01.jpg
    DSC_0003_01.jpg
    163.9 KB · Views: 552
  • DSC_0012.jpg
    DSC_0012.jpg
    135 KB · Views: 548
  • DSC_0005.jpg
    DSC_0005.jpg
    134.1 KB · Views: 546

Mike81

AzB Silver Member
Silver Member
Just finished making my 4 point full splice jig. I felt pretty good about it. You ruined it! Thanks
 

Ssonerai

AzB Silver Member
Silver Member
Appreciate the nice comments & sense of humor, guys!

Epoxy seems to be fine, i am letting the leg blanks set a while longer and chopping up material for cue butts so they can be made before tearing down the machine set ups.

Got sidelined by the road crew guys over after lunch to take a big dead maple out along my fence line. Really relieved they did it, I'm getting too old to do that stuff by myself & it was getting dangerous. As far as cues, it had nice tight grain but was hollow, rotten & spalted. Decided i didn't even want to spend the time to cut it for the furnace, so they cleaned everything up for me & took it to the county mulch site.

More later. Gotta move other firewood this afternoon,
Thanks again!
smt
 

Ssonerai

AzB Silver Member
Silver Member
Update-

Per advice, used WEST.
As mentioned previous posts, I had been afraid it would make the glue line too prominent due to penetration and staining, but it seems fine everywhere. The legs were from some good stock. They are 2-1/4" diameter at the fattest.

While machines were set up for legs, I gathered some scrap and decent lower interest wood, to make 6 cue butt blanks besides. Need to see how they come out, point length and such before committing to better materials. For the cue butts, I had to change the point length (angle) used for the legs - due to the way a cue tapers, the points get shorter than how they are sawn. The legs are so fat, it still yields a very nice point length. Cue diameters are much more svelte. As sawn, cue points are 9". Won't know for sure how long they still are after profiling until the deed is done. Hoping for at least 6", ideally 7+. Again, that's why nothing special yet.

Thanks for the encouragement!

smt
 

Attachments

  • DSC_0038.jpg
    DSC_0038.jpg
    127.9 KB · Views: 404
  • DSC_0040.jpg
    DSC_0040.jpg
    184.1 KB · Views: 401

Ssonerai

AzB Silver Member
Silver Member
Very interested if you would post some pictures of your jigs for cutting these hexagonal splices

I wonder if you are imagining my set ups are more interesting than the facts. There are multiple ways to do it, There are some refinements ive come up with; but the basics still apply.
The key is good tooling, and perfect hex stock to start with.

I'm pretty careful grinding the tooling, no sense setting it up if it isn't right.

https://forums.azbilliards.com/images/v4/attach/jpg.gif

https://forums.azbilliards.com/images/v4/attach/jpg.gif

Here's a check of the profile. This carbide insert is 1" on a side, and they are very accurately made. It just "sticks" in the angle made by the cutter.

https://forums.azbilliards.com/images/v4/attach/jpg.gif

Sharp eyed observers will note that the cutter in the shaper head is smaller than the one shown being ground. It is wide enough for cue sticks, but was not wide enough for the 2-1/4" diameter legs, so i had to cut some bigger HSS blanks, drill them, and make wider cutters. Both sets were made the same way. There is a relieving step after the step shown, done on a different grinder, for better clearance.

This thing keeps timing out. will have to do multiple posts.

smt
 

Attachments

  • DSC_0015.jpg
    DSC_0015.jpg
    139.8 KB · Views: 369
  • DSC_0021.jpg
    DSC_0021.jpg
    114.5 KB · Views: 363
  • DSC_0032.jpg
    DSC_0032.jpg
    92 KB · Views: 364
Last edited:

Ssonerai

AzB Silver Member
Silver Member
Prongs are the most difficult, The only process i use for this is shown. Unlike the other part, i'm not sure there are other practical options. A slitting saw could be used for odd # prongs, but i have not explored that.

Sometimes when you saw a piece, it just goes nuts from stress relief. I figure that wood is best left out of a cue anyway. There were a couple pieces of really interesting waterfall/moire grain Pau Ferro i had high hopes for, but they just went crazy. Threw them in the burn pile.
 

Attachments

  • DSC_0014_01.jpg
    DSC_0014_01.jpg
    140.8 KB · Views: 369
  • DSC_0015_01.jpg
    DSC_0015_01.jpg
    141.9 KB · Views: 369
  • DSC_0010.jpg
    DSC_0010.jpg
    112.3 KB · Views: 371
  • DSC_0009_01.JPG
    DSC_0009_01.JPG
    191.1 KB · Views: 364
Last edited:

Ssonerai

AzB Silver Member
Silver Member
It can probably be seen from above, nothing is going to work if you don't make the hexes perfectly. But there is some wiggle room. The prongs move a little as they are sawn, the other part (fins????) vibrate in the cuts and can come out a little uneven, even when the set up is perfect.

So to answer your Q, these might be considered essential jigs. To touch up/final fit the parts. The rebate plane jig is just a prong cut in a waste piece, and then sectioned so you can plane right or left, with the fin supported.

In the card scraper pic - the parallel clamp has been machined with grooved jaws, to just hold a card scraper securely. Card scraper stock is available down to maybe .025". So even after you put the burr on, it is going to fit in a narrow slot.

These won't fix poor machining, but they can improve the fit of parts with small glitches.
Honestly, you can probably do the same thing with sanding sticks or even knife edge files reserved for only woodworking.
 

Attachments

  • DSC_0017.jpg
    DSC_0017.jpg
    119.6 KB · Views: 366
  • DSC_0018.jpg
    DSC_0018.jpg
    106.6 KB · Views: 370
  • DSC_0021.jpg
    DSC_0021.jpg
    143.9 KB · Views: 376
Last edited:

HQueen

AzB Silver Member
Silver Member
Thanks for posting the pictures. I pretty much have everything down, just wondering how you were cleaning up the back of your points. I’ve never been able to get a smooth cut from a bandsaw blade. What tpi and style of blade are you using?
 

Ssonerai

AzB Silver Member
Silver Member
What tpi and style of blade are you using?

Not positive -
about a decade ago i bought a bunch of 16'-6" NOS bands on eBay because they were cheap and fit my saw. In the mix was a dozen labeled: ".025" 4T Regular Skip" printed on the boxes.

I have used them mostly for sawing veneers. But also tried them when i started making 4 point FS. They are not smooth cutting like, say, a circular trim saw would be, but not bad. What is good is they cut consistently. Once the saw is tuned up, they cut where you aim. So if the guide board is aligned with the natural drift of each band, it will cut well. I cut veneers up to about a 1' wide, that are only 1/16" thick as sawn. (so long as the board does not have a lot of stress in it)

Here's where i disagree with the label: I would call them hook, or claw tooth. They do not look like a usual skip tooth; and they do have good positive rake.

That's all i've got. The boxes have a blue plaid pattern but don't list a make/mfg.

One last note: the first band i tried during this set up had a bad weld. It rattled, throbbed front to back, and cut rough. This one has a good weld, smooth running, so hope it lasts a while.

smt
 

Mike81

AzB Silver Member
Silver Member
Any tips on getting the bottom of the splice points sharp past the point that the bandsaw blade can go. I’ve been trying a thin hacksaw blade but it tends to wander..?
 

Attachments

  • 83F256F6-240D-47F9-B9DD-E202D89B64AA.jpg
    83F256F6-240D-47F9-B9DD-E202D89B64AA.jpg
    205.2 KB · Views: 251

Ssonerai

AzB Silver Member
Silver Member
MVP - thank you for the kind words.

Mike 81 - yours look sharper than mine.

When i made my first 4 prong FS blanks, it was copying other cues (bar cues and sneakys), so i did not know the fin part of the splice was supposed to be sharp. I intentionally made it like a butt from Cue Supply in FL, with a fairly broad base, as i thought it was supposed to be that way.

Mine are thinner now, but not sure i can work up to caring if they come to a point. I'll never be a high dollar cue maker, i like the joinery and have the equipment (for my regular millwork) including a 3D Gorton, but can't get excited about inlays. I did enough high end finishing in my life, hope to never have to do it again, etc, etc. So I'm happy to make a few oddball sneaky style FS cues with French polish finish, do some experiments, and enjoy it.

To answer your question, though; my bandsaw blade at .025 has a thinner kerf than most hacksaws, i believe. Going from there, a card scraper can be sharpened with a bevel, say on a surface grinder, and in a tight slot, pushed like a chisel, so i can imagine how to make tighter points at the fin end as a challenge. :^) Honestly, i do thing a slight square looks better.

smt
 
Top