Before & after of a home style Delmo 9ft.

realkingcobra

Well-known member
Silver Member
I talked with Jon Ames up in Elko, NV quite a while back about him buying a Diamond 7ft ProAm, that he would be more interested in buying the Diamond if I'd agree to fix up his Delmo 9ft home table because he wanted both tables side by side.

I asked him what he wanted done to the Delmo and he replied that he wanted it to play tighter and right...little did I know what I was in for:D

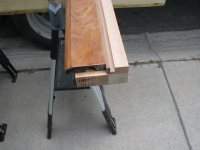
So.....I delivered and set up his Diamond 7ft ProAm, then took apart his Delmo 9ft'er only to discover what the real condition of this table was. In the following pictures you'll see just what I saw when I took the table apart:D:D

Starting project.JPG

Starting project (2).JPG

Starting project (3).JPG

Starting project (4).JPG

Starting project (5).JPG
 

realkingcobra

Well-known member
Silver Member
The first thing I asked myself, was why in the heck would ANY table manufacture make sub-rails out of fir wood...it's way to soft and staples would tear it apart sooner or later, so I the first thing I had to do was get rid of the fir wood. The rail caps are made out of Walnut so they're worth saving.

Saving the rail caps (2).JPG

Saving the rail caps.JPG

Saving the rail caps (3).JPG

Saving the rail caps (4).JPG

Saving the rail caps (5).JPG

Made one hell of a mess though:D
 

realkingcobra

Well-known member
Silver Member
I decided that if I had to build new rails for this table, I was going to at least build them the way Delmo should have from the beginning. Ripped some Oak and Poplar and built some butcher block sub-rails, doweled them as well.

Oak sub-rails (3).JPG

Oak sub-rails (2).JPG

Oak sub-rails.JPG
 

realkingcobra

Well-known member
Silver Member
Alright, time to mount the old rail caps to the new butcher blocked sub-rails, which includes doweling them to not only fit in the exact spot they need to be, but to also keep them from moving around when being glued and clamped.

Mounting the rail caps.JPG

Mounting the rail caps (2).JPG

Mounting the rail caps (3).JPG

Mounting the rail caps (4).JPG

Mounting the rail caps (5).JPG
 

Dead Crab

AzB Silver Member
Silver Member
I just found a reason to build new rails this winter. Butcherblock oak/poplar....way cool, AND you can get the wood at Lowes.
 

realkingcobra

Well-known member
Silver Member
I had to add new Walnut to sub-rail caps to extend them out because first of all, they were at all different widths, then they were pretty broken up along the feather strip dado. So I added a 1/4" of new walnut to make things right.
 

Attachments

  • Mounting the rail caps (6).JPG
    Mounting the rail caps (6).JPG
    90.1 KB · Views: 3,876

realkingcobra

Well-known member
Silver Member
In these next pictures, I put on the pocket miters, down angles, and cut back for the pocket openings. The sub-rails are extended so I don't have to add wood to tighten up the pockets, in fact I have to remove wood as you'll see.

Miter and down angle.JPG

Miter and down angle (2).JPG

Miter and down angle (3).JPG

Miter and down angle (4).JPG

Miter and down angle (5).JPG
 

Nostroke

AzB Silver Member
Silver Member
You must do it for love because with those skills, Im sure you could make a bunch more in some other industry.
 

mullyman

Hung Like a Gnat!
Silver Member
Hey, is this a teaser??? Where are the rest of the pics? I gotta tell you guys, the best threads on this forum are when RKC does a table and posts pics of the process. RKC, gotta ask, how much time does all this take?
MULLY
 

realkingcobra

Well-known member
Silver Member
Re-drilling to mount the pockets in the new rails. Modifying the pocket bolt openings to fit better, and adding the cloth relief dado.

Drilling for the pockets and adding the cloth relief.JPG

Drilling for the pockets and adding the cloth relief (2).JPG

Drilling for the pockets and adding the cloth relief (3).JPG

Drilling for the pockets and adding the cloth relief (4).JPG

Drilling for the pockets and adding the cloth relief (5).JPG

The guy who's drilling the pocket ears out on my drill press is Zach, he's a table mechanic out of Phoenix, AZ. He's going to be with me for about 4-6 weeks, then head back to AZ to start back working on tables down there...with new and improved skills:D to give better support in the Phoenix area, especially on the Diamond tables in that area, as well as all other types of tables;)
 

realkingcobra

Well-known member
Silver Member
I didn't care for the way the rails looked either, so I figured what the heck and went ahead and refinished them as well.

Refinishing the rails.JPG

Refinishing the rails (2).JPG
 

elvicash

AzB Silver Member
Silver Member
I have to say it, that is some awesome onsite woodwork and I look forward to seeing the complete table. I know why people wait to get the tables done by the Real King Cobra.

Cobra if you are coming through Indianapolis anytime in the next few months I have an easy one for you and will wait to get in line.

Thanks for posting

Dana in Indy
 

realkingcobra

Well-known member
Silver Member
Hey, is this a teaser??? Where are the rest of the pics? I gotta tell you guys, the best threads on this forum are when RKC does a table and posts pics of the process. RKC, gotta ask, how much time does all this take?
MULLY

To be quite honest with you, I don't know...somewhere between 60-80 hours if I had to guess;)
 

realkingcobra

Well-known member
Silver Member
Well, after rebuilding the rails to new again, I found out why the rails didn't line up on the pockets....because none of the rail bolt holes lined up with the old bolt pattern...so all the rail bolt holes were off by any where from 1/8" to 1/2" leaving no room to adjust the alignment of the rails from before...so I had to re-drill all the rail bolt holes to correct that problem....then while I was at it...I found out that one of the slates was broken...so I fixed that as well.

Fixing the slates (2).JPG

Fixing the slates (3).JPG

Fixing the slates.JPG

Fixing the slates (4).JPG

Fixing the slates (5).JPG
 
Top