One of a kind GC3, Rick Shellhouse's new table.

realkingcobra

Well-known member
Silver Member
First of all, I already rebuilt the rails at the Diamond factory before I left out to deliver and set up Rick's GC3, so there's no pictures of the rail work I did, but I've shown enough pictures in the past about the rails I've rebuild that it's nothing new from the work I normally do, so I didn't want to bore anyone with the details of that part of this GC3. But, what I did want to do is show the work of something completely off the wall...a 50% Brunswick and 50% Diamond "King Cobra" 9ft pool table...LOL This is so off the wall its never been done before by anyone...making this GC3 a total one of a kind pool table, never to be done again. I just wanted to do it once just for the fun of it...so, Rick was the lucky customer who ended up with this one of a kind table. Believe me when I say it's not a Brunswick or a Diamond...but a combination of both manufactures...making it a "King Cobra" pool table overall. If I had to put a price tag on this table, I'd price it between $5,000 to $6,000 dollars...as a one of a kind table.

And before anyone asks, NO...I'm not going to be doing this again on another table. If anyone wants all the extras I did to this GC3, just buy a Diamond, as it already comes this way...stock!

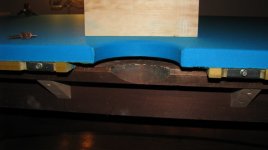
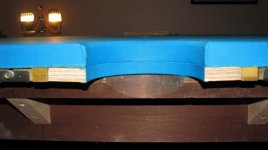
The first thing I had to do was beef up the slate/frame support because there's a big difference between 1" and 30mm (1 3/16") in order to handle the extra weight of the 9ft Diamond Profession slate, not that the GC3 frame couldn't handle the weight with ease...I just don't want the frame to change level years down the road under the stress of trying to support that extra weight is all.

So, I made support blocks and put them in line with each rail bolt, 18 of them and screwed/glued them in place after I assembled the frame base as you can see in the pictures I posted.

IMG_0122.jpg

IMG_0124.jpg
 
Last edited:

realkingcobra

Well-known member
Silver Member
Next, I added the 1"x 8" Poplar wood boards to the GC3 slate frame in order to build up the frame, instead of installing a backing on the slates. To this I router-ed out all the channels to mount the Diamond wedge levelers, all 20 of them because on the end rails, the rail bolt is centered on the slate, so instead of off setting the wedge leveler, I added a second one and spread them a little apart from the rail bolt as to be able to raise the slate evenly if I needed to.

IMG_0099.jpg

IMG_0102.jpg

IMG_0120.jpg

It's late right now, so I'll post more pictures tomorrow.

Glen
 
Last edited:

stevel

Lomax Custom Cues
Silver Member
Looks good Glen,I see you picked up one of Mark's ideas as well while you were at his shop. I'm doing my Anniversary frame the same way.Mark brought me the wood to do them a couple of weeks ago. I guess you saw my rails when you were at his shop,can't wait till it's finished. I'm going to use poplar instead of pine,but it serves the same purpose.That frame will be solid forever now.Good work as always.

Best Wishes,

Steve
 

ROB.M

:)
Silver Member
Table

Nice. I dig your gold crowns. With it being a 50/50 combo table like that. I can't wait to see how it looks... Because we all know how it plays' dead nuts '
-Thanks for sharing
-
Rob.M
 
Last edited:

realkingcobra

Well-known member
Silver Member
Looks good Glen,I see you picked up one of Mark's ideas as well while you were at his shop. I'm doing my Anniversary frame the same way.Mark brought me the wood to do them a couple of weeks ago. I guess you saw my rails when you were at his shop,can't wait till it's finished. I'm going to use poplar instead of pine,but it serves the same purpose.That frame will be solid forever now.Good work as always.

Best Wishes,

Steve

That frame bracing is an old trick, I posted pictures of a GC I did a long time ago here on AZ showing the same bracing...but Mark is the only other mechanic I've seen that does it the same way, Mark is a great mechanic, and yes the rails he's working on for you are outstanding...I wouldn't expect less from Mark, I'm just glad he's willing to do this kind of work because I have no interest in taking rails to the level Mark is producing...I'd have to be crazy to take on some of the jobs Mark has...LOL...which I guess makes Mark crazy as hell...or maybe he just has a love affair with Pandora...because he just keeps opening her box...LMAO

Glen
 

realkingcobra

Well-known member
Silver Member
Nice. I dig your gold crowns. With it being a 50/50 combo table like that. I can't wait to see how it looks... Because we all know how it plays' dead nuts '
-Thanks for sharing
-
Rob.M

When I finish up with this GC, there won't be a single staple any where holding the bed cloth down...not even in the pockets....hehe
 

ROB.M

:)
Silver Member
Table

Now I really can't wait to see these pics. Especially the pocket finish:)
Sent u a question via PM
-
Thx.
Rob.M
 

realkingcobra

Well-known member
Silver Member
This is Rick hard at work drilling out the 18 rail bolt holes to line up with the Gold Crown 3 rails, as the Diamond bolt patern is different than Brunswick. I made it easy for him by setting him up with a 3/4" Diamond hole plug cutting bit, which is the nuts for drilling through the slate:D
IMG_0007.jpg

In these pictures, I'm showing the cavity I cut out using my router to make room for the steel plates that join the slates together at the outside edges of the slate seams, because they they sit below the bottom edge of the slate, while the slates rest on the Poplar 1" x 8" support board. This is relief has to be cut out in the 4 outer edges of the seams.

IMG_0008.jpg

IMG_0009.jpg
 

realkingcobra

Well-known member
Silver Member
If anyone is ever in the need to drill rail bolt holes through slate, even Brazilian slate which is hard as hell, this is how clean the diamond tipped hole plug drill bit drill from Lowe's cuts through the slate. Just make sure you use water to cool the bit while it's being used. The trick to stopping the drill bit from walking around when starting to use it, is to first make some kind of a jig to hold the drill bit in place, like a board that can be clamped in place, with a 3/4" hole drilled through it first. This is the best drill bit in the world when it comes to drilling a rail bolt hole right next to an existing rail bolt hole that is just a little offset so it can't be used so another hole next to it has to be drilled.

IMG_0003.jpg

IMG_0001.jpg
 

realkingcobra

Well-known member
Silver Member
In these pictures you can now see how the steel plate joinging works, as well as the slate center levelers mounted on the crossmember, which gives me the ability to raise or lower the slate down the middle of the table.
IMG_0018.jpg

IMG_0021.jpg

IMG_0023.jpg
 

realkingcobra

Well-known member
Silver Member
Now, to measure the step difference between one side of the seam to the other. Once that's determined, I then shim up the lower side of the slate to match the seam with the opposing slate in order to flush up the seams.
IMG_0024.jpg
 

realkingcobra

Well-known member
Silver Member
OK, everythings finished with the slate, seams are all flush, screw and bolt holes all filled in with bondo and sanded flush.
IMG_0029.jpg

IMG_0045.JPG

IMG_0048.jpg

IMG_0059.jpg
 

realkingcobra

Well-known member
Silver Member
Installed the bed cloth, and as I said...finished off the pockets with NO staples...not ONE!...LOL...here you go Rob.
 

Attachments

  • IMG_0065.JPG
    IMG_0065.JPG
    93.3 KB · Views: 1,966
  • IMG_0068.jpg
    IMG_0068.jpg
    48 KB · Views: 1,890
  • IMG_0073.jpg
    IMG_0073.jpg
    41 KB · Views: 1,896

realkingcobra

Well-known member
Silver Member
The pocket plates bolt to the bottom of the pocket shelf with 2 bolts each going up through the slate into nuts drilled out and inserted into the slate on both sides of the pocket ears.
IMG_0070.jpg
 

PoolTable911

AdvancedBilliardSolutions
Silver Member
Glenn....Awesome....That is insane! You have done it again..You are truely a Master Mechanic...:bow-down: Thanks for all your help over the years.
 
Top