Coring on my metal lathe

JC

Coos Cues
I have done all my coring to date on my hightower lathe and would like to use my metal lathe but I'm not quite sure how to set it up accurately.

I have round shank gun drills. I am afraid to use the tail stock because the morris taper chuck seems like it could rattle loose and wrap my air hose around it but centering the drill using the carriage seems tricky too.

If someone could share how they do it with me I would be much obliged before I hurt myself.

Thanks,

JC
 

JC

Coos Cues
1/2 shank gun drill and heavy duty drill chuck.

I have all of that.

So do you stop the lathe and rewind the tailstock every 2-3 inches and then push it back into the bottom of the hole and start in again? Or leave the tailstock loose and push it through by hand? I'm afraid if I don't stop the lathe the morris taper on the drill chuck will come loose from vibration.

In an older thread I searched Canadian Cue said he mounts the gun drill in the tool post and pushes it with the autofeed. I'm having trouble visualizing how to center and mount the drill.

JC
 

MVPCues

AzB Silver Member
Silver Member
I have all of that.

So do you stop the lathe and rewind the tailstock every 2-3 inches and then push it back into the bottom of the hole and start in again? Or leave the tailstock loose and push it through by hand? I'm afraid if I don't stop the lathe the morris taper on the drill chuck will come loose from vibration.

In an older thread I searched Canadian Cue said he mounts the gun drill in the tool post and pushes it with the autofeed. I'm having trouble visualizing how to center and mount the drill.

JC

It's Morse taper. If there is more than a modicum of vibration, something else is wrong. A Morse taper shouldn't come free and spin unless you retract the quill too far when drilling, especially when using a gun drill, and especially in wood. Don't retract the quill to the point that always results in the taper being ejected. If a properly seated taper comes free on your lathe when you did not retract too far, you have a compromised taper.

Drill and bore a 1" long exit hole 1/16" smaller than the drill size. Reverse piece. Drill and bore a 1" long entry hole .001" larger than the drill size. Turn off lathe. Slide tailstock forward so the drill head is elatedly inside the hole. Turn lathe on. Feed quill as far as your quill length allows. Retract quill length to original starting point, well away from ejection point. Loosen and slide tailstock forward to bottom of hole. Tighten tailstock. Repeat until drill is completely through. Turning off the lathe during the procedure is not necessary and very possibly detrimental.
 
  • Like
Reactions: JC

Kim Bye

AzB Silver Member
Silver Member
If your exeperiencing slipping in the morsetaper fit, you might have to ream the quill again. Check out your drill chuck adapter too, is it worn or dirty?
 
  • Like
Reactions: JC

Canadian cue

AzB Silver Member
Silver Member
I do my coring with the gun drill mounted in the tool post. Had my drill made with the rear NPT for the air. Built a aluminum collet block that clamps into my tool post. I make a starter hole with a drill in the tail stock then do the rest with carriage. I engage the feed at slow feed and let it go. I have nice setup for the chips with the dust collector so very little mess. I will snap a pic for you if you would like.
 
  • Like
Reactions: JC

Mcues

AzB Silver Member
Silver Member
I have all of that.

So do you stop the lathe and rewind the tailstock every 2-3 inches and then push it back into the bottom of the hole and start in again? Or leave the tailstock loose and push it through by hand? I'm afraid if I don't stop the lathe the morris taper on the drill chuck will come loose from vibration.

In an older thread I searched Canadian Cue said he mounts the gun drill in the tool post and pushes it with the autofeed. I'm having trouble visualizing how to center and mount the drill.

JC

Imagine the drill to be a boring bar. First a pilot hole and then align the drill. You don't have to use the autofeed do it manually until you get the correct turning speed,feed, and air delivery.

Mario
 
  • Like
Reactions: JC

JoeyInCali

Maker of Joey Bautista Cues
Silver Member
It's Morse taper. If there is more than a modicum of vibration, something else is wrong. A Morse taper shouldn't come free and spin unless you retract the quill too far when drilling, especially when using a gun drill, and especially in wood. Don't retract the quill to the point that always results in the taper being ejected. If a properly seated taper comes free on your lathe when you did not retract too far, you have a compromised taper.

Drill and bore a 1" long exit hole 1/16" smaller than the drill size. Reverse piece. Drill and bore a 1" long entry hole .001" larger than the drill size. Turn off lathe. Slide tailstock forward so the drill head is elatedly inside the hole. Turn lathe on. Feed quill as far as your quill length allows. Retract quill length to original starting point, well away from ejection point. Loosen and slide tailstock forward to bottom of hole. Tighten tailstock. Repeat until drill is completely through. Turning off the lathe during the procedure is not necessary and very possibly detrimental.
That is a little scary to me.
I crank the tailstock close to 3 inches in.
Stop the lathe.
Release the tailstock lock to the bed.
Hold the drill while it's bottomed out.
Crank the tailstock in to about 25mm of the quill sticking out. That's enough not to release the MT3 tang.
Lock the tailstock to the bed. Back up the drill a hair from the bottom of the hole so it doesn't plunge at start-up.
Drill again close to 3 inches.
For dust collection, you might want to do something like this.
 

Attachments

  • dustc.jpg
    dustc.jpg
    34.4 KB · Views: 582
Last edited:

MVPCues

AzB Silver Member
Silver Member
That is a little scary to me.
I crank the tailstock close to 3 inches in.
Stop the lathe.
Release the tailstock lock to the bed.
Hold the drill while it's bottomed out.
Crank the tailstock in to about 25mm of the quill sticking out. That's enough not to release the MT3 tang.
Lock the tailstock to the bed. Back up the drill a hair from the bottom of the hole so it doesn't plunge at start-up.
Drill again close to 3 inches.
For dust collection, you might want to do something like this.

I don't understand why that is a little scary to you. I have never stopped my lathe in the middle of a drilling operation, normal drill or gun drill. When I slide my tailstock forward with gentle pressure, I feel the drill touch up before any actual stock removal begins. Lock tailstock down and then proceed with a smooth engagement. Keeping your hand on the drill chuck gives you a lot of feel, and if it is keyless, you can keep tension on it so there is no minute twisting action during the re-engagement.

Tell me what you are worried about, and I may consider I'm doing it wrong.

Edit: After more input, I will try your method of keeping the drill bit bottomed out. It does sound like it might be better. Thanks for sharing. I'm not inclined to stop the lathe though.
 
Last edited:

rhinobywilhite

AzB Silver Member
Silver Member
My setup is similar to Joey's, using a PVC T to provide a way to collect the dust. I have that all mounted to the tool post and the gundrill is mounted in the tailstock.

Like Joey, I move up about 3 inches with the tailstock handle, then move the tailstock mount forward as I reverse the gundrill to move it toward the tailstock.

I also predrill a hole that is very close to the size of the gundrill in both ends of the wood to be cored. I then bore to size the end I will enter with the gun drill.

Add air pressure, turn on the lathe and start drilling.

Ps- I am sure I used Joey's post in another thread to set up my own. You can call up that thread, JC, and see a lot of info.
 
  • Like
Reactions: JC

Ron Padilla

AzB Silver Member
Silver Member
There are some utube vdeos but they are lacking in a lot of ways. I am going to be starting the process soon and would like to see a video, I m a visual learner and can grasp a great deal from vidoes.
 

Ron Padilla

AzB Silver Member
Silver Member
after I made my comment above I went to utube and searched for pool cue boring with a gun drill! There were the few cue makers with their videos but there were some guys that make Native American Flutes that also use a gun drill to bore the wood just like pool cue makers do, the flute makers showed a bit more than the cue makers showed! search that on utube and you might find it helps a little more! If yu search it out I would like to know what you think of what you saw!
Thanks
 

conetip

AzB Silver Member
Silver Member
With gun drilling , it is not super fast. You got the idea already and have air to blow out the chips/swarf. There are many ways to starting a hole with a gun drill. One is to pre drill or bore a pilot hole the same diameter as the gundrill about the length of the guide of the drill itself, generally 1.5 diameters of the hole. Another way is to use a drill guide bush. This is a very close sliding fit to the gun drill. It is correctly centred to the work piece. This will guide the gundrill for the initial start, and for any other passes that may be required.
When drilling , it does not have to be a perfect continuous feed all the way through. That would be ideal if it always chipped well and always cleared the swarf out. I have done both with the tailstock and the carriage holding the gundrill. I find the carriage one easier to manage , as it is on a Taig type lathe.
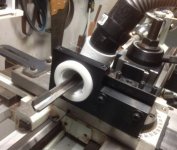
The alignment is the really important one. In my case, I made a block to hold the gun drill in my small Italian type tool post. I then made up a steel bar, that is the same length of my drill that fits the holder. This test bar has a centre in the back, for the tailstock centre to align the back. I hold the front of the test bar so it is just located into the collet by a few mm. On my setup, there is an adaptor plate that holds the QCTP to the cross slide. So any small miss alignment can be allowed for in the clearance of the screws. Once done up and set, and the cross slide locked into position or recorded in my case, can then take out the test bar, and put in the gun drill. The back end really does need to be within 2 thou of alignment other wise it can be the cause of a wondering hole. I find that just hand feeding is just fine, look at the chips coming out. I feed mine quite slow, in the 0.05mm to 0.1mm per rev range and I don't run mine very fast at all. I have my spindle at about the 400 rpm range, and feed the carriage or tailstock at a rate of about 20 to 30 mm per minute or so. The wood does not get hot, and the holes stay straight. If it the wood is getting hot, then it is either running too fast or the drill is getting dull. Getting dull is usually the main reason for the heat. They can be hand sharpened on a diamond wheel, but that is not for everyone. I set my pieces up and the collet steady and the collet chuck, but un supported out the very back of the spindle. I process and do the pilot hole ist on all the pieces, then reset up the gundrill to then drill the batch. That way I am not changing the setup. My main reason for going slow, is I found for me, that when going faster, the grain was influencing the cutting of the drill.
There is carbide double land/ double Margin drills, but at this stage are too pricey for me. These new to me double margin drills, have way faster drilling speeds and feeds and maintain a hole roundness similar to gun drills and will make as straight a hole . I use them at work and have borrowed the 16mm one for a test. It really is impressive.
Neil
 

Ron Padilla

AzB Silver Member
Silver Member
I do my coring with the gun drill mounted in the tool post. Had my drill made with the rear NPT for the air. Built a aluminum collet block that clamps into my tool post. I make a starter hole with a drill in the tail stock then do the rest with carriage. I engage the feed at slow feed and let it go. I have nice setup for the chips with the dust collector so very little mess. I will snap a pic for you if you would like.

would you mind posting a photo 1 cannot have enough info to settle the nerves kind of like a glass of fine wine or a toke of good, oops I mean some good yak before going forward!!
 

JC

Coos Cues
Thank you everyone for your thoughtful replies on this subject.

I played around with this all day Saturday trying both the carriage and the tailstock and ultimately decided the tailstock was the better option for me. I can just lube up the lathe bed and push the drill right on through by sliding the tailstock with very little effort and setup time. No need to use the screw. In fact screwing it in a few inches and then winding it back just took more time and effort and caused my morse taper to come loose a few times. The tailstock has enough mass to push it through even tough wood like BEM pretty effortlessly. I found putting the drill in my tool holder gave me a lot of checking and cross checking to make sure it's lined up on all planes. Lots of time that I thought would have to be repeated each time I wanted to core. So I decided to go with the tailstock as it's always exactly where I need it to be.

Since my gun drill is marked in inches I wanted to be able to see it to know the depth so the Joey PVC dust collector wasn't going to work for me. I built a small wooden box with a plastic viewing window out of scrap wood instead. It leaks zero dust and I can see the depth I'm at through it. .

Anyway I cored a bunch of wood today and it seems to be working nicely.

008 [800x600].jpg

007 [800x600].jpg

Thanks again everyone,

JC
 

scdiveteam

Rick Geschrey
Silver Member
With

Hi.

Here is my coring procedure. This works well for me concerning concetricity with repeatability.

Center drill a 3/4" and 1/4" center on the piece to be cored.

Mount the stock with the 3/4" center on the chuck side inserted 3" and the 1/4" center in the tail stock live center.

Set up your 3 center rest paws with even pressure. Spin Lathe with bees wax applied to wood at those paws. By using center rest paws, you can use a variety of diameters.

Remove live center and mount the tail stock chuck with 3/4" 60 degree center drill. Install 3/4" center past the ramp to the shank dia. to prepare for the gun drill insertion.

Mount gun drill and start drilling.

400 rpm to reduce heat build up.

Drill 3" at a time by turning the tail stock wheel. Unlock tail stock and overhaul the purchase 3". Repeat until the drill passes the chuck end by 1". You dont have to turn off the lathe for the 10 seconds it takes to overhaul the tail stock position.

JMO,

Rick
 
Last edited:

JC

Coos Cues
Hi.

Here is my coring procedure. This works well for me concerning concetricity with repeatability.

Center drill a 3/4" and 1/4" center on the piece to be cored.

Mount the stock with the 3/4" center on the chuck side inserted 3" and the 1/4" center in the tail stock live center.

Set up your 3 center rest paws with even pressure. Spin Lathe with bees wax applied to wood at those paws. By using center rest paws, you can use a variety of diameters.

Remove live center and mount the tail stock chuck with 3/4" 60 degree center drill. Install 3/4" center past the ramp to the shank dia. to prepare for the gun drill insertion.

Mount gun drill and start drilling.

400 rpm to reduce heat build up.

Drill 3" at a time by turning the tail stock wheel. Unlock tail stock and overhaul the purchase 3". Repeat until the drill passes the chuck end by 1". You dont have to turn off the lathe for the 10 seconds it takes to overhaul the tail stock position.

JMO,

Rick

I tried it both ways quite a few times and didn't see the advantage to pushing the drill in with the tail stock screw and resetting every 3 inches. Just pushing the whole tailstock assembly drill and all through the wood with it loose on the lathe bed is a whole lot quicker and just as accurate. I do reach under and tighten the nut on the adjuster so with the lever released the plate underneath is close to the underside of the lathe bed just in case something grabs the tailstock can't go far but thus far it hasn't moved. Just slides right along flat with even hand pressure. Actually I think having the quill locked instead of loose enough to turn the screw makes it more stable with that long gun drill hanging out the front.

My observations your mileage may vary

I wish I would have bought longer gun drills. At the time I was too inexperienced to consider dust collection.
 
Last edited:

Ssonerai

AzB Silver Member
Silver Member
I tried it both ways quite a few times and didn't see the advantage to pushing the drill in with the tail stock screw and resetting every 3 inches. Just pushing the whole tailstock assembly drill and all through the wood with it loose on the lathe bed is a whole lot quicker and just as accurate. I do reach under and tighten the nut on the adjuster so with the lever released the plate underneath is close to the underside of the lathe bed just in case something grabs the tailstock can't go far but thus far it hasn't moved. Just slides right along flat with even hand pressure. Actually I think having the quill locked instead of loose enough to turn the screw makes it more stable with that long gun drill hanging out the front.

I drill shafts sometimes as deep as 7" using the TS and wheel feed & peck drilling; but have not yet tried gun drilling for coring. IOW, this is not a recommendation, i have not tried it:

Some big old lathes had a latch to attach the carriage to the TS, to drag it along under power feed.

Of course you would not be able to feel a jam or chips packing up with this method.
:eek:

smt
 

BarenbruggeCues

Unregistered User
Silver Member
Been using a carriage mounted gun drill for years and wouldn't do it any other way.
It would be a waste of my time and energy pushing a tail stock back and forth.

:cool:
 
Top