Brunswick Madison

frige

Registered
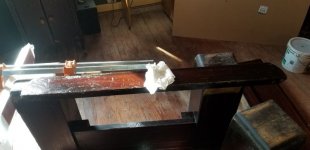
Hey everybody
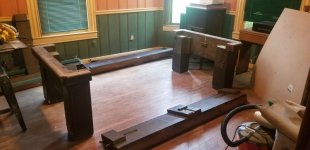
I picked up what I believe is a Madison probably from the 1920s. It is completely taken apart but appears to be all there. The veneer is in poor shape at the bottom of the legs. I am gluing it just to stabilize it for now. How difficult is it to repair it? It has inlays of a lighter wood so that is way beyond me but I will give it a shot.
 

Attachments

  • 20200304_131111.jpg
    20200304_131111.jpg
    49.4 KB · Views: 555

frige

Registered
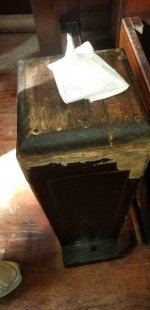
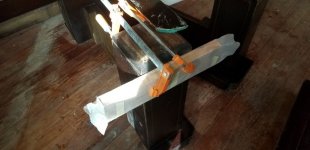
It is very dirty so I am cleaning it with murphys oil soap. As you can see the legs are in poor shape.
 

Attachments

  • 20200308_165025.jpg
    20200308_165025.jpg
    40.2 KB · Views: 540
  • 20200308_163316.jpg
    20200308_163316.jpg
    25.6 KB · Views: 541
  • 20200308_165033.jpg
    20200308_165033.jpg
    45.3 KB · Views: 542

Ssonerai

AzB Silver Member
Silver Member
My wife bought a Royal from the same era.
They used hot hide glue in those days, so if you are set up for it, it is not difficult to hammer veneer. I've used a lot of hot hide glue for historical work over the years, so am familiar with it; but just started learning to hammer.

You have to scroll down a bit before the pictures start, click on the mini-pics and they will blow up.

https://www.practicalmachinist.com/...hammer-veneer-350757/?highlight=hammer+veneer

I made the stringing to match the missing stuff on hers, too, but got side-tracked with house repairs and real work over the past year.
There's two different sizes in the table, hence the 2 sizes blanks made below, to resaw for stringing.

230915d1529166622-anyone-here-hammer-veneer-dsc_0062.jpg


I've also made/proved a router fixture and tooling, to add solid inlaid corners to the legs when i finish the veneer repairs. But still no time to get back to the table yet.

smt
 

frige

Registered
Call this place and talk to Derrick. They rebuild these and he knows a lot. https://www.billiardrestoration.com/antique-pool-tables/madison.htm
I did call him and he is a really cool guy. Took his time to talk to me and turned me on to a supplier. I do not have the skill like most of yall have but I am going to do my best to learn how to hammer veneer and at least have a nice table to play on.
It is going to be in the parlor of my 1890s house so it fits well.
 

frige

Registered
Also I am using wood glue to stabilize the veneer. Not sure how I could get the hide glue behind the loose wood. Am I making a mistake?
 

Ssonerai

AzB Silver Member
Silver Member
Also I am using wood glue to stabilize the veneer. Not sure how I could get the hide glue behind the loose wood. Am I making a mistake?

Sigh.
The skills it takes to do restoration work well and conservatively aren't difficult. But they are still a skillset that is not instant.

If what you do, is successful for you, keep doing it. :thumbup:

That said, it is really difficult to fix things that are mucked up with modern glues. They don't mix well with old materials, and are comparatively impossible to get back out.

The one leg that the face veneers are ruined on mine, someone tried to stick down with titebond and possibly contact cement. It did not hold, the veneer face with bubbles and loose, got torn up by people kicking it, & the new glues prevented anything else from sticking until i strip them out.

That said, someone who had taken the time and understood the work, potentially could have made a good repair with titebond originally. But veneering with titebond is not easy unless you are clean, fast, and have good pressure cauls or a vacuum set up.

Hot hide glue mixes with itself, and more or less re-constitutes the old stuff in place, so long as it is not contaminated with modern glue, or other substances, nor moldy. As I noted in the link, it is kind of 2 steps - get the hot stuff in, using spatulas and plastic wedged to lift. It will gel in lumps. Then re-heat it with an iron (don't scorch the wood, the glue only needs to be about 140F or even less. Iron enough to get it liquid again, then "hammer" it down. The "hammer" is actually used like a squeegee. To squeege the glue further under, and to squeege it out. At this point the veneer should be pretty well re-stuck. But if there are still lumps or the glue cooled too fast, you can reheat, and squeege again.

Hot hide glue takes an initial gel that will hold the veneer in place. Then it develops strength as it dries over night or so.

I'm not a purist, i use epoxy and titebond for some things. I will use them when i put the solid edgings on the leg corners. I use mostly WEST epoxy and pressure or vac bags when veneering my own new work with my own, thick, shop sawn veneers. But a cabinet that was veneered with hot hide glue (not liquid hide) will be easier to repair using that same technique. IOW, I prefer the method because i am lazy and it is easier than alternatives.

Which gets back to keep doing what works for you.

smt
 
Last edited:

frige

Registered
Thanks Ssonerai,
I realize I am not doing a professional job. At 61 and more projects than any one can finish in a lifetime what I want to do is get the table back up and going. Hopefully we can say it has character. At this point I just wanted to stabilize the veneer so it wont break off any more. I will have a million more questions as I get it together.
 

Ssonerai

AzB Silver Member
Silver Member
frige -
i'm not trying to tell anyone how to fix their own table. You asked:

Hey everybody...... The veneer is in poor shape at the bottom of the legs. I am gluing it just to stabilize it for now. How difficult is it to repair it? It has inlays of a lighter wood so that is way beyond me but I will give it a shot.

So i linked to a longer post on doing just that. If you have the facility & materials, it is the easiest, fastest method. If not, probably it is not as easy as what is familiar & would not be fast.

So i'm not trying to be big-headed or anything else about what is "correct".

I've almost concluded that with some of these older tables, the best way would be to strip the loose veneer, bondo the the voids, sand it all out smooth and paint it black. :grin-square:

Put levelers in the feet, set it up and plane the bed flat. redo the slate liners, then get to work on the rails, which are what matter for performance.

But my wife bought the table i get to work on, she likes the furniture aspect and i like the classic looks. If i can ever finish the projects for paying customers, I'd like to get back to work on it.

Good luck with yours, and seriously, if you have a successful approach that works for you, keep doing it.
BTW, I've got a 1/2 dozen years on you. Hopefully we'll all get past the plague thing and have a few more healthy decades.

smt
 
Last edited:

frige

Registered
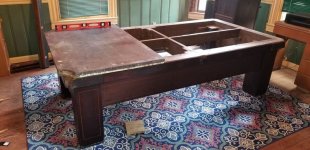
Well I am satisfied in the appearance. Of course Im easy lol. So I am starting assembly. The house is 130 years old and is pier and beam construction. So I put down a sheet of 3/4 plywood to distribute the weight. Fun part. Can I level the table and make it stay that way. Lol. I need to do more research.
 

Attachments

  • 20200405_170002.jpg
    20200405_170002.jpg
    72.2 KB · Views: 337

rexus31

AzB Silver Member
Silver Member
Well I am satisfied in the appearance. Of course Im easy lol. So I am starting assembly. The house is 130 years old and is pier and beam construction. So I put down a sheet of 3/4 plywood to distribute the weight. Fun part. Can I level the table and make it stay that way. Lol. I need to do more research.

Looks good!

You should always start with the center slate.
 

rexus31

AzB Silver Member
Silver Member
Care to share your rationale for this?

I've been doing this work for many years, and I almost never start with the center slate.

If you start with the center as part of the frame leveling process, the weight is evenly distributed starting with the center slate first then adding the end slates in trying to get the base as level as possible before fine tuning the slates.

Disclaimer: Not a mechanic. Just a process I've read on here multiple times and the mechanic that setup my Gold Crown used this process.
 

bradsh98

Bradshaw Billiard Service
Silver Member
If you start with the center as part of the frame leveling process, the weight is evenly distributed starting with the center slate first then adding the end slates in trying to get the base as level as possible before fine tuning the slates.

Disclaimer: Not a mechanic. Just a process I've read on here multiple times and the mechanic that setup my Gold Crown used this process.

I rough level the frame, before placing the slates. I do not start any slate leveling until I have all slates placed, and aligned, on the frame.

From there, I secure the highest point, and raise everything else to that plane. In most cases, the center slate is generally lower than the ends. Because of this, I rarely start with the center slate.
 

trentfromtoledo

8onthebreaktoledo
Silver Member
If you start with the center as part of the frame leveling process, the weight is evenly distributed starting with the center slate first then adding the end slates in trying to get the base as level as possible before fine tuning the slates.

Disclaimer: Not a mechanic. Just a process I've read on here multiple times and the mechanic that setup my Gold Crown used this process.

I do it this way as well. Makes the most sense to me :)

TFT

p.s. 99% of the tables I work on are commercial( GC's and Diamonds) and frame sagging in the center is not common :)
 
Last edited:

Ssonerai

AzB Silver Member
Silver Member
p.s. 99% of the tables I work on are commercial( GC's and Diamonds) and frame sagging in the center is not common

You are just not using a sensitive enough level to see it. :grin:

Trent - that's true, but i'm only saying it as a joke - so don't get bent out of shape. :wink:

And if you want to see something drive you crazy, put a Starrett 199 on the end of a machine table, walk around the machine, & press on the other end, watching the bubble.... Or just walk around a machine on an insubstantial foundation.

The world is made of rubber.

smt
 

trentfromtoledo

8onthebreaktoledo
Silver Member
All good SMT! I use the starrett 98- 12"

Rubber and its bounce is the name of the game!


TFT

You are just not using a sensitive enough level to see it. :grin:

Trent - that's true, but i'm only saying it as a joke - so don't get bent out of shape. :wink:

And if you want to see something drive you crazy, put a Starrett 199 on the end of a machine table, walk around the machine, & press on the other end, watching the bubble.... Or just walk around a machine on an insubstantial foundation.

The world is made of rubber.

smt
 

frige

Registered
I did used to play at a very old bar, and locals knew you could stand in different spots and influence the game. ;)
 

logical

Loose Rack
Silver Member
If you need one of these PM me and I'll save you $20. I had a table similar if not identical.
15be8496eeee221efe3dd55a8ae4a034.jpg


Sent from the future.
 
Top