You are using an out of date browser. It may not display this or other websites correctly.
You should upgrade or use an alternative browser.
You should upgrade or use an alternative browser.
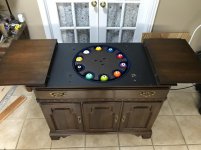
Home made Billiard Ball Cleaner Project 1
- Thread starter Bca8ball
- Start date
Home made Billiard Ball Cleaner Project 2
More Photos
Can't post the video of operation but I verified with slo-mo the ball axis changing during rotation.
I put a couple of short videos on YouTube:
https://youtu.be/g1luocKQO-k
https://youtu.be/4kpyViatgac
More Photos
Can't post the video of operation but I verified with slo-mo the ball axis changing during rotation.
I put a couple of short videos on YouTube:
https://youtu.be/g1luocKQO-k
https://youtu.be/4kpyViatgac
Attachments

Last edited:
That is awesome!
Sent from my iPhone using Tapatalk
Sent from my iPhone using Tapatalk
More Photos
Can't post the video of operation but I verified with slo-mo the ball axis changing during rotation.
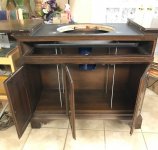
Very nice re-purposing of the cabinet! Looks great.
How did you design the various components from the spinning platter to the ball separation disc and the motor location to ensure the balls do not spin on the same axis?
Perhaps take another slo-motion video of shorter length and post up so we can see it?
I ask the question about design because we all know that IF someone simply makes a “spinning ball polisher” and keeps the axis of the spinning platter that the balls rest upon aligned with the center of the ball separator disc in the middle and the motor turning it all, that the balls WILL NOT have a continuously random rotation - they will turn in the same (very very little if any variance) axis not polishing the entire ball surface with the same contact times over every square mm let’s say. I know you say that you’ve verified this with a slow motion video, so I’m just wondering how you achieved this if you’re willing to share with all of the viewers here since home-built Ball polishers gets a lot of attention and isn’t as easy as “if you spin them you’ll clean them” sort of thing.

Thank you so much for sharing this project.
~ K
Sent from my iPhone using Tapatalk
What did you use for the motor?
1/2HP DC Motor (90V/1750RPM) with a AC 110V Rotary Knob Voltage Speed Controller.
Outstanding. Very creative.
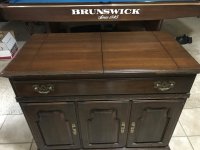
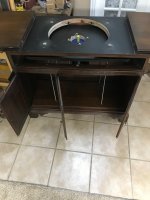
Thanks, no one will look at a yard sale end table, chest, or small dresser that same...lol
As long as you are pushing the balls against another surface (vs simply spinning a surface under them), they will change axis.Very nice re-purposing of the cabinet! Looks great.
How did you design the various components from the spinning platter to the ball separation disc and the motor location to ensure the balls do not spin on the same axis?
Perhaps take another slo-motion video of shorter length and post up so we can see it?
I ask the question about design because we all know that IF someone simply makes a “spinning ball polisher” and keeps the axis of the spinning platter that the balls rest upon aligned with the center of the ball separator disc in the middle and the motor turning it all, that the balls WILL NOT have a continuously random rotation - they will turn in the same (very very little if any variance) axis not polishing the entire ball surface with the same contact times over every square mm let’s say. I know you say that you’ve verified this with a slow motion video, so I’m just wondering how you achieved this if you’re willing to share with all of the viewers here since home-built Ball polishers gets a lot of attention and isn’t as easy as “if you spin them you’ll clean them” sort of thing.
Thank you so much for sharing this project.
~ K
Sent from my iPhone using Tapatalk
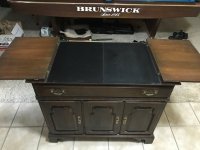
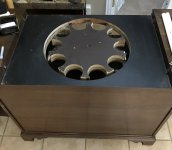
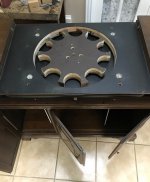
This center plater is similar to the Diamond Billiards concept, the rotation forces the ball against the outer edge creating a different edge friction and axis change.
It was truly a deign as I went project, I saw a yard sale bar and had a brainstorm.
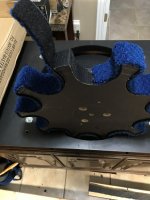
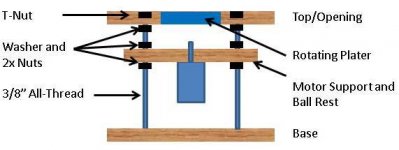
I wasn't sure about heights/spacing etc.; therefore, I used 4 all-thread rods.
The rods start at the top, then they adjust the motor support/ball rest height/spacing as needed.
Here is an illustration that might be better than my explanation.
The site won't let me post a video here; if interested, I could YouTube one.
Attachments
Last edited:
I, for one, would LOVE to see a more thorough write up on what this thing entails, and I'd love to see a youtube video. My table is suppose to be installed very soon and I'll be looking into options for ball cleaning seriously shortly thereafter. Your solution looks fantastic, I'm very interested in doing something similar.
1/2HP DC Motor (90V/1750RPM) with a AC 110V Rotary Knob Voltage Speed Controller.
Now all you need do is cutout a rectangular hole off to the side for an outlet box, and wire in a spring-wound timer connected to the motor AC supply.
")
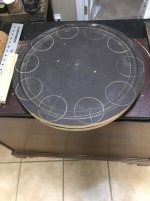
Are the balls snug enough in the holes? If too loose , I'm not sure you are going to get enough friction for a good clean.
It rotates the same the Diamond Billiard's cleaner; theirs has zero friction, none at all.
You really don't want any friction; it's about pushing the balls against multiple surfaces while rotating.
Impressive.
Not including the cost of the cabinet (as this can vary significantly), any R&D changes you may have encountered or your labor of love, what do you estimate your total cost to be.
I used a old table top to double the top, the ball shelf layer, and the spindle; 2 layers of 5/8" or 3/4" plywood would work as well or better.
I bought a nice 3 1/2" hole saw vs using my jig saw but I will exclude the tool purchase:
It would be safe to consider $200 including nuts, bolts, washers, and plywood.
$109.20 - DC MOTOR 1/2HP 90V/1750RPM
$31.99 - AC 110V Voltage Speed Controller DC Motor Variable DC0-90V
$29.68 ($7.42 each for four 3/8" All-Thread Rods 36" long
I uploaded a couple of short videos on YouTube.
https://youtu.be/g1luocKQO-k
https://youtu.be/4kpyViatgac
https://youtu.be/g1luocKQO-k
https://youtu.be/4kpyViatgac
Last edited: