Restoring '46 Brunswick Anniversary - Castings Concern

goldcrown4

AzB Silver Member
Silver Member
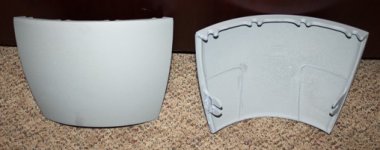
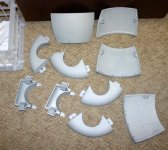
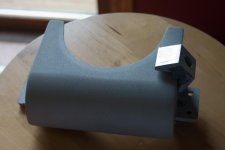
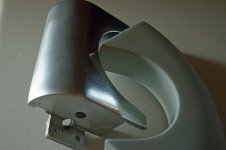
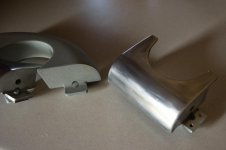
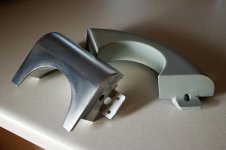
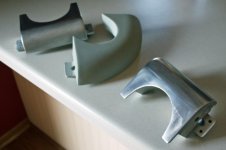
The 60 + year old anodized aluminum pocket castings were taken to an alumunim treatment facility near where I work. I was expecting a consistent satin sheen with a hardcoating but got a soft 'primer-gray' color instead. There were concerns about the porosity of the old aluminum resulting in this. They suggested a powder coat like paint process to follow. I'm wondering if the gray color would result if the castings were not de-anodized first. I had mentioned this before handing them over. The reason typical off-the-shelf aluminum polish (like from Mother's used for mag wheel polishing) doesn't work on these old pocket castings is because they are anodized. So, logic tells me if the castings had been de-anodized first, this might not have happened.

Can anyone tell me what other options I might have? I realize it could take someone with a chemical engineering background to answer but hopefully someone will know. I mean, can these still be chromed perhaps?
 

Attachments

  • CRW_8380c.jpg
    CRW_8380c.jpg
    75.8 KB · Views: 2,865

ArizonaPete

AzB Silver Member
Silver Member
I'm a Chemical Engineer but can't help you. What you need is a Metallurgical Engineer. Offhand, I would avoid de-anodizing an older piece such as this. I think you'd be much better off with powder coating it. You may also want to powder coat the adjustable legs while you're at it. There have been some posts on this forum of various tables (usually GC's) with powder coating corners and legs. Almost all are outstanding. I don't think you'd have a problem getting them chrome plated. Good luck in your endeavor.
 

chevybob20

AzB Silver Member
Silver Member
I can't believe that those castings would be any different than the Centennial. I finished all of the castings on my 1940's model by hand.

I stripped the coating off with TAL Strip 2. This process removed the clear coat and left the grey powder coating.

I stripped the powder coating with a wire wheel.

Then I used a piece of Scotch bright on a palm sander. The sander was the hook and loom type. This will leave scroll marks but remove the wire wheel marks.

I then installed a woven buffing pad on my bench grinder. I buffed the pieces using the polishing compound that comes in the bar style. It is amazing how fast the pieces polished.

I then used Meguires aluminum pollish. I applied several coats. The black oxidation will almost go away. I finished with a final coat of Mothers Clifornia Gold Carnauba Cleaner Wax.

If you have convex shaped pieces you can use an angle grinder with a woven wheel.

Always polish in the same direction if posible to achieve the best results. Faster speeds are better for aluminum polishing.

My table had fluted side rails so I had to sand by hand. I started with 120 grit and worked up to 2000 grit before polishing with the buffing wheel. I don't believe it was nescessary because the woven wheel removes material faster than I thought it would.

Good luck and feel free to PM me if you need anything else.
 

goldcrown4

AzB Silver Member
Silver Member
@ chevybob... we gotta talk... this is what I'm dealing with. I've been told now that chroming them will make them nice and shiny, but will also show all the imperfections due to the porosity of old castings. I guess the aluminum wasn't so pure in the 40's ???
 

Attachments

  • IMG_8381 c.jpg
    IMG_8381 c.jpg
    97.1 KB · Views: 2,744

Bigkahuna

It's Good For Your Game!
Silver Member
I have a brother that does aluminum polishing. His stuff looks pretty nice! That stuff looks like it just got a bead blast am I correct?
 

matteroner

AzB Silver Member
Silver Member
@ chevybob... we gotta talk... this is what I'm dealing with. I've been told now that chroming them will make them nice and shiny, but will also show all the imperfections due to the porosity of old castings. I guess the aluminum wasn't so pure in the 40's ???

these probably can be polished to a shine by hand ....you just need to use finer and finer grades of sand paper until you get to a 1000 - 1500 or so then use a steel wool . I would use wet sand paper and water...then use an aluminum polish to finish the job.....

takes forever ...but I took my rims from what yours look like to a reflective almost chrome polish.......

just takes forever but I think it can be done .....
 

goldcrown4

AzB Silver Member
Silver Member
pocket surround castings

@ bigkahuna: As far as I know, the castings were dipped into "Type-III Hardcoat/Class I Natural" anodizing solution. (Exceedingly nice work on your majorly detailed restoration/documentation effort by the way... just got done reading thru ALL of it)

@matteroner: I will be scraping the inside of one of these castings to see how deep I have to go to get back to what looks like aluminum. If I proceed with a DIY polishing effort, that will hint at what grit to start at. I mean, I can polish agates, gems and minerals and alumunim is considerably softer than some of those I work with in my lapidary hobby, so this shouldn't be too difficult conceptually. I don't own a bench grinder though so I can't attach convenient polishing/sanding wheels to it. That might have to change.
---------------------------------
If I get these powdercoated, I hope there's a nice shiny silver (untextured) color available. I've been searching the awesome forums here at AZBilliards trying to find as many photos of powdercoated pockets as I can. Can't really use the GC copper pics to judge by. I don't know exactly what state my pockets are currently in... that is, they "appear" to be ready for some kind of coating because it looks like a smooth, flatter than flat gray color (slightly beige/olive too)... completely sheen free at present. I'm going to continue researching what "chrome/sandblast" looks like before deciding on powdercoating because i've been quoted $243.50 to do all 10 pieces that way (or $487 for chrome that might not turn out the way I hope.)
 

chevybob20

AzB Silver Member
Silver Member
IMG_1414.jpg

IMG_1417.jpg

These are progress pics from my Centennial.

The top picture is two ends on the leg skirts. The one on the right is after using TAL Strip 2. The piece on the left is after using a wire wheel and a scotch bright drum to strip the coating.

The last picture is of the two leg skirt pieces resting on the rail blinds. The rail blinds are untouched. By the way, it took me 20 hours from start to finish, on the long rail blinds each. After the wire wheel, I used sand paper 120, 220, 300, 400, 600, 1000, 1500, 2000 grits. Wet from 220 grit.
Then I used buffing compound followed by a deoxidizing wax (Mothers and Meguires).

As you can see, my castings were fluted. It was very hard to strip and finish. The corners were easier. I just wire wheeled them. I used a finish sander (hook and loom type) with a piece of scotch brite. Then, I used my bench top grinder with a buffing wheel installed. It took one day to finish all four corners. There aren't any side pocket castings on my table.

I'm not sure our castings had the coatings from the factory. They might not be the same quality aluminum. One of my pocket castings was different. The presence of a screw hole for a screw in pocket clued me in. It had slightly more air holes (casting defects) than the others.

I was quoted $900.00 to chrome one long rail blind. I decided that manual was my favorite Spanish friend.:grin:

I suggest using Mark Gregory (perfectpocketz) or Glenn to perform the rail work. If not use a reference from them.
 
Last edited:

chevybob20

AzB Silver Member
Silver Member
Your castings look to be in great shape. Although, its hard to tell from a picture. I'll answer any questions you have on the metal and wood work. The actual table work is best left to the mechs that have experience. I was lucky to work with Mark Gregory on my table.
 

chevybob20

AzB Silver Member
Silver Member
IMG_2026.jpg

IMG_2027.jpg

These are two of my corner castings. I just took these. they haven't been waxed since the table was set up. I took them with the flash off. For some reason the flash makes the bright work look dull.

I had trouble achieving an even finish on the blinds, so I went with a brushed look on them.
 

goldcrown4

AzB Silver Member
Silver Member
centennial polishing

thanks for those photos! wow... you did a great job on those! You are a patient individual. I just wish I had seen your process and photos before I had my castings dipped. I'm reluctant to attempt a DIY polish because they look so different after the recent anodizing compared to how they looked before that.
 

chevybob20

AzB Silver Member
Silver Member
Thank you. I want to see how your castings finish. I think yours will be closer to original. Believe me, last winter was cold in the garage. Thoughts of powder coating were entertained.
 

goldcrown4

AzB Silver Member
Silver Member
castings continued...

@chevybob20 or anyone curious... I'm encouraged to give it a go (DIY polishing). Here's why. One thing I hadn't mentioned is that when my newly anodized castings were returned to me, one of the 45 degree angle fastening brackets had come loose from its weld (a clean break at the weld joint on the back of one of the side-pocket castings) during the dip, or, someone dropped it just right. In any case, I can easily refasten it later, but the point of me mentioning it is because it became a guinea pig for finishing. I let that small bracket (I'll post pics of it tomorrow... don't have my good camera with me) sit in a dish of Drano (foam kind) for about 20 minutes. It came out looking a bit duller than the anodized surfaces.

First thing I did was use a small wire scrubber attached to my Dremel mounted in a drill press accessory. It produced the pure aluminum (silver) appearance I was hoping for, but not smooth of course.

I then proceeded to use an 80 grit aluminum-silicate based sandpaper attached to a Rotozip tool to smooth that same flat surface and it removed almost all of the deeper imperfections. I only had 220 grit besides the 80 in the same sandpaper type and it did an amazing job. I can only expect better and better results going with a proper series of grits, and finishing with 0000 steel wool.

After each of the three surfaces were done this way, I tried the Dremel polish paste on one face, and though the surface was smoother, it did not have significant more luster. I tried Mother's Aluminum Polish paste and it produced better results. Polishing wheels on the dremel were used in both cases. Again, going thru the proper grit sequence should result in excellent result. I even have cerium oxide for my stone polishing, and might experiment with it on the aluminum. Wishing I had tin oxide instead, but cerium I have plenty of.

I'll post photos of the bracket tomorrow, but my next step is to get more Drano (but I think I'll just use the regular stuff, no gel, or foam) and dilute as little as possible to de-anodize the larger pieces, hopefully two at a time or more. I wonder how long I can leave the pieces in there... I mean, the longer the better??? I don't think 15-20 min is long enough to soak thru those old castings, especially for the pieces that are much larger than that small angle bracket.
 

goldcrown4

AzB Silver Member
Silver Member
castings continued and a few other pics

I'm posting a few photos I took this morning. Hopefully they will show a clear difference between the treated aluminum described in my previous post and my sanding efforts.
 

Attachments

  • CRW_8391.jpg
    CRW_8391.jpg
    86.6 KB · Views: 2,527
  • CRW_8397.jpg
    CRW_8397.jpg
    92.8 KB · Views: 2,450
  • CRW_8399.jpg
    CRW_8399.jpg
    85.2 KB · Views: 2,561

goldcrown4

AzB Silver Member
Silver Member
circa '46 Anniversary serial number and nameplate

Photo of nameplate and inside of rail apron (serial number). I'm hoping someone can tell me a more precise year this table was born. "BB/3107 79560 9 FT MOD D-C".

The third photo shows one of the small skirts that attaches next to the ball catch. You'll see it is missing the lower strip of wood. The missing pieces will need to be crafted or I can get new ones from Ken at Classic Billiards.
 

Attachments

  • CRW_8400.jpg
    CRW_8400.jpg
    98 KB · Views: 3,000
  • IMG_8401.jpg
    IMG_8401.jpg
    98.1 KB · Views: 2,742
  • IMG_8403.jpg
    IMG_8403.jpg
    90.8 KB · Views: 2,639

Oregonmeds

AzB Silver Member
Silver Member
I just finished up the legs and castings for a gold crown that were super ugly, painted and scratched to hell and stained with old floor wax etc using some wet sanding disks left over from installing our marble and granite flooring and countertop tiles. (I didn't use them on the grinder, just by hand)

The boxes contained 80, 120,240,320,400,500,600 grits and I used them all in series like you're supposed to. Worked out beautifully. Once you use the 80 to get through the hard plating on top then it gets really pretty easy for all the subsequent grits. But it is just time consuming. Did the 80 grit in the sink under running water, took a lot of elbow grease, then just brought a bucket of water out to leisurely do the rest in front of the tv one piece each night.

That's all I had to do, 600 sounds like not enough and probably wouldn't be with other material but with this it was fine then I just hand polished with simichrome metal polish and they turned out perfect, better than brand new.
Finished them with some old school car turtle wax after metal polish to keep them from oxidizing.

I'm not even sure all those grits were really necessary. Aluminum seems very forgiving and easy to work with compared to when I polished all the granite, and I think being fairly soft I could have probably skipped a few grits in that box. You'll really notice a difference from the nickel plating hardness to the aluminum beneath and it's visually obvious too.

I could have gone further with higher grit and gotten even more of a chrome like perfect show quality shine but that's all I had on hand and the original finish wasn't this good anyway, they were brushed nickel originally. Plus I don't have as nice a table as you guys and this will get some heavy regular use that would ruin a mirror shine soon enough anyway so I didn't see it worth going that far.

One trick I learned is that if you need to fill any deep nicks or gouges or voids in the metal from the old casting process you can just use a handheld propane torch and silver solder or regular solder exactly like what's used for plumbing.
 
Last edited:

goldcrown4

AzB Silver Member
Silver Member
more progress on the castings

@oregonmeds... that last tip could come in handy... I would not have thought of that at all. thanks for the post!

@ all:
I used about 6 tablespoons of crystal Drano mixed with enough water to submerge the two side pocket castings. I had them on wires for frequent inspection. As advertised, Drano makes quick work in its de-anodizing chemical reaction thanks to the sodium hydroxide (which is found in other common household agents). About 20 min of soaking, some agitating here and there and ta-da... they came out charcoal gray. I then took a wire wheel accessory attached to my Dewalt elec drill, and proceeded to speedily clean the surface, though it did leave brush marks, but at least I was getting somewhere... a nice consistent silvery color with low sheen. Next I went to a 120 grit 5" sandpaper attached to a padded backing/drill accessory. It did a remarkable job on its own, but I begrudgingly stepped up to 220, then leaped to 600 alum oxide wet/dry paper, just to see its effect. Somewhere in todays hardware store browsing, I forgot to get 400 grit. I then applied Mother's alum mag polish, and did a quick terry cloth buff by hand to get an idea of how these ALL are going to look.

I remain highly encouraged by the results thus far. The challenge I'm having is the drill attachment being 5" diameter. Though the grit is stuck to a padded backing, I can't get it to flex over a broader area on the curved surfaces. I think what I need is simply sponge/padded blocks of sandpaper, but hard to find them in all the needed grits. I'll post pics of the continued progress tomorrow.
 

Oregonmeds

AzB Silver Member
Silver Member
No problem, just don't blast it with too much heat in one spot or cook any little area so much that you discolor the metal, heat it somewhat evenly and only what you need to melt the solder. I used a large flame on the back of the casting, working it around and closer to the piece that needed repair until the solder melted on the front.

And the sanding disks I used were thick enough to not show fingermarks in sanding, but thin enough to conform to all the shapes. I didn't use any power tools or hard blocks to sand or it would have changed the profile and left flat spots or something. You could probably just wrap the sandpaper you have around a thin flexible plastic or something.

I knew how to polish and repair aluminum scratches from watching so many motorcycle and car restoration shows, and then restoring a few bikes myself. You can probably find videos of this process on youtube if you haven't seen it done before. Often called brazing aluminum. You can get actual brazing rod for aluminum at a weld shop but I just made due with the solder I already had.
 
Last edited:

goldcrown4

AzB Silver Member
Silver Member
castings continued...stark contrasts and streaks

For those that had to scroll to see the enormous photos from yesterday...apologies. I've resized these new ones to a good proportion (from 8x12 to 5x7).

In each of the following photos, there is a reference image showing one casting that has not been de-anodized. Some people might actually like the way that looks as its relatively smooth, and consistent in color, but this is not the way Anni's or Centennials were intended to look.

In the first photo, the curved portion is not sanded, but shows what a wire brush on a drill will do. De-anodizing and brushing will make the castings look like metal again.

In the second photo, the curved portion is streaky due to the ridgidity of the power tool attachment. It is quite apparent it does not flex enough so I need sponge-type blocks for even pressure on the bends.

In the third photo, just highlighting the stark contrast from not a tremendous amount of effort.

Each photo where there is shine, was sanded using 120, 220, then 600 and includes a single dose of Mother's Aluminum Mag polish, which made the surface smoother to the touch, but did not signifianctly enhance overall sheen. I did not have 400 grit (error noted late last night). I do have 1500 and will give it a test run, but due to the natural imperfections of the old porous castings, I don't know if it's worth doing. I figure the results will end up looking just like the chrome shop told me... nice and shiny but with all the imperfections jumping out at you. For a perfect sheen, I'd have to sand every scratch and pit out. At 600 I'm getting very desirable results, and I haven't even used the buffing wheel yet. The castings still look like they're from the 1940's but with no oxidation.
 

Attachments

  • CRW_8416 r.jpg
    CRW_8416 r.jpg
    56.3 KB · Views: 1,102
  • CRW_8417 r.jpg
    CRW_8417 r.jpg
    57.9 KB · Views: 1,101
  • CRW_8414 r.jpg
    CRW_8414 r.jpg
    66 KB · Views: 1,110
  • CRW_8412 r.jpg
    CRW_8412 r.jpg
    46.4 KB · Views: 1,088

Oregonmeds

AzB Silver Member
Silver Member
Nice job, huge difference. I still don't get how that finish you had was supposedly electroplating, just looks sandblasted.

Is that just what they look like after stripping with drano? I've never heard of or seen that process so I don't know.

I think you should go a bit deeper with the 80 grit or whatever your largest grit is on the next one though. You won't need to take that much material off to get past that uneven layer and it would look better still. The thickness of the castings will still be fine, they're thicker than the rails anyway, if you reconnect them to see all the thickness you have to work with you'll see what I mean.

Almost looks flat enough to just use an orbital sander on the top to make that quick and easy.
 
Top