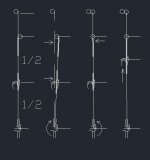
New CP2CP Pivot

LAMas

AzB Silver Member
Silver Member
For those that have followed my other threads, this is similar and more parsimonious::wink:

New aiming method inspired by AtLarge;
This is Powerpoint so some objects are not placed exact.

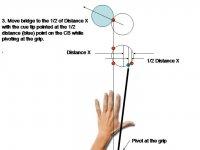
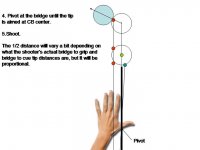
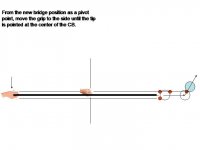
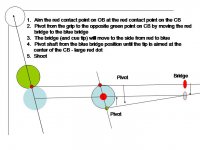
At step 1, 2, 3 and 4 Place the bridge 1/2 way between the tip and grip.
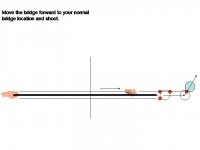
At step 5 slide the bridge forward to your normal shooting position.

CP2CP PIVOT.jpg

Bridge and grip up close to the CB:


cp2cp2p close.JPG

Bridge and grip farther apart slide the bridge up to normal:


c2c p.JPG


Have fun.
 
Last edited:

AtLarge

AzB Gold Member
Gold Member
Silver Member
Whoa. If I am understanding what you are saying, I may have inspired you into something that won't work well. I think the first pivot (step 2 in post #1) will be too large in many cases and will result (after the second pivot) in too thick of a hit. In other words, the stick will wind up on a shot line that is not parallel to the line in your step 1 (the line through the two contact points).

[This should be easy to see if you set up a real thin cut. In that case, your first pivot is moving the tip nearly the full width of the CB and putting the new bridge point past where it needs to be.]
 

AtLarge

AzB Gold Member
Gold Member
Silver Member
LAMas -- I see you edited post #1 today so that the first pivot (pivoting from the back hand by moving or deforming the front hand) is now done with the front hand much farther from the tip than a normal bridge length. Then you slide the front hand forward to the normal bridge length after the second pivot. That certainly addresses my point in post #2 about the lateral bridge shift being too large if the front hand is at a normal bridge length.

Nice work! I wonder how good of an approximation it is, i.e., how close it comes to geometrically correct, for all cut angles with a back-hand grip of various lengths like 45", 50", 55".

If anyone is reading this thread and wondering what the heck it's all about, here's a little explanation. In contact-point-to-contact-point (CP2CP) aiming for cut shots, one normally just visualizes the line or vertical plane running through the two contact points (or, equivalently, cutting off equal-but-opposite portions of the two balls) and then aligns the cue stick through CB center, parallel to the plane or line through the contact points.

So the cue may not ever really be on the line through the contact points. But some people have a bit of a problem placing the stick parallel to that line, because the shooter can look down only one line at a time -- the line through the contact points or the line through center CB.

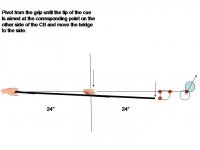
So this thread (and others in the past) is talking about trying to put the cue stick on the shot line through center CB with two pivots, the first one pivoting around the back-hand grip and the second one pivoting around the front hand "V." I've likened it to "parallel parking" the cue stick on the shot line.

Yes, this is kind of awkward in actual operation. Better to just go directly to the shot line through center CB if you can. Or even use a shot line through the two contact points; that works well in many instances. Or align the stick through the two contact points and then make just one pivot (with the front hand, around the back hand) back to center CB or even just part way to center CB. This last way isn't geometrically correct, but will still work for many shots.

There are many ways to try to skin this cat. A double-pivot method is kind of neat, and may even work well for some.
 

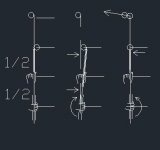
LAMas

AzB Silver Member
Silver Member
LAMas -- I see you edited post #1 today so that the first pivot (pivoting from the back hand by moving or deforming the front hand) is now done with the front hand much farther from the tip than a normal bridge length. Then you slide the front hand forward to the normal bridge length after the second pivot. That certainly addresses my point in post #2 about the lateral bridge shift being too large if the front hand is at a normal bridge length.

Nice work! I wonder how good of an approximation it is, i.e., how close it comes to geometrically correct, for all cut angles with a back-hand grip of various lengths like 45", 50", 55".

If anyone is reading this thread and wondering what the heck it's all about, here's a little explanation. In contact-point-to-contact-point (CP2CP) aiming for cut shots, one normally just visualizes the line or vertical plane running through the two contact points (or, equivalently, cutting off equal-but-opposite portions of the two balls) and then aligns the cue stick through CB center, parallel to the plane or line through the contact points.

So the cue may not ever really be on the line through the contact points. But some people have a bit of a problem placing the stick parallel to that line, because the shooter can look down only one line at a time -- the line through the contact points or the line through center CB.

So this thread (and others in the past) is talking about trying to put the cue stick on the shot line through center CB with two pivots, the first one pivoting around the back-hand grip and the second one pivoting around the front hand "V." I've likened it to "parallel parking" the cue stick on the shot line.

Yes, this is kind of awkward in actual operation. Better to just go directly to the shot line through center CB if you can. Or even use a shot line through the two contact points; that works well in many instances. Or align the stick through the two contact points and then make just one pivot (with the front hand, around the back hand) back to center CB or even just part way to center CB. This last way isn't geometrically correct, but will still work for many shots.

There are many ways to try to skin this cat. A double-pivot method is kind of neat, and may even work well for some.

AtLarge,

When I posted this thread, I was at home and my laptop only has crude PowerPoint and the grip fell off of the page (LOL), but the concept looked OK but I needed to get to work and on Acad to prove that the same and similar Isoseles triangles created by the points of aim and pivots would work in all cases. I can diagram many angles but for whom - trust me? LOL. Like it even works for straight in shots. It does become awkward when the CB is against the rail and the first bridge location is off the table.

I was looking forward for a peer review and I thank you for inspiring me to spend the time to develop and diagram the CP2CP2Pivot System more accurately. LOL

It is but a beginners tool for those that want and grasp it after which the points and pivots become academic when the visuals might take over after HAMB with it.

Be well.
 

CueAndMe

AzB Silver Member
Silver Member
I look forward to trying this, LAMas. Even if it works for only ultra thin cuts, it would be very useful.
 

CueAndMe

AzB Silver Member
Silver Member
I tried it on my table, and sadly I didn't find it useful. I found that with a separation of about 3 diamonds between cue ball and object ball and a bridge hand at a very long 30" it did come close, but that's a lot of accommodation, especially considering that if you can see the contact points in the first place, there are easier ways to get there. :)
 

LAMas

AzB Silver Member
Silver Member
I tried it on my table, and sadly I didn't find it useful. I found that with a separation of about 3 diamonds between cue ball and object ball and a bridge hand at a very long 30" it did come close, but that's a lot of accommodation, especially considering that if you can see the contact points in the first place, there are easier ways to get there. :)

Thanks for trying. It should work for all separations greater than 1 diamond.
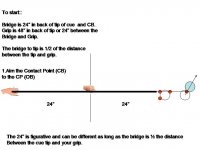
The geometry is predicated on the bridge hand 1/2 way between the cue tip and your normal gripping spot on the cue butt.

You say that you tried it with the first location of your bridge at 30" behind the cue tip and CB - is that correct?

That means that you did or should have gripped the butt back 60" behind the cue tip - is that correct? That would put the bridge 1/2 the distance between the cue tip and where you grip the cue on the butt. That would match the diagrams. Some cues are only 59" long.

You have very long arms to grip the butt 60" behind the cue tip.

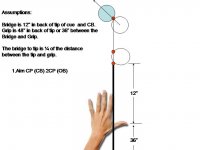
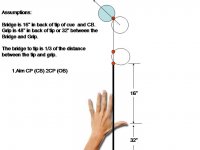
For me, I grip the butt about 48" (4 feet) behind the tip (on the wrap) so my initial bridge is 24" (2 feet) behind the tip or 1/2 way between the grip and the tip.

After the pivot with the tip aimed at the center CB, I slide my bridge forward until it is about 12" (1 foot) behind the tip which is my normal bridge distance behind the tip for shooting.

I am sorry that the system didn't work that well for you but the geometry as diagramed is correct but I agree that 2 pivots are not parsimonious.

It works for me.

Have fun....with another system.
 
Last edited:

CueAndMe

AzB Silver Member
Silver Member
Yup. It looks like the geometry does work. I find it extremely hard to implement, but it should work if a person can somehow add up all the visualizations and precisely go through all of the motions.
 

LAMas

AzB Silver Member
Silver Member
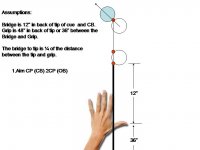
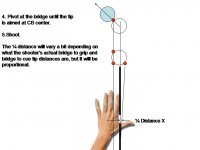
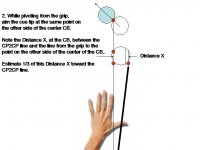
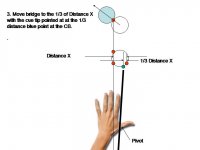
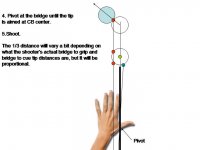
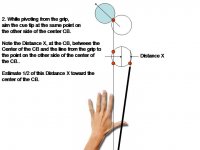
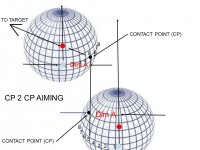
Perhaps this will be easier for some users to try:

Slide1.JPG

Slide2.JPG

Slide3.JPG

Slide4.JPG

Have fun.

It occurs to me that the pre-pivot aiming point could be 1/4 the distance from the CCB to the second aim point (opposite the contact point on the CB)
I will diagram that soon.

More fun to come.
 
Last edited:

LAMas

AzB Silver Member
Silver Member
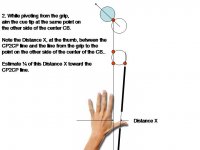
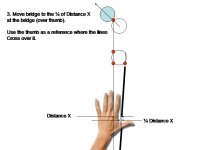
Aiming the tip at points on the CB Pre-pivot (1) is more parsimonious:

Slide1.JPG
Slide2.JPG
Slide3.JPG
Slide4.JPG

CP2CP Pivot 1Capture.JPG


Have fun
 
Last edited:

AtLarge

AzB Gold Member
Gold Member
Silver Member
Post #11 -- the words for the definition of Distance X in Step 2, and the diagram of it, do not agree.
 

LAMas

AzB Silver Member
Silver Member
Post #11 -- the words for the definition of Distance X in Step 2, and the diagram of it, do not agree.

AtLarge,

Thanks for the correction. I was interested in your earlier comment about moving the bridge hand a little bit (distance) to the side. So I wondered what that little bit was for a very thin cut. All other moves to the side would be smaller for other thicker angles.

I will correct the PowerPoints. I will prove it out on Acad today.

Thanks again for you interest and help.
 
Last edited:

duckie

GregH
Silver Member
So, this is a center ball only system then?

What if I need to use high inside to put the CB where I need for the next shot?

Pivot works how in this case?

This shows that all systems discussed here leave out one vital aspect of pool.....position for the next shot.....which requires the use of spin, which no system can deal with.

Running balls ......meaning making one, then another, then another and so on. Yet this aspect is never taken into account by aiming system designers.

It's always one shot only that is considered.
 

LAMas

AzB Silver Member
Silver Member
So, this is a center ball only system then?

What if I need to use high inside to put the CB where I need for the next shot?

Pivot works how in this case?

This shows that all systems discussed here leave out one vital aspect of pool.....position for the next shot.....which requires the use of spin, which no system can deal with.

Running balls ......meaning making one, then another, then another and so on. Yet this aspect is never taken into account by aiming system designers.

It's always one shot only that is considered.

duckie,
Hi.
You are correct and what you are asking is too large of a problem that has been discussed in other threads - you know that. What good is shape if you miss the shot?
I do this for fun and it's free.

Be well.
 

LAMas

AzB Silver Member
Silver Member
If you can move your bridge back 16" from the cue tip, then a 1/2 point can be used instead of a 1/3 point depicted in the earlier diagrams.

1/2 is easier to visualize than 1/3 for me.

Slide1.JPG

Slide2.JPG

Slide3.JPG

Slide4.JPG

Have fun.
 

LAMas

AzB Silver Member
Silver Member
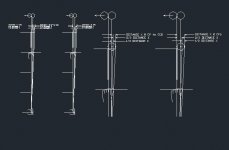
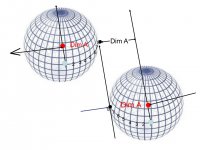
More diagrams to illustrate the CP2CP Pivot System that is based on complementary isosceles triangle geometry.

Slide1.JPG

Slide2.JPG

Slide3.JPG

Slide4.JPG

Have fun
 
Last edited:

Low500

AzB Silver Member
Silver Member
I've never seen any pool balls that look like these in your posts with all those little squares and numbers and stuff.
Where did you buy those?
 
Top