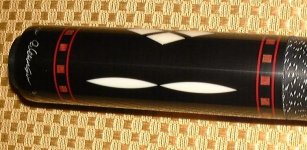
I just had someone bring me a cue made by a name cuemaker for a tip. After he left I got to looking at the joint ring design. It is black phenolic with two thin silver rings and some star like inlays cut through the rings. I pulled out my loupe for a closer look and I could not believe what I saw. It is hard to tell but the silver rings are either painted on or pinstripes. They are defiantly not actual rings. Like I said this cue was bought from a name cue maker. Has anyone ever seen this before? I have seen a lot of magic marker touch up to make say points even on cues. I never saw something like this before though or if I had must not have realized it was not a real ring. It does look nice and you would have to examine it as close as I did do not be fooled.
You are using an out of date browser. It may not display this or other websites correctly.
You should upgrade or use an alternative browser.
You should upgrade or use an alternative browser.
Painted on ring
- Thread starter macguy
- Start date
hey macguy
a couple of years ago a player brought me a brand new cue from a widely known american cue manufacturer, he wanted the finish completely removed from the cue. said he liked the feel of bare wood. in the course of removing the finish the butt cap disappeared, it was black paint. there is some pretty crummy stuff out there.
a couple of years ago a player brought me a brand new cue from a widely known american cue manufacturer, he wanted the finish completely removed from the cue. said he liked the feel of bare wood. in the course of removing the finish the butt cap disappeared, it was black paint. there is some pretty crummy stuff out there.
Just out of curiousity, why is it that people don't post the names on a thread like this? If someone is doing something dishonest and misrepresenting their cues then they should be called out on it; not to mention that the consumer should be made aware of such things.
Rackin_Zack said:Just out of curiousity, why is it that people don't post the names on a thread like this? If someone is doing something dishonest and misrepresenting their cues then they should be called out on it; not to mention that the consumer should be made aware of such things.
I was not looking to knock someone just asking a question. He just uses pinstripe or paint as a decorative thing nothing wrong with that. The work is beautiful just not what I thought it was. Most of the cuemakers use tricks like tinted epoxy to make the inlay look tighter then it is. Some look like the inlay is just floated in and the pocket isn't even close but that is what they do. I will say the majic marker fixes I have seen were on Joss cues as well as some others. One Joss I saw they had all but painted on 1/2 inch of two of the points to get them even. Once the finish is on it is almost impossable to tell.
I'm curious to know who it is....
If I'm ordering a cue and I request some ringwork, I'd expect to get just that, not painted on rings....
To me, this is the equivalent of asking for a 4 point cue w/ veneers and actually receiving a cue that has overlay/stickers instead of real points.
It's deceptive.
If I'm ordering a cue and I request some ringwork, I'd expect to get just that, not painted on rings....
To me, this is the equivalent of asking for a 4 point cue w/ veneers and actually receiving a cue that has overlay/stickers instead of real points.
It's deceptive.
1pRoscoe said:I'm curious to know who it is....
If I'm ordering a cue and I request some ringwork, I'd expect to get just that, not painted on rings....
To me, this is the equivalent of asking for a 4 point cue w/ veneers and actually receiving a cue that has overlay/stickers instead of real points.
It's deceptive.
How do you make the leap to the idea the guy is deceiving anybody? Maybe he sold cue and told the owner it has hand done silver lief rings as well as ivory. I don't own the cue, what would be the point of me saying the guys name?
1pRoscoe said:You're right.......................................
If the owner of the cue requested rings and this is what he received, it's deceptive.
If the owner of the cue doesn't know any better, it's not, I guess.....
The cue was bought at valley Forge as a finished cue and I could care less what the owner and the maker talked about. I just asked a question if anyone had seen this before.
macguy said:I just had someone bring me a cue made by a name cuemaker for a tip. After he left I got to looking at the joint ring design. It is black phenolic with two thin silver rings and some star like inlays cut through the rings. I pulled out my loupe for a closer look and I could not believe what I saw. It is hard to tell but the silver rings are either painted on or pinstripes. They are defiantly not actual rings. Like I said this cue was bought from a name cue maker. Has anyone ever seen this before? I have seen a lot of magic marker touch up to make say points even on cues. I never saw something like this before though or if I had must not have realized it was not a real ring. It does look nice and you would have to examine it as close as I did do not be fooled.
Mac,
I have seen similar rings in Mcdaniel and Mottey cues. Where this star or inverse diamond is in the ringset. When you loop it it looks like the ring ends before the inlay. I have never thought either was pinstriping since they both use ivory or silver for the rings. I have always thought it was an oversize pocket cut filled with epoxy that made the ring look strange.
Joe
classiccues said:Mac,
I have seen similar rings in Mcdaniel and Mottey cues. Where this star or inverse diamond is in the ringset. When you loop it it looks like the ring ends before the inlay. I have never thought either was pinstriping since they both use ivory or silver for the rings. I have always thought it was an oversize pocket cut filled with epoxy that made the ring look strange.
Joe
I think you helped solve the mystery. I took another look at it using a microscope I got from Radio Shack a while ago. It is 100 power, loupe's are only 10 power. Usually it is useless for looking at cues because it blows things up too much. When I first looked at it with the 10 power loupe you can see that the paint is floating above the inlay where it slightly overlaps the inlay and is on top of at least some of the finish before the final coats of finish were applied. Under the 100 power scope you can see that the paint ends just after it covers the silver ring, you can see the edge of the paint stripe. What the maker has done is touch up the epoxy filled gap made by the pocket (Just as you described) with a little bit of silver paint to hide it. It is very well done and if I had not looked at it with a loupe it can't be seen. It is sort of like when you see the magic marker touch ups on some cues in an attempt to make something to look more perfect. I don't know if this is a good thing or a bad thing, most people don't expect the cue to be perfect but if the gap was visible to the eye I guess it may have looked pretty bad so that is what the maker did. thank you for the clue.
about 7 years ago while living in augusta ,ga i had the opportunity to be exposed to many nice cues......of all the cues i saw the one that sticks out in my mind was a very beautiful cue made by a very well named cuemaker.....the cue was gorgeous especially the gold veneer outlining the ivory points......upon closer inspection with a magnifying glass you could tell that i was not a veneer but instead it was gold foil that was meticulously applied on the cue......didnt change my thought about how great a cue it was......just blew my mind that a cuemaker would do the foil job and make out like it is a gold venner.......all in all the cue is stlii a mind blowing cue.....juston
We're not gonna name names now are, we on makers who use black resin or phenolic disguised as gaboon ebony? LOL
I would think pretty much everybody does it, (the tinted epoxy I mean)JoeyInCali said:We're not gonna name names now are, we on makers who use black resin or phenolic disguised as gaboon ebony? LOL
macguy said:I would think pretty much everybody does it, (the tinted epoxy I mean)
Is there any other way to get sharp inlays other than using tinted epoxy? What about in something light like maple or such?
Rackin_Zack said:Is there any other way to get sharp inlays other than using tinted epoxy? What about in something light like maple or such?
There is no getting away from the radis of the cutter. You have to just cut the pocket to tightly fit all the sides of the inlay and hand cut out the pointed parts. It's not as hard as you would think just takes a little time.
Corners can be cut/knifed perfect, but depends on the shape of the inlay, and takes some practice to aquire the skill at that level. Some are alittle tougher to knife in. For instance, seems as if points with straight lines are easier to cut the corners in on, some inlays that have a curve in them are alittle harder to do. Sometimes dyes are used, but not usually to cover up anything major. The materials you are knifing can play into It also, some materials are easier to knife in then others. Sometimes inlays can go in, and fit nice and tight, but still have the slightest bit of glueline in the end, so some prefer to outline in black inlay, and use a died epoxy to glue them in just to be safe. It's nothing more then tools of the trade.
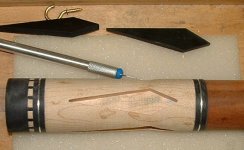
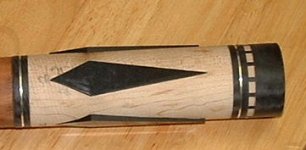
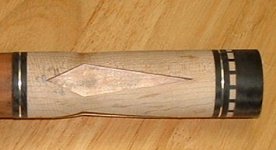
Here is an example to give an idea, the cue pictured is just a basic house cue conversion I was practicing on, but gives an idea. These somewhat simple inlays did not need the dye, but It was used after the pics were taken just to be safe. sorry have not turned It down yet, so don't have the finished pic. The second picture shows the pocket after being cut with a pantomill, and still has round points/tips. The first picture is after being knifed in to sharpen the corners. The third is the inlays fitted to the pocket, but unglued. As you can see, they probably would be fine without the dye, but made more since to use It to be safe, and since it was black anyway it was used when they were later glued in, just as a safety precaution on this one. Notice the straight lines on this inlay- That makes It easier to knife the corners in IMO. To give credit where due, Chris was kind enough to sell me the pattern for this, It was close to what I wanted anyway, and made more since to get It from him then to make My own being It was almost identical to what I wanted in this design. His patterns work very well. I have others I made Myself that have curved lines going to a point as oppossed to the straight, and they are alot harder to knife the corners in on.
I just wanted to clear the air on the dye issue, so people don't get the wrong idea about what makers are doing this for. Most do not fill any huge gaps with It, in fact probably don't even need It in most cases. The inlays still fit tight, just like one would expect. I am just a rookie to alot of makers standards, but even I did'nt really need the dye here, just alittle extra assurance for Me to be safe, since it was in black anyway.
Greg
Attachments
Last edited:
macguy said:There is no getting away from the radis of the cutter. You have to just cut the pocket to tightly fit all the sides of the inlay and hand cut out the pointed parts. It's not as hard as you would think just takes a little time.
I've recently started using a tool change in my CNC pocketing. I cut my pockest with a 1/32" cutter which is pretty standard, but then I change to a 1/64" cutter and run an additional program which sharpens the tips. I've found that the 1/64" cutters are smaller than the thickness of the exacto knife blades and will give at least as sharp of points as the razor cut ones. Hopefully you can see what I mean from the attached pic.
just more hot air!
Sherm >> Oh BTW, no black epoxy necessary or used on this!