Billiard University (BU) playing-ability-exam scores and ratings

Anybody plan to practice the BU Exams this weekend?

I look forward to seeing the results from all of the people who said they would post scores and/or videos. I don't want to list all of the users, but you know who you are.

Good luck with your practice and the exams,
Dave

Please try the free Billiard University (BU) playing-ability exams to assess your game and monitor improvement over time. Your BU score gives you a player rating and can qualify you to earn a diploma (Bachelors, Masters, or Doctorate of Pool). All of the exam documents (with well-illustrated shot diagrams) and score sheets needed to take the exams and track your progress are available on the BU Exam Resources Page.

The following videos provide complete demonstrations of all exam drills, along with how to score them:
BU Exam I Overview - demonstrations and scoring of the Fundamentals Exam
BU Exam II Overview - demonstrations and scoring of the Skills Exam

Please post your score after you take the exams so I can add your results to the list above. Also, if you have a video camera, please film and post videos for your exams. Instructions on how to do this can be found in the BU Exam Instructions document, and the following videos demonstrate each step in the process:
Video Recording - recording official exam runs for on-line submittal
Video Submittal - uploading videos and applying for a diploma

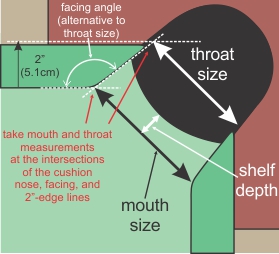
With your BU score, please also report your table size and corner pocket info shown in the following diagram:

table_pocket_measurements.jpg

Also please try the 10-ball "playing the ghost" drill so we can see how well a practiced BU score compares to an average "playing the ghost" score. I recommend doing the ghost drill 3 or more times (10 racks of 10-ball each) and using the middle (median) value of the 10-rack scores to help deal with the inherent (and sometimes extreme) variability.

Thank you for participating,
Dave
 
I finally got around to practicing and re-filming Exam II. I got a 68 out of 77 in the Masters-level exam. I improved a lot on the safeties and banks, but I lost a few easy points on the 9-ball and 8-ball patterns. Here's my latest, with my previous Exam I (74):

142 -- dr_dave -- adv-3 (A+/A), 54 (B+) -- table: 8', 4 3/4", 4 1/8", 1 3/8" -- Exam I, Exam II

I'm sure I can do a little better on both Exam I and Exam II, but it will take some more practice and lots of focus.

In the next few days, I plan to see how high I can score on both exams on a Valley "bar box."

I also hope to spend time soon practicing and filming the exams on a Gold Crown.

I also plan to run through the 10-ball ghost drill again soon to see if all of this practice has helped my run-out game.

Here's the latest:

List of AZB'ers who have taken the BU playing-ability exams so far (in ranked order):

BU score -- Username -- BU Rating, 10-ball ghost rating -- table: size, corner pocket mouth, throat, shelf -- Video links (if available):

168 -- Gerry Williams -- semi pro (A++/AAA), 73 (Pro) -- table: 9', 4 1/2", 4", 1 7/8" -- Table Specs, Exam I (part 1, part 2), Exam II (part 1, part 2, part 3)
161 -- Gerry Williams -- semi pro (A++/AAA), 73 (Pro) -- table: 9', 4 1/2", 4", 1 7/8" -- Table Specs, Exam I (part 1, part 2), Exam II (part 1, part 2, part 3)
160 -- scottjen26 -- semi pro (A++/AAA), 64 (A+) -- table 9', 4 1/2", 3 7/8", 1 1/2" -- Exam I (part 1, part 2), Exam II (part 1, part 2, part 3)
159 -- Gerry Williams -- adv-3 (A+/A), 73 (Pro) -- table: 9', 4 1/2", 4", 1 7/8" -- Table Specs, Exam I (part 1, part 2), Exam II (part 1, part 2, part 3)
157 -- scottjen26 -- adv-3 (A+/A), 64 (A+) -- table 9', 4 1/2", 3 7/8", 1 1/2" -- Exam I (part 1, part 2), no Exam II video yet (see AZB post)
156 -- Gerry Williams -- adv-3 (A+/A), 73 (Pro) -- table: 9', 4 1/2", 4", 1 7/8" -- Table Specs, Exam I (part 1, part 2), Exam II
149 -- scottjen26 -- adv-3 (A+/A), 64 (A+) -- table 9', 4 1/2", 3 7/8", 1 1/2" -- Exam I (part 1, part 2), Exam II
148 -- Neil -- adv-3 (A+/A); 60 (A) -- table: 7', 4 1/8", 2 7/8", 1 3/8" -- Exam I (part 1, part 2), Exam II (part 1, part 2)
142 -- dr_dave -- adv-3 (A+/A), 54 (B+) -- table: 8', 4 3/4", 4 1/8", 1 3/8" -- Exam I, Exam II
141 -- 12squared (Dave Gross) -- adv-3 (A+/A); 78 (Pro) -- table: 9', 4 7/8", 4 1/8", 1 1/2" -- no videos (see AZB post)
141 -- Neil -- adv-3 (A+/A); 60 (A) -- table: 7', 4 1/8", 3 1/2", 1 3/8" -- Exam I (part 1, part 2), Exam II (part 1, part 2, part 3)
135 -- Mooneye -- adv-2 (A-/B+), 49 (B) -- table: 7', 4 7/8", 4 1/8", 1 5/8" -- Table Specs, Exam I, Exam II
135 -- dr_dave -- adv-2 (A-/B+), 54 (B+) -- table: 8', 4 3/4", 4 1/8", 1 3/8" -- Exam I, Exam II
133 -- Mooneye -- adv-2 (A-/B+), 49 (B) -- table: 7', 4 7/8", 4 1/8", 1 5/8" -- Exam I, Exam II
132 -- Gerry Williams -- adv-2 (A-/B+), 73 (Pro) -- table: 9', 4 1/2", 4", 1 7/8" -- Table Specs, Exam I, Exam II (part 1, part 2)
132 -- BRussell -- adv-2 (A-/B+), 51 (B+) -- table: 8', 5", 4 1/4", 1 1/2" -- Exam I, Exam II
127 -- Okie --adv-2 (A-/B+), 61 (A+) -- table: 9', 4 3/4", 4", 1 1/2" -- Table Specs, Exam I, Exam II
127 -- Mooneye -- adv-2 (A-/B+), 49 (B) -- table: 7', 4 7/8", 4 1/8", 1 5/8" -- Exam I, no Exam II video (see AZB post)
124 -- JC -- adv-1 (B/B-), 57 (A) -- table: 9', 4 7/16", 3 7/8", 1 3/8" -- Table Specs, Exam 1, Exam 2
121 -- TheOneGnat -- adv-1 (B/B-), 51 (B+) -- table: 8', 4 1/2 in, 4 in, 1 5/8 in -- no videos (see AZB post and the update)
119 -- Mooneye -- adv-1 (B/B-), 49 (B) -- table: 7', 4 7/8", 4 1/8", 1 5/8" -- Exam I, Exam II
117 -- RobMan -- adv-1 (B/B-), 46 (B) -- table: 9', 5", no throat yet, 1" -- no videos (see AZB post)
112 -- Okie -- adv-1 (B/B-), 61 (A+) -- table: 9', 4 3/4", 4", 1 1/2" -- Table Specs, Exam I, Exam II
112 -- RobMan -- adv-1 (B/B-), 46 (B) -- table: 9', 5", no throat yet, 1" -- no videos (see AZB post)
108 -- row21097 -- int-3 (B-/C+), 57 (A) -- table: 9', 4 1/2”, 4”, 1 1/2” -- Table Specs, Exam I (part 1, part 2, part 3), Exam II (part 1, part 2, part 3)
102 -- Okie -- int-3 (B-/C+), 52 (B+) -- table: 9', 4 3/4", 4", 1 1/2" -- Table Specs, Exam I, Exam II
101 -- 67tbird -- int-3 (B-/C+), 46 (B) -- table: 8', 4 1/4", 4", 1 1/2" -- no videos (see AZB post)
98 -- Eagleshot -- int-3 (B-/C+), 48 (B) -- table: 9', 4 1/2, 4", 1 1/4" -- no videos (from PM)
92 -- 67tbird -- int-2 (C+/C), 34 (D+) -- table: 8', 4 1/4", 4", 1 1/2" -- no videos (see AZB post)
90 -- EagleEye -- int-2 (C+/C), no 10-ball ghost score yet -- table: 9', 5", 3 7/8", 1 3/8" -- administered at the 2013 BU Summer School Boot Camp
88 -- DrGonzo -- int-2 (C+/C), 47 (B) -- table: 9', 4.5", 4", 1.5" -- no videos (see AZB post)
87 -- iusedtoberich -- int-2 (C+/C), 38 (C) -- table: 9', 5 1/8", 4 1/8", 1 1/2" -- Table Specs, Exam I, Exam II
78 -- iusedtoberich -- int-2 (C+/C), 38 (C) -- table: 9', 5 1/8", 4 1/8", 1 1/2" -- Table Specs, Exam I, Exam II
77 -- mamics --int-2 (C+/C), 20 (D) -- table: 9', 4 5/8", 3 13/16", 1 1/4" -- no videos (see AZB post)
77 -- SeanChamp -- int-2 (C+/C), 29 (D) -- table: 8', 4 1/2", no throat yet, 1" -- no videos (see AZB post)
62 -- mamics -- int-1 (C), 20 (D) -- table: 9', 4 5/8", 3 13/16", 1 1/4" -- no videos (see AZB post)
55 -- mamics -- int-1 (C), 20 (D) -- table: 9', 4 5/8", 3 13/16", 1 1/4" -- no videos (see AZB post)

Here are the details and scores for all official BU graduates.
 
Last edited:
Hi, I'm going to do the exam in the near future. I can't state exactly when it's going to happen but I'm already doing the drills for practice. I think they can only improve my games. Nice job. Best regards.
 
Hi, I'm going to do the exam in the near future. I can't state exactly when it's going to happen but I'm already doing the drills for practice. I think they can only improve my games. Nice job. Best regards.
I look forward to seeing your scores (and videos if available).

Catch you later,
Dave
 
In the next few days, I plan to see how high I can score on both exams on a Valley "bar box."
I spent all day yesterday at the pool hall, and the best I could do on the Valley "bar box" was:

Exam I: 82 + Masters Exam II: 64 = 146

Here's the latest:

List of AZB'ers who have taken the BU playing-ability exams so far (in ranked order):

BU score -- Username -- BU Rating, 10-ball ghost rating -- table: size, corner pocket mouth, throat, shelf -- Video links (if available):

168 -- Gerry Williams -- semi pro (A++/AAA), 73 (Pro) -- table: 9', 4 1/2", 4", 1 7/8" -- Table Specs, Exam I (part 1, part 2), Exam II (part 1, part 2, part 3)
161 -- Gerry Williams -- semi pro (A++/AAA), 73 (Pro) -- table: 9', 4 1/2", 4", 1 7/8" -- Table Specs, Exam I (part 1, part 2), Exam II (part 1, part 2, part 3)
160 -- scottjen26 -- semi pro (A++/AAA), 64 (A+) -- table 9', 4 1/2", 3 7/8", 1 1/2" -- Exam I (part 1, part 2), Exam II (part 1, part 2, part 3)
159 -- Gerry Williams -- adv-3 (A+/A), 73 (Pro) -- table: 9', 4 1/2", 4", 1 7/8" -- Table Specs, Exam I (part 1, part 2), Exam II (part 1, part 2, part 3)
157 -- scottjen26 -- adv-3 (A+/A), 64 (A+) -- table 9', 4 1/2", 3 7/8", 1 1/2" -- Exam I (part 1, part 2), no Exam II video yet (see AZB post)
156 -- Gerry Williams -- adv-3 (A+/A), 73 (Pro) -- table: 9', 4 1/2", 4", 1 7/8" -- Table Specs, Exam I (part 1, part 2), Exam II
149 -- scottjen26 -- adv-3 (A+/A), 64 (A+) -- table 9', 4 1/2", 3 7/8", 1 1/2" -- Exam I (part 1, part 2), Exam II
148 -- Neil -- adv-3 (A+/A); 60 (A) -- table: 7', 4 1/8", 2 7/8", 1 3/8" -- Exam I (part 1, part 2), Exam II (part 1, part 2)
146 -- dr_dave -- adv-3 (A+/A), 54 (B+) -- table: 7', 4 1/2", 4 1/2", 3/4" -- no videos (see AZB post)
142 -- dr_dave -- adv-3 (A+/A), 54 (B+) -- table: 8', 4 3/4", 4 1/8", 1 3/8" -- Exam I, Exam II
141 -- 12squared (Dave Gross) -- adv-3 (A+/A); 78 (Pro) -- table: 9', 4 7/8", 4 1/8", 1 1/2" -- no videos (see AZB post)
141 -- Neil -- adv-3 (A+/A); 60 (A) -- table: 7', 4 1/8", 3 1/2", 1 3/8" -- Exam I (part 1, part 2), Exam II (part 1, part 2, part 3)
135 -- Mooneye -- adv-2 (A-/B+), 49 (B) -- table: 7', 4 7/8", 4 1/8", 1 5/8" -- Table Specs, Exam I, Exam II
135 -- dr_dave -- adv-2 (A-/B+), 54 (B+) -- table: 8', 4 3/4", 4 1/8", 1 3/8" -- Exam I, Exam II
133 -- Mooneye -- adv-2 (A-/B+), 49 (B) -- table: 7', 4 7/8", 4 1/8", 1 5/8" -- Exam I, Exam II
132 -- Gerry Williams -- adv-2 (A-/B+), 73 (Pro) -- table: 9', 4 1/2", 4", 1 7/8" -- Table Specs, Exam I, Exam II (part 1, part 2)
132 -- BRussell -- adv-2 (A-/B+), 51 (B+) -- table: 8', 5", 4 1/4", 1 1/2" -- Exam I, Exam II
127 -- Okie --adv-2 (A-/B+), 61 (A+) -- table: 9', 4 3/4", 4", 1 1/2" -- Table Specs, Exam I, Exam II
127 -- Mooneye -- adv-2 (A-/B+), 49 (B) -- table: 7', 4 7/8", 4 1/8", 1 5/8" -- Exam I, no Exam II video (see AZB post)
124 -- JC -- adv-1 (B/B-), 57 (A) -- table: 9', 4 7/16", 3 7/8", 1 3/8" -- Table Specs, Exam 1, Exam 2
121 -- TheOneGnat -- adv-1 (B/B-), 51 (B+) -- table: 8', 4 1/2 in, 4 in, 1 5/8 in -- no videos (see AZB post and the update)
119 -- Mooneye -- adv-1 (B/B-), 49 (B) -- table: 7', 4 7/8", 4 1/8", 1 5/8" -- Exam I, Exam II
117 -- RobMan -- adv-1 (B/B-), 46 (B) -- table: 9', 5", no throat yet, 1" -- no videos (see AZB post)
112 -- Okie -- adv-1 (B/B-), 61 (A+) -- table: 9', 4 3/4", 4", 1 1/2" -- Table Specs, Exam I, Exam II
112 -- RobMan -- adv-1 (B/B-), 46 (B) -- table: 9', 5", no throat yet, 1" -- no videos (see AZB post)
108 -- row21097 -- int-3 (B-/C+), 57 (A) -- table: 9', 4 1/2”, 4”, 1 1/2” -- Table Specs, Exam I (part 1, part 2, part 3), Exam II (part 1, part 2, part 3)
102 -- Okie -- int-3 (B-/C+), 52 (B+) -- table: 9', 4 3/4", 4", 1 1/2" -- Table Specs, Exam I, Exam II
101 -- 67tbird -- int-3 (B-/C+), 46 (B) -- table: 8', 4 1/4", 4", 1 1/2" -- no videos (see AZB post)
98 -- Eagleshot -- int-3 (B-/C+), 48 (B) -- table: 9', 4 1/2, 4", 1 1/4" -- no videos (from PM)
92 -- 67tbird -- int-2 (C+/C), 34 (D+) -- table: 8', 4 1/4", 4", 1 1/2" -- no videos (see AZB post)
90 -- EagleEye -- int-2 (C+/C), no 10-ball ghost score yet -- table: 9', 5", 3 7/8", 1 3/8" -- administered at the 2013 BU Summer School Boot Camp
88 -- DrGonzo -- int-2 (C+/C), 47 (B) -- table: 9', 4.5", 4", 1.5" -- no videos (see AZB post)
87 -- iusedtoberich -- int-2 (C+/C), 38 (C) -- table: 9', 5 1/8", 4 1/8", 1 1/2" -- Table Specs, Exam I, Exam II
78 -- iusedtoberich -- int-2 (C+/C), 38 (C) -- table: 9', 5 1/8", 4 1/8", 1 1/2" -- Table Specs, Exam I, Exam II
77 -- mamics --int-2 (C+/C), 20 (D) -- table: 9', 4 5/8", 3 13/16", 1 1/4" -- no videos (see AZB post)
77 -- SeanChamp -- int-2 (C+/C), 29 (D) -- table: 8', 4 1/2", no throat yet, 1" -- no videos (see AZB post)
62 -- mamics -- int-1 (C), 20 (D) -- table: 9', 4 5/8", 3 13/16", 1 1/4" -- no videos (see AZB post)
55 -- mamics -- int-1 (C), 20 (D) -- table: 9', 4 5/8", 3 13/16", 1 1/4" -- no videos (see AZB post)

Here are the details and scores for all official BU graduates.
 
I spent all day yesterday at the pool hall, and the best I could do on the Valley "bar box" was:

Exam I: 82 + Masters Exam II: 64 = 146

Not too much different than on the 8'. Do you feel it was the table for the higher score or just more practice with the drills?
 
Not too much different than on the 8'. Do you feel it was the table for the higher score or just more practice with the drills?
I did expect to do better on the bar box compared to my home 8' table. Here are the table-difficulty factors for the two tables (from the TDF thread):

dr_dave -- 8':0.90 -- 4 3/4":0.95 -- 5/8":1.00 -- 1 3/8":0.98 -- 0.84 (8' Connelly home table)
dr_dave -- 7':0.85 -- 4 1/2":1.00 -- 0":0.95 -- 3/4":0.95 -- 0.77 (7' Valley/Dynamo "bar box")

Here are some possible reasons for why I didn't do much better on the bar box:
- The small side pockets (compared to my home table) limited some shot options and made the cross-side banks tougher.
- The cloth speed on the bar box is fast for the amount of table area available.
- The bar was noisy and there were many distractions with people saying hi and asking me what I was doing.
- The AC wasn't working, so it started getting hot and humid as the day went on.

I think I'll spend future time on my home table. I still think I can do a little better on both exams, especially with all of the practice I've been getting.

Catch you later,
Dave

PS: I hope you and others also try the exams on different tables so we can see if the TDF numbers have any relevance at all to BU scores. I'm sure my scores would be much lower on a bigger table with smaller pockets. I hope to test that some day soon.
 
I ran three sets of the 10-ball ghost drill (30 racks) today and got the following scores: 64, 53, 58. I've updated the number listed with my most recent BU scores to 58 (see below). The 10-ball ghost ratings seem to match the BU ratings fairly well for most people so far.

I played a lot of pool this week (about 6-8 hours per day), and the practice has definitely paid off. My shot making and confidence has improved quite a bit. Now its back to the real world, where I actually need to get some work done.

Keep practicing the BU Exams. The focused and efficient practice will definitely help improve your game. it worked for me.

Catch you later,
Dave

AZB'ers who have taken the BU playing-ability exams:

BU score -- Username -- BU Rating, 10-ball ghost rating -- table: size, corner pocket mouth, throat, shelf -- Video links (if available):

168 -- Gerry Williams -- semi pro (A++/AAA), 73 (Pro) -- table: 9', 4 1/2", 4", 1 7/8" -- Table Specs, Exam I (part 1, part 2), Exam II (part 1, part 2, part 3)
161 -- Gerry Williams -- semi pro (A++/AAA), 73 (Pro) -- table: 9', 4 1/2", 4", 1 7/8" -- Table Specs, Exam I (part 1, part 2), Exam II (part 1, part 2, part 3)
160 -- scottjen26 -- semi pro (A++/AAA), 64 (A+) -- table 9', 4 1/2", 3 7/8", 1 1/2" -- Exam I (part 1, part 2), Exam II (part 1, part 2, part 3)
159 -- Gerry Williams -- adv-3 (A+/A), 73 (Pro) -- table: 9', 4 1/2", 4", 1 7/8" -- Table Specs, Exam I (part 1, part 2), Exam II (part 1, part 2, part 3)
157 -- scottjen26 -- adv-3 (A+/A), 64 (A+) -- table 9', 4 1/2", 3 7/8", 1 1/2" -- Exam I (part 1, part 2), no Exam II video yet (see AZB post)
156 -- Gerry Williams -- adv-3 (A+/A), 73 (Pro) -- table: 9', 4 1/2", 4", 1 7/8" -- Table Specs, Exam I (part 1, part 2), Exam II
149 -- scottjen26 -- adv-3 (A+/A), 64 (A+) -- table 9', 4 1/2", 3 7/8", 1 1/2" -- Exam I (part 1, part 2), Exam II
148 -- Neil -- adv-3 (A+/A); 60 (A) -- table: 7', 4 1/8", 2 7/8", 1 3/8" -- Exam I (part 1, part 2), Exam II (part 1, part 2)
146 -- dr_dave -- adv-3 (A+/A), 58 (A) -- table: 7', 4 1/2", 4 1/2", 3/4" -- no videos (see AZB post)
142 -- dr_dave -- adv-3 (A+/A), 58 (A) -- table: 8', 4 3/4", 4 1/8", 1 3/8" -- Exam I, Exam II
141 -- 12squared (Dave Gross) -- adv-3 (A+/A); 78 (Pro) -- table: 9', 4 7/8", 4 1/8", 1 1/2" -- no videos (see AZB post)
141 -- Neil -- adv-3 (A+/A); 60 (A) -- table: 7', 4 1/8", 3 1/2", 1 3/8" -- Exam I (part 1, part 2), Exam II (part 1, part 2, part 3)
135 -- Mooneye -- adv-2 (A-/B+), 49 (B) -- table: 7', 4 7/8", 4 1/8", 1 5/8" -- Table Specs, Exam I, Exam II
135 -- dr_dave -- adv-2 (A-/B+), 54 (B+) -- table: 8', 4 3/4", 4 1/8", 1 3/8" -- Exam I, Exam II
133 -- Mooneye -- adv-2 (A-/B+), 49 (B) -- table: 7', 4 7/8", 4 1/8", 1 5/8" -- Exam I, Exam II
132 -- Gerry Williams -- adv-2 (A-/B+), 73 (Pro) -- table: 9', 4 1/2", 4", 1 7/8" -- Table Specs, Exam I, Exam II (part 1, part 2)
132 -- BRussell -- adv-2 (A-/B+), 51 (B+) -- table: 8', 5", 4 1/4", 1 1/2" -- Exam I, Exam II
127 -- Okie --adv-2 (A-/B+), 61 (A+) -- table: 9', 4 3/4", 4", 1 1/2" -- Table Specs, Exam I, Exam II
127 -- Mooneye -- adv-2 (A-/B+), 49 (B) -- table: 7', 4 7/8", 4 1/8", 1 5/8" -- Exam I, no Exam II video (see AZB post)
124 -- JC -- adv-1 (B/B-), 57 (A) -- table: 9', 4 7/16", 3 7/8", 1 3/8" -- Table Specs, Exam 1, Exam 2
121 -- TheOneGnat -- adv-1 (B/B-), 51 (B+) -- table: 8', 4 1/2 in, 4 in, 1 5/8 in -- no videos (see AZB post and the update)
119 -- Mooneye -- adv-1 (B/B-), 49 (B) -- table: 7', 4 7/8", 4 1/8", 1 5/8" -- Exam I, Exam II
117 -- RobMan -- adv-1 (B/B-), 46 (B) -- table: 9', 5", no throat yet, 1" -- no videos (see AZB post)
112 -- Okie -- adv-1 (B/B-), 61 (A+) -- table: 9', 4 3/4", 4", 1 1/2" -- Table Specs, Exam I, Exam II
112 -- RobMan -- adv-1 (B/B-), 46 (B) -- table: 9', 5", no throat yet, 1" -- no videos (see AZB post)
108 -- row21097 -- int-3 (B-/C+), 57 (A) -- table: 9', 4 1/2”, 4”, 1 1/2” -- Table Specs, Exam I (part 1, part 2, part 3), Exam II (part 1, part 2, part 3)
102 -- Okie -- int-3 (B-/C+), 52 (B+) -- table: 9', 4 3/4", 4", 1 1/2" -- Table Specs, Exam I, Exam II
101 -- 67tbird -- int-3 (B-/C+), 46 (B) -- table: 8', 4 1/4", 4", 1 1/2" -- no videos (see AZB post)
98 -- Eagleshot -- int-3 (B-/C+), 48 (B) -- table: 9', 4 1/2, 4", 1 1/4" -- no videos (from PM)
92 -- 67tbird -- int-2 (C+/C), 34 (D+) -- table: 8', 4 1/4", 4", 1 1/2" -- no videos (see AZB post)
90 -- EagleEye -- int-2 (C+/C), no 10-ball ghost score yet -- table: 9', 5", 3 7/8", 1 3/8" -- administered at the 2013 BU Summer School Boot Camp
88 -- DrGonzo -- int-2 (C+/C), 47 (B) -- table: 9', 4.5", 4", 1.5" -- no videos (see AZB post)
87 -- iusedtoberich -- int-2 (C+/C), 38 (C) -- table: 9', 5 1/8", 4 1/8", 1 1/2" -- Table Specs, Exam I, Exam II
78 -- iusedtoberich -- int-2 (C+/C), 38 (C) -- table: 9', 5 1/8", 4 1/8", 1 1/2" -- Table Specs, Exam I, Exam II
77 -- mamics --int-2 (C+/C), 20 (D) -- table: 9', 4 5/8", 3 13/16", 1 1/4" -- no videos (see AZB post)
77 -- SeanChamp -- int-2 (C+/C), 29 (D) -- table: 8', 4 1/2", no throat yet, 1" -- no videos (see AZB post)
62 -- mamics -- int-1 (C), 20 (D) -- table: 9', 4 5/8", 3 13/16", 1 1/4" -- no videos (see AZB post)
55 -- mamics -- int-1 (C), 20 (D) -- table: 9', 4 5/8", 3 13/16", 1 1/4" -- no videos (see AZB post)

Here are the details and scores for all official BU graduates.
 
I ran three sets of the 10-ball ghost drill (30 racks) today and got the following scores: 64, 53, 58.
BTW, one thing that helped me improve my 10-ball ghost drill score was breaking with slightly less power than normal. I rarely made a ball on the break (although, this doesn't matter since you have ball in hand after the break anyway), but I seemed to get better ball spread with less clusters. There was also practically no risk of scratching.

Regards,
Dave
 
one thing that helped me improve my 10-ball ghost drill score was breaking with slightly less power than normal.

I tried this tonite also - shot my best & most consistent10 ball ghost scores to date,

2 racks of 10. (32 & 31)
rack 1: 3 0 3 3 5 3 5 1 6 3.
rack 2: 6 5 3 3 3 1 1 4 3 2.
Only 1 scratch in rack 1 - much less than usual.

Time for bed so wont bother with the 3rd rack of 10 (my mean rack is going to be either 32 or 31 in any case - I'll take the 31 - happy with that improvement.)

Strange though - I have hardly hit a ball in close to 2 weeks - and shot quite well tonite ? [by my standards] (maybe not expecting too much with the lack of practice = relaxed = better stroke ?)

It was great to actually get the cueball going to where I needed it sometimes (and make the pot) - the knowledge & stroke training is starting to come together methinks.

oh, I also did pattern rack tonite - but this isnt the first time - had some crappy scores previously with the same pattern racking - 2 & 3 in bottom corners + 4 & 5 behind the 1 ball.

Please update my BU rank Dave - 31 for ghost score.
(hopefully improved) exam 2 scores coming soon.
Cheers.
 
Last edited:
Please update my BU rank Dave - 31 for ghost score.
Thanks for the update, and good job with the improvement. I've changed the number on your most recent BU score.

(hopefully improved) exam 2 scores coming soon.
Good luck. Please consider posting videos if possible. You might get some helpful feedback.


Here's the latest:

AZB'ers who have taken the BU playing-ability exams:

BU score -- Username -- BU Rating, 10-ball ghost rating -- table: size, corner pocket mouth, throat, shelf -- Video links (if available):

168 -- Gerry Williams -- semi pro (A++/AAA), 73 (Pro) -- table: 9', 4 1/2", 4", 1 7/8" -- Table Specs, Exam I (part 1, part 2), Exam II (part 1, part 2, part 3)
161 -- Gerry Williams -- semi pro (A++/AAA), 73 (Pro) -- table: 9', 4 1/2", 4", 1 7/8" -- Table Specs, Exam I (part 1, part 2), Exam II (part 1, part 2, part 3)
160 -- scottjen26 -- semi pro (A++/AAA), 64 (A+) -- table 9', 4 1/2", 3 7/8", 1 1/2" -- Exam I (part 1, part 2), Exam II (part 1, part 2, part 3)
159 -- Gerry Williams -- adv-3 (A+/A), 73 (Pro) -- table: 9', 4 1/2", 4", 1 7/8" -- Table Specs, Exam I (part 1, part 2), Exam II (part 1, part 2, part 3)
157 -- scottjen26 -- adv-3 (A+/A), 64 (A+) -- table 9', 4 1/2", 3 7/8", 1 1/2" -- Exam I (part 1, part 2), no Exam II video yet (see AZB post)
156 -- Gerry Williams -- adv-3 (A+/A), 73 (Pro) -- table: 9', 4 1/2", 4", 1 7/8" -- Table Specs, Exam I (part 1, part 2), Exam II
149 -- scottjen26 -- adv-3 (A+/A), 64 (A+) -- table 9', 4 1/2", 3 7/8", 1 1/2" -- Exam I (part 1, part 2), Exam II
148 -- Neil -- adv-3 (A+/A); 60 (A) -- table: 7', 4 1/8", 2 7/8", 1 3/8" -- Exam I (part 1, part 2), Exam II (part 1, part 2)
146 -- dr_dave -- adv-3 (A+/A), 58 (A) -- table: 7', 4 1/2", 4 1/2", 3/4" -- no videos (see AZB post)
142 -- dr_dave -- adv-3 (A+/A), 58 (A) -- table: 8', 4 3/4", 4 1/8", 1 3/8" -- Exam I, Exam II
141 -- 12squared (Dave Gross) -- adv-3 (A+/A); 78 (Pro) -- table: 9', 4 7/8", 4 1/8", 1 1/2" -- no videos (see AZB post)
141 -- Neil -- adv-3 (A+/A); 60 (A) -- table: 7', 4 1/8", 3 1/2", 1 3/8" -- Exam I (part 1, part 2), Exam II (part 1, part 2, part 3)
135 -- Mooneye -- adv-2 (A-/B+), 49 (B) -- table: 7', 4 7/8", 4 1/8", 1 5/8" -- Table Specs, Exam I, Exam II
135 -- dr_dave -- adv-2 (A-/B+), 54 (B+) -- table: 8', 4 3/4", 4 1/8", 1 3/8" -- Exam I, Exam II
133 -- Mooneye -- adv-2 (A-/B+), 49 (B) -- table: 7', 4 7/8", 4 1/8", 1 5/8" -- Exam I, Exam II
132 -- Gerry Williams -- adv-2 (A-/B+), 73 (Pro) -- table: 9', 4 1/2", 4", 1 7/8" -- Table Specs, Exam I, Exam II (part 1, part 2)
132 -- BRussell -- adv-2 (A-/B+), 51 (B+) -- table: 8', 5", 4 1/4", 1 1/2" -- Exam I, Exam II
127 -- Okie --adv-2 (A-/B+), 61 (A+) -- table: 9', 4 3/4", 4", 1 1/2" -- Table Specs, Exam I, Exam II
127 -- Mooneye -- adv-2 (A-/B+), 49 (B) -- table: 7', 4 7/8", 4 1/8", 1 5/8" -- Exam I, no Exam II video (see AZB post)
124 -- JC -- adv-1 (B/B-), 57 (A) -- table: 9', 4 7/16", 3 7/8", 1 3/8" -- Table Specs, Exam 1, Exam 2
121 -- TheOneGnat -- adv-1 (B/B-), 51 (B+) -- table: 8', 4 1/2 in, 4 in, 1 5/8 in -- no videos (see AZB post and the update)
119 -- Mooneye -- adv-1 (B/B-), 49 (B) -- table: 7', 4 7/8", 4 1/8", 1 5/8" -- Exam I, Exam II
117 -- RobMan -- adv-1 (B/B-), 46 (B) -- table: 9', 5", no throat yet, 1" -- no videos (see AZB post)
112 -- Okie -- adv-1 (B/B-), 61 (A+) -- table: 9', 4 3/4", 4", 1 1/2" -- Table Specs, Exam I, Exam II
112 -- RobMan -- adv-1 (B/B-), 46 (B) -- table: 9', 5", no throat yet, 1" -- no videos (see AZB post)
108 -- row21097 -- int-3 (B-/C+), 57 (A) -- table: 9', 4 1/2”, 4”, 1 1/2” -- Table Specs, Exam I (part 1, part 2, part 3), Exam II (part 1, part 2, part 3)
102 -- Okie -- int-3 (B-/C+), 52 (B+) -- table: 9', 4 3/4", 4", 1 1/2" -- Table Specs, Exam I, Exam II
101 -- 67tbird -- int-3 (B-/C+), 46 (B) -- table: 8', 4 1/4", 4", 1 1/2" -- no videos (see AZB post)
98 -- Eagleshot -- int-3 (B-/C+), 48 (B) -- table: 9', 4 1/2, 4", 1 1/4" -- no videos (from PM)
92 -- 67tbird -- int-2 (C+/C), 34 (D+) -- table: 8', 4 1/4", 4", 1 1/2" -- no videos (see AZB post)
90 -- EagleEye -- int-2 (C+/C), no 10-ball ghost score yet -- table: 9', 5", 3 7/8", 1 3/8" -- administered at the 2013 BU Summer School Boot Camp
88 -- DrGonzo -- int-2 (C+/C), 47 (B) -- table: 9', 4.5", 4", 1.5" -- no videos (see AZB post)
87 -- iusedtoberich -- int-2 (C+/C), 38 (C) -- table: 9', 5 1/8", 4 1/8", 1 1/2" -- Table Specs, Exam I, Exam II
78 -- iusedtoberich -- int-2 (C+/C), 38 (C) -- table: 9', 5 1/8", 4 1/8", 1 1/2" -- Table Specs, Exam I, Exam II
77 -- mamics --int-2 (C+/C), 31 (D+) -- table: 9', 4 5/8", 3 13/16", 1 1/4" -- no videos (see AZB post)
77 -- SeanChamp -- int-2 (C+/C), 29 (D) -- table: 8', 4 1/2", no throat yet, 1" -- no videos (see AZB post)
62 -- mamics -- int-1 (C), 20 (D) -- table: 9', 4 5/8", 3 13/16", 1 1/4" -- no videos (see AZB post)
55 -- mamics -- int-1 (C), 20 (D) -- table: 9', 4 5/8", 3 13/16", 1 1/4" -- no videos (see AZB post)

Here are the details and scores for all official BU graduates.
 
Exam 2 (Masters level) = 33 points. (31st July)

Previous Best Exam 1 = 56 points (7th July)

Total BU score now = 89.

Comparison on exam 2 improvement maybe not relevant as original exam 2 was bachelors level (21 points on 26/6)

I'm very happy to be noticing significant improvement in potting percentage & cue ball control in such a short timeframe - deffo must pay credit to the BU resources & info / ideas on AZ ! :-D

Cheers.
 
Exam 2 (Masters level) = 33 points. (31st July)

Previous Best Exam 1 = 56 points (7th July)

Total BU score now = 89.
Nice job!

I'm very happy to be noticing significant improvement in potting percentage & cue ball control in such a short timeframe - deffo must pay credit to the BU resources & info / ideas on AZ ! :-D
Purposeful and efficient practice can make a big difference. I'm glad you like the BU Exams. They have helped my game quite a bit also.


Here's the latest:

AZB'ers who have taken the BU playing-ability exams:

BU score -- Username -- BU Rating, 10-ball ghost rating -- table: size, corner pocket mouth, throat, shelf -- Video links (if available):

168 -- Gerry Williams -- semi pro (A++/AAA), 73 (Pro) -- table: 9', 4 1/2", 4", 1 7/8" -- Table Specs, Exam I (part 1, part 2), Exam II (part 1, part 2, part 3)
161 -- Gerry Williams -- semi pro (A++/AAA), 73 (Pro) -- table: 9', 4 1/2", 4", 1 7/8" -- Table Specs, Exam I (part 1, part 2), Exam II (part 1, part 2, part 3)
160 -- scottjen26 -- semi pro (A++/AAA), 64 (A+) -- table 9', 4 1/2", 3 7/8", 1 1/2" -- Exam I (part 1, part 2), Exam II (part 1, part 2, part 3)
159 -- Gerry Williams -- adv-3 (A+/A), 73 (Pro) -- table: 9', 4 1/2", 4", 1 7/8" -- Table Specs, Exam I (part 1, part 2), Exam II (part 1, part 2, part 3)
157 -- scottjen26 -- adv-3 (A+/A), 64 (A+) -- table 9', 4 1/2", 3 7/8", 1 1/2" -- Exam I (part 1, part 2), no Exam II video yet (see AZB post)
156 -- Gerry Williams -- adv-3 (A+/A), 73 (Pro) -- table: 9', 4 1/2", 4", 1 7/8" -- Table Specs, Exam I (part 1, part 2), Exam II
149 -- scottjen26 -- adv-3 (A+/A), 64 (A+) -- table 9', 4 1/2", 3 7/8", 1 1/2" -- Exam I (part 1, part 2), Exam II
148 -- Neil -- adv-3 (A+/A); 60 (A) -- table: 7', 4 1/8", 2 7/8", 1 3/8" -- Exam I (part 1, part 2), Exam II (part 1, part 2)
146 -- dr_dave -- adv-3 (A+/A), 58 (A) -- table: 7', 4 1/2", 4 1/2", 3/4" -- no videos (see AZB post)
142 -- dr_dave -- adv-3 (A+/A), 58 (A) -- table: 8', 4 3/4", 4 1/8", 1 3/8" -- Exam I, Exam II
141 -- 12squared (Dave Gross) -- adv-3 (A+/A); 78 (Pro) -- table: 9', 4 7/8", 4 1/8", 1 1/2" -- no videos (see AZB post)
141 -- Neil -- adv-3 (A+/A); 60 (A) -- table: 7', 4 1/8", 3 1/2", 1 3/8" -- Exam I (part 1, part 2), Exam II (part 1, part 2, part 3)
135 -- Mooneye -- adv-2 (A-/B+), 49 (B) -- table: 7', 4 7/8", 4 1/8", 1 5/8" -- Table Specs, Exam I, Exam II
135 -- dr_dave -- adv-2 (A-/B+), 54 (B+) -- table: 8', 4 3/4", 4 1/8", 1 3/8" -- Exam I, Exam II
133 -- Mooneye -- adv-2 (A-/B+), 49 (B) -- table: 7', 4 7/8", 4 1/8", 1 5/8" -- Exam I, Exam II
132 -- Gerry Williams -- adv-2 (A-/B+), 73 (Pro) -- table: 9', 4 1/2", 4", 1 7/8" -- Table Specs, Exam I, Exam II (part 1, part 2)
132 -- BRussell -- adv-2 (A-/B+), 51 (B+) -- table: 8', 5", 4 1/4", 1 1/2" -- Exam I, Exam II
127 -- Okie --adv-2 (A-/B+), 61 (A+) -- table: 9', 4 3/4", 4", 1 1/2" -- Table Specs, Exam I, Exam II
127 -- Mooneye -- adv-2 (A-/B+), 49 (B) -- table: 7', 4 7/8", 4 1/8", 1 5/8" -- Exam I, no Exam II video (see AZB post)
124 -- JC -- adv-1 (B/B-), 57 (A) -- table: 9', 4 7/16", 3 7/8", 1 3/8" -- Table Specs, Exam 1, Exam 2
121 -- TheOneGnat -- adv-1 (B/B-), 51 (B+) -- table: 8', 4 1/2 in, 4 in, 1 5/8 in -- no videos (see AZB post and the update)
119 -- Mooneye -- adv-1 (B/B-), 49 (B) -- table: 7', 4 7/8", 4 1/8", 1 5/8" -- Exam I, Exam II
117 -- RobMan -- adv-1 (B/B-), 46 (B) -- table: 9', 5", no throat yet, 1" -- no videos (see AZB post)
112 -- Okie -- adv-1 (B/B-), 61 (A+) -- table: 9', 4 3/4", 4", 1 1/2" -- Table Specs, Exam I, Exam II
112 -- RobMan -- adv-1 (B/B-), 46 (B) -- table: 9', 5", no throat yet, 1" -- no videos (see AZB post)
108 -- row21097 -- int-3 (B-/C+), 57 (A) -- table: 9', 4 1/2”, 4”, 1 1/2” -- Table Specs, Exam I (part 1, part 2, part 3), Exam II (part 1, part 2, part 3)
102 -- Okie -- int-3 (B-/C+), 52 (B+) -- table: 9', 4 3/4", 4", 1 1/2" -- Table Specs, Exam I, Exam II
101 -- 67tbird -- int-3 (B-/C+), 46 (B) -- table: 8', 4 1/4", 4", 1 1/2" -- no videos (see AZB post)
98 -- Eagleshot -- int-3 (B-/C+), 48 (B) -- table: 9', 4 1/2, 4", 1 1/4" -- no videos (from PM)
92 -- 67tbird -- int-2 (C+/C), 34 (D+) -- table: 8', 4 1/4", 4", 1 1/2" -- no videos (see AZB post)
90 -- EagleEye -- int-2 (C+/C), no 10-ball ghost score yet -- table: 9', 5", 3 7/8", 1 3/8" -- administered at the 2013 BU Summer School Boot Camp
89 -- mamics -- int-2 (C+/C), 31 (D+) -- table: 9', 4 5/8", 3 13/16", 1 1/4" -- no videos (see AZB post)
88 -- DrGonzo -- int-2 (C+/C), 47 (B) -- table: 9', 4.5", 4", 1.5" -- no videos (see AZB post)
87 -- iusedtoberich -- int-2 (C+/C), 38 (C) -- table: 9', 5 1/8", 4 1/8", 1 1/2" -- Table Specs, Exam I, Exam II
78 -- iusedtoberich -- int-2 (C+/C), 38 (C) -- table: 9', 5 1/8", 4 1/8", 1 1/2" -- Table Specs, Exam I, Exam II
77 -- mamics -- int-2 (C+/C), 31 (D+) -- table: 9', 4 5/8", 3 13/16", 1 1/4" -- no videos (see AZB post)
77 -- SeanChamp -- int-2 (C+/C), 29 (D) -- table: 8', 4 1/2", no throat yet, 1" -- no videos (see AZB post)
62 -- mamics -- int-1 (C), 20 (D) -- table: 9', 4 5/8", 3 13/16", 1 1/4" -- no videos (see AZB post)
55 -- mamics -- int-1 (C), 20 (D) -- table: 9', 4 5/8", 3 13/16", 1 1/4" -- no videos (see AZB post)

Here are the details and scores for all official BU graduates.
 
FYI, we have made a slight change to the instructions for drills F2 and F4 in Exam I. Here it is:

With the stop shot (F2) and draw shot (F4) drills, if you end up in position 1 you are allowed to place the CB anywhere between positions 1 and 2. This will allow you to comfortably avoid a double hit.

This probably won't affect many AZB'ers, but for people who don't have reliable stop and draw shots, it could help out quite a bit. CB position "1" will now be easier (and not more difficult) than position "2."

Regards,
Dave
 
Last edited:
I'll bump this thread periodically hoping people who have said they would post scores eventually do. Also, I want to encourage people who haven't seen the BU exams yet to try them out. They are challenging and fun and are a good pool workout. See the first post for more info and instructions.

Here's the latest:

AZB'ers who have taken the BU playing-ability exams:

BU score -- Username -- BU Rating, 10-ball ghost rating -- table: size, corner pocket mouth, throat, shelf -- Video links (if available):

168 -- Gerry Williams -- semi pro (A++/AAA), 73 (Pro) -- table: 9', 4 1/2", 4", 1 7/8" -- Table Specs, Exam I (part 1, part 2), Exam II (part 1, part 2, part 3)
161 -- Gerry Williams -- semi pro (A++/AAA), 73 (Pro) -- table: 9', 4 1/2", 4", 1 7/8" -- Table Specs, Exam I (part 1, part 2), Exam II (part 1, part 2, part 3)
160 -- scottjen26 -- semi pro (A++/AAA), 64 (A+) -- table 9', 4 1/2", 3 7/8", 1 1/2" -- Exam I (part 1, part 2), Exam II (part 1, part 2, part 3)
159 -- Gerry Williams -- adv-3 (A+/A), 73 (Pro) -- table: 9', 4 1/2", 4", 1 7/8" -- Table Specs, Exam I (part 1, part 2), Exam II (part 1, part 2, part 3)
157 -- scottjen26 -- adv-3 (A+/A), 64 (A+) -- table 9', 4 1/2", 3 7/8", 1 1/2" -- Exam I (part 1, part 2), no Exam II video yet (see AZB post)
156 -- Gerry Williams -- adv-3 (A+/A), 73 (Pro) -- table: 9', 4 1/2", 4", 1 7/8" -- Table Specs, Exam I (part 1, part 2), Exam II
149 -- scottjen26 -- adv-3 (A+/A), 64 (A+) -- table 9', 4 1/2", 3 7/8", 1 1/2" -- Exam I (part 1, part 2), Exam II
148 -- Neil -- adv-3 (A+/A); 60 (A) -- table: 7', 4 1/8", 2 7/8", 1 3/8" -- Exam I (part 1, part 2), Exam II (part 1, part 2)
146 -- dr_dave -- adv-3 (A+/A), 58 (A) -- table: 7', 4 1/2", 4 1/2", 3/4" -- no videos (see AZB post)
142 -- dr_dave -- adv-3 (A+/A), 58 (A) -- table: 8', 4 3/4", 4 1/8", 1 3/8" -- Exam I, Exam II
141 -- 12squared (Dave Gross) -- adv-3 (A+/A); 78 (Pro) -- table: 9', 4 7/8", 4 1/8", 1 1/2" -- no videos (see AZB post)
141 -- Neil -- adv-3 (A+/A); 60 (A) -- table: 7', 4 1/8", 3 1/2", 1 3/8" -- Exam I (part 1, part 2), Exam II (part 1, part 2, part 3)
135 -- Mooneye -- adv-2 (A-/B+), 49 (B) -- table: 7', 4 7/8", 4 1/8", 1 5/8" -- Table Specs, Exam I, Exam II
135 -- dr_dave -- adv-2 (A-/B+), 54 (B+) -- table: 8', 4 3/4", 4 1/8", 1 3/8" -- Exam I, Exam II
133 -- Mooneye -- adv-2 (A-/B+), 49 (B) -- table: 7', 4 7/8", 4 1/8", 1 5/8" -- Exam I, Exam II
132 -- Gerry Williams -- adv-2 (A-/B+), 73 (Pro) -- table: 9', 4 1/2", 4", 1 7/8" -- Table Specs, Exam I, Exam II (part 1, part 2)
132 -- BRussell -- adv-2 (A-/B+), 51 (B+) -- table: 8', 5", 4 1/4", 1 1/2" -- Exam I, Exam II
127 -- Okie --adv-2 (A-/B+), 61 (A+) -- table: 9', 4 3/4", 4", 1 1/2" -- Table Specs, Exam I, Exam II
127 -- Mooneye -- adv-2 (A-/B+), 49 (B) -- table: 7', 4 7/8", 4 1/8", 1 5/8" -- Exam I, no Exam II video (see AZB post)
124 -- JC -- adv-1 (B/B-), 57 (A) -- table: 9', 4 7/16", 3 7/8", 1 3/8" -- Table Specs, Exam 1, Exam 2
121 -- TheOneGnat -- adv-1 (B/B-), 51 (B+) -- table: 8', 4 1/2 in, 4 in, 1 5/8 in -- no videos (see AZB post and the update)
119 -- Mooneye -- adv-1 (B/B-), 49 (B) -- table: 7', 4 7/8", 4 1/8", 1 5/8" -- Exam I, Exam II
117 -- RobMan -- adv-1 (B/B-), 46 (B) -- table: 9', 5", no throat yet, 1" -- no videos (see AZB post)
112 -- Okie -- adv-1 (B/B-), 61 (A+) -- table: 9', 4 3/4", 4", 1 1/2" -- Table Specs, Exam I, Exam II
112 -- RobMan -- adv-1 (B/B-), 46 (B) -- table: 9', 5", no throat yet, 1" -- no videos (see AZB post)
108 -- row21097 -- int-3 (B-/C+), 57 (A) -- table: 9', 4 1/2”, 4”, 1 1/2” -- Table Specs, Exam I (part 1, part 2, part 3), Exam II (part 1, part 2, part 3)
102 -- Okie -- int-3 (B-/C+), 52 (B+) -- table: 9', 4 3/4", 4", 1 1/2" -- Table Specs, Exam I, Exam II
101 -- 67tbird -- int-3 (B-/C+), 46 (B) -- table: 8', 4 1/4", 4", 1 1/2" -- no videos (see AZB post)
98 -- Eagleshot -- int-3 (B-/C+), 48 (B) -- table: 9', 4 1/2, 4", 1 1/4" -- no videos (from PM)
92 -- 67tbird -- int-2 (C+/C), 34 (D+) -- table: 8', 4 1/4", 4", 1 1/2" -- no videos (see AZB post)
90 -- EagleEye -- int-2 (C+/C), no 10-ball ghost score yet -- table: 9', 5", 3 7/8", 1 3/8" -- administered at the 2013 BU Summer School Boot Camp
89 -- mamics -- int-2 (C+/C), 31 (D+) -- table: 9', 4 5/8", 3 13/16", 1 1/4" -- no videos (see AZB post)
88 -- DrGonzo -- int-2 (C+/C), 47 (B) -- table: 9', 4.5", 4", 1.5" -- no videos (see AZB post)
87 -- iusedtoberich -- int-2 (C+/C), 38 (C) -- table: 9', 5 1/8", 4 1/8", 1 1/2" -- Table Specs, Exam I, Exam II
78 -- iusedtoberich -- int-2 (C+/C), 38 (C) -- table: 9', 5 1/8", 4 1/8", 1 1/2" -- Table Specs, Exam I, Exam II
77 -- mamics -- int-2 (C+/C), 31 (D+) -- table: 9', 4 5/8", 3 13/16", 1 1/4" -- no videos (see AZB post)
77 -- SeanChamp -- int-2 (C+/C), 29 (D) -- table: 8', 4 1/2", no throat yet, 1" -- no videos (see AZB post)
62 -- mamics -- int-1 (C), 20 (D) -- table: 9', 4 5/8", 3 13/16", 1 1/4" -- no videos (see AZB post)
55 -- mamics -- int-1 (C), 20 (D) -- table: 9', 4 5/8", 3 13/16", 1 1/4" -- no videos (see AZB post)

Here are the details and scores for all official BU graduates.
 
Here's the latest, with updated table info from RobMan (via PM):

AZB'ers who have taken the BU playing-ability exams:

BU score -- Username -- BU Rating, 10-ball ghost rating -- table: size, corner pocket mouth, throat, shelf -- Video links (if available):

168 -- Gerry Williams -- semi pro (A++/AAA), 73 (Pro) -- table: 9', 4 1/2", 4", 1 7/8" -- Table Specs, Exam I (part 1, part 2), Exam II (part 1, part 2, part 3)
161 -- Gerry Williams -- semi pro (A++/AAA), 73 (Pro) -- table: 9', 4 1/2", 4", 1 7/8" -- Table Specs, Exam I (part 1, part 2), Exam II (part 1, part 2, part 3)
160 -- scottjen26 -- semi pro (A++/AAA), 64 (A+) -- table 9', 4 1/2", 3 7/8", 1 1/2" -- Exam I (part 1, part 2), Exam II (part 1, part 2, part 3)
159 -- Gerry Williams -- adv-3 (A+/A), 73 (Pro) -- table: 9', 4 1/2", 4", 1 7/8" -- Table Specs, Exam I (part 1, part 2), Exam II (part 1, part 2, part 3)
157 -- scottjen26 -- adv-3 (A+/A), 64 (A+) -- table 9', 4 1/2", 3 7/8", 1 1/2" -- Exam I (part 1, part 2), no Exam II video yet (see AZB post)
156 -- Gerry Williams -- adv-3 (A+/A), 73 (Pro) -- table: 9', 4 1/2", 4", 1 7/8" -- Table Specs, Exam I (part 1, part 2), Exam II
149 -- scottjen26 -- adv-3 (A+/A), 64 (A+) -- table 9', 4 1/2", 3 7/8", 1 1/2" -- Exam I (part 1, part 2), Exam II
148 -- Neil -- adv-3 (A+/A); 60 (A) -- table: 7', 4 1/8", 2 7/8", 1 3/8" -- Exam I (part 1, part 2), Exam II (part 1, part 2)
146 -- dr_dave -- adv-3 (A+/A), 58 (A) -- table: 7', 4 1/2", 4 1/2", 3/4" -- no videos (see AZB post)
142 -- dr_dave -- adv-3 (A+/A), 58 (A) -- table: 8', 4 3/4", 4 1/8", 1 3/8" -- Exam I, Exam II
141 -- 12squared (Dave Gross) -- adv-3 (A+/A); 78 (Pro) -- table: 9', 4 7/8", 4 1/8", 1 1/2" -- no videos (see AZB post)
141 -- Neil -- adv-3 (A+/A); 60 (A) -- table: 7', 4 1/8", 3 1/2", 1 3/8" -- Exam I (part 1, part 2), Exam II (part 1, part 2, part 3)
135 -- Mooneye -- adv-2 (A-/B+), 49 (B) -- table: 7', 4 7/8", 4 1/8", 1 5/8" -- Table Specs, Exam I, Exam II
135 -- dr_dave -- adv-2 (A-/B+), 54 (B+) -- table: 8', 4 3/4", 4 1/8", 1 3/8" -- Exam I, Exam II
133 -- Mooneye -- adv-2 (A-/B+), 49 (B) -- table: 7', 4 7/8", 4 1/8", 1 5/8" -- Exam I, Exam II
132 -- Gerry Williams -- adv-2 (A-/B+), 73 (Pro) -- table: 9', 4 1/2", 4", 1 7/8" -- Table Specs, Exam I, Exam II (part 1, part 2)
132 -- BRussell -- adv-2 (A-/B+), 51 (B+) -- table: 8', 5", 4 1/4", 1 1/2" -- Exam I, Exam II
127 -- Okie --adv-2 (A-/B+), 61 (A+) -- table: 9', 4 3/4", 4", 1 1/2" -- Table Specs, Exam I, Exam II
127 -- Mooneye -- adv-2 (A-/B+), 49 (B) -- table: 7', 4 7/8", 4 1/8", 1 5/8" -- Exam I, no Exam II video (see AZB post)
124 -- JC -- adv-1 (B/B-), 57 (A) -- table: 9', 4 7/16", 3 7/8", 1 3/8" -- Table Specs, Exam 1, Exam 2
121 -- TheOneGnat -- adv-1 (B/B-), 51 (B+) -- table: 8', 4 1/2 in, 4 in, 1 5/8 in -- no videos (see AZB post and the update)
119 -- Mooneye -- adv-1 (B/B-), 49 (B) -- table: 7', 4 7/8", 4 1/8", 1 5/8" -- Exam I, Exam II
117 -- RobMan -- adv-1 (B/B-), 46 (B) -- table: 9', 5", 4 1/4", 1 1/5" -- no videos (see AZB post)
112 -- Okie -- adv-1 (B/B-), 61 (A+) -- table: 9', 4 3/4", 4", 1 1/2" -- Table Specs, Exam I, Exam II
112 -- RobMan -- adv-1 (B/B-), 46 (B) -- table: 9', 5", 4 1/4", 1 1/5" -- no videos (see AZB post)
108 -- row21097 -- int-3 (B-/C+), 57 (A) -- table: 9', 4 1/2”, 4”, 1 1/2” -- Table Specs, Exam I (part 1, part 2, part 3), Exam II (part 1, part 2, part 3)
102 -- Okie -- int-3 (B-/C+), 52 (B+) -- table: 9', 4 3/4", 4", 1 1/2" -- Table Specs, Exam I, Exam II
101 -- 67tbird -- int-3 (B-/C+), 46 (B) -- table: 8', 4 1/4", 4", 1 1/2" -- no videos (see AZB post)
98 -- Eagleshot -- int-3 (B-/C+), 48 (B) -- table: 9', 4 1/2, 4", 1 1/4" -- no videos (from PM)
92 -- 67tbird -- int-2 (C+/C), 34 (D+) -- table: 8', 4 1/4", 4", 1 1/2" -- no videos (see AZB post)
90 -- EagleEye -- int-2 (C+/C), no 10-ball ghost score yet -- table: 9', 5", 3 7/8", 1 3/8" -- administered at the 2013 BU Summer School Boot Camp
89 -- mamics -- int-2 (C+/C), 31 (D+) -- table: 9', 4 5/8", 3 13/16", 1 1/4" -- no videos (see AZB post)
88 -- DrGonzo -- int-2 (C+/C), 47 (B) -- table: 9', 4.5", 4", 1.5" -- no videos (see AZB post)
87 -- iusedtoberich -- int-2 (C+/C), 38 (C) -- table: 9', 5 1/8", 4 1/8", 1 1/2" -- Table Specs, Exam I, Exam II
78 -- iusedtoberich -- int-2 (C+/C), 38 (C) -- table: 9', 5 1/8", 4 1/8", 1 1/2" -- Table Specs, Exam I, Exam II
77 -- mamics -- int-2 (C+/C), 31 (D+) -- table: 9', 4 5/8", 3 13/16", 1 1/4" -- no videos (see AZB post)
77 -- SeanChamp -- int-2 (C+/C), 29 (D) -- table: 8', 4 1/2", no throat yet, 1" -- no videos (see AZB post)
62 -- mamics -- int-1 (C), 20 (D) -- table: 9', 4 5/8", 3 13/16", 1 1/4" -- no videos (see AZB post)
55 -- mamics -- int-1 (C), 20 (D) -- table: 9', 4 5/8", 3 13/16", 1 1/4" -- no videos (see AZB post)

Here are the details and scores for all official BU graduates.
 
Last edited:
I've had the exams printed out and in a binder since they debuted a couple of months ago, but I haven't attempted the exams yet. I have been practicing a lot of the drills and they have definitely helped me improve. The wagon wheel drill has been particularly helpful. Next time I go to the pool hall, if I have time, I want to try to at least get a score for Exam I and play at least 10 racks of the 10 ball ghost.
 
I've had the exams printed out and in a binder since they debuted a couple of months ago, but I haven't attempted the exams yet. I have been practicing a lot of the drills and they have definitely helped me improve. The wagon wheel drill has been particularly helpful. Next time I go to the pool hall, if I have time, I want to try to at least get a score for Exam I and play at least 10 racks of the 10 ball ghost.
Sounds good. Please post your scores when you get a chance to take the exams.

I was hoping others would also try the exams and post scores. I was especially hoping people would post scores the first time they attempt the exams and again after practice to see how much they can improve.

Catch you later,
Dave

I have another run through your exams on my to do list. I believe I can significantly improve on the scores I have posted so far.

Time will tell ;)

Ken
 
I have another run through your exams on my to do list. I believe I can significantly improve on the scores I have posted so far.

Time will tell ;)

Ken
Good luck Ken. I look forward to seeing how well you and others can improve on your scores. I also plan to practice more and give it another go soon.

Catch you later,
Dave
 
Back
Top