I finally got some 'Finished' pictures of one of my latest projects:
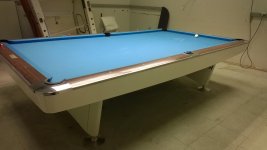
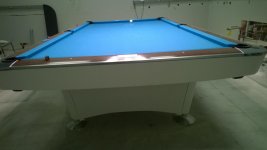
A customer of mine wanted a 5x10 pocket table. The only 5x10 table that we could find locally, was a Gold Crown Carom table. The table was stored in the backroom of a poolhall, with less than desirable conditions. The roof had been leaking for years, and two of the aprons for this table were laying on the water-soaked carpeted floor. Fortunately, the slates and frame were stored upright, away from water-soaked areas.
Before I was able to begin doing any work, we allowed the components to dry out for a couple of weeks, at the new location (an old laboratory, in a commercial building). I wish that I had taken more pictures throughout the process, but I am usually more concerned with getting the work done, than I am with documenting it.
At first, I figured I would have to cut two new aprons, to replace the two that were water-logged. They were both badly split and twisted. However, I figured I would try to repair them, just to satisfy my own curiosity. Amazingly, they straightened right out (with the help of some clamping and fixturing), and glued back together just fine. With some filling and some sanding, they look as good as new. I did have to cut a couple new blocks for the ends, to attach the blind brackets to.
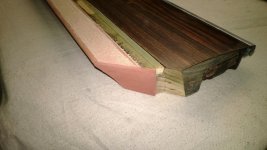
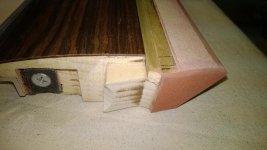
The biggest chore was modifying the rails. They had to be cut in half, and have the pockets angles cut into them. I also cut back the subrails, to correctly accept k55 cushions.
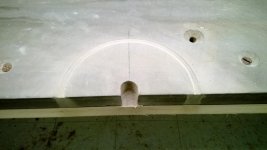
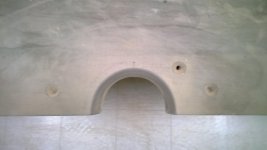
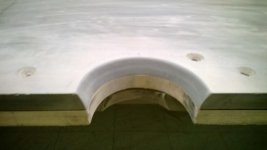
The next biggest chore was cutting the pockets into the slate. I created jigs, using a diamond bit in a trim router, to layout the pockets. This gave me a nice sharp line to cut to. The corner pockets were fairly easy to cut, as the slate is cut at a 45 degree angle, and has a beveled wood block attached at the end. For the side pockets, I used a hole saw to cut the wood backer boards, and cut the slate along my layout lines with a diamond blade in a jigsaw. To finish off the pockets, I used a belt sander, and put a radius on the pocket edges with a diamond sanding pad.
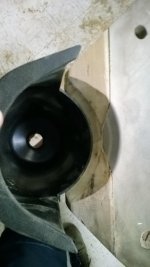
I ordered pockets, castings, cushions, and other miscellaneous supplies from Ken Hash, at Classic Billiards.
Table has Simonis 760 installed, with 4 1/4" pockets.
A customer of mine wanted a 5x10 pocket table. The only 5x10 table that we could find locally, was a Gold Crown Carom table. The table was stored in the backroom of a poolhall, with less than desirable conditions. The roof had been leaking for years, and two of the aprons for this table were laying on the water-soaked carpeted floor. Fortunately, the slates and frame were stored upright, away from water-soaked areas.
Before I was able to begin doing any work, we allowed the components to dry out for a couple of weeks, at the new location (an old laboratory, in a commercial building). I wish that I had taken more pictures throughout the process, but I am usually more concerned with getting the work done, than I am with documenting it.
At first, I figured I would have to cut two new aprons, to replace the two that were water-logged. They were both badly split and twisted. However, I figured I would try to repair them, just to satisfy my own curiosity. Amazingly, they straightened right out (with the help of some clamping and fixturing), and glued back together just fine. With some filling and some sanding, they look as good as new. I did have to cut a couple new blocks for the ends, to attach the blind brackets to.
The biggest chore was modifying the rails. They had to be cut in half, and have the pockets angles cut into them. I also cut back the subrails, to correctly accept k55 cushions.
The next biggest chore was cutting the pockets into the slate. I created jigs, using a diamond bit in a trim router, to layout the pockets. This gave me a nice sharp line to cut to. The corner pockets were fairly easy to cut, as the slate is cut at a 45 degree angle, and has a beveled wood block attached at the end. For the side pockets, I used a hole saw to cut the wood backer boards, and cut the slate along my layout lines with a diamond blade in a jigsaw. To finish off the pockets, I used a belt sander, and put a radius on the pocket edges with a diamond sanding pad.
I ordered pockets, castings, cushions, and other miscellaneous supplies from Ken Hash, at Classic Billiards.
Table has Simonis 760 installed, with 4 1/4" pockets.