Johnny95610 said:
I would like to expermint with some rings is there anything to help me get started with the inlay, lamination, or just how it is done. I can handle the turning part.
thanks,
johnny
Good Day
I am a garage cue builder in South Texas, and started building my own rings a few months back. I use the Hightower Dlx Cuesmith lathe. One thing to keep in mind is this. You will have to build THREE (3) diferent diameter ring billets to be used to complete a cue or many cues. Depending on what final taper you decide is your "cue identity", in other words---a cue taper of 1.25 at Butt down to 0.85 at joint--(or any other taper combo).
Now the smaller ring billet (for the joint/shaft rings) will be cut round down to approx. 0.950 or closer if you like. A groove is cut to a depth of maybe 0.20" or so. You will need a good way of "indexing" your material, so that you can turn the round wood on axis 4 steps--(90 degress each turn) - or 8 steps --(45 degrees each turn), etc, etc.
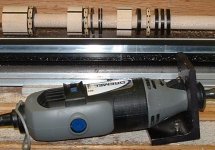
Set up a router with an end mill of the diameter you want for the width, say 0.10 -0.20, plunge the depth you want--(see above for your depth), and run the router along the length of your round wood material. Cutting a long groove length wise.
Cut your inlay material to the length and width of the grovve, fill grooves with glue, insert inlay material, wrap in wax paper, wrap rubber tubing around and around the entire length, wait 24 hours, and unwrap your new ring billet.
Now for step Number 2 !!

See above, make your 2nd and 3rd diameter ring billets the same, but with a diameter of say--1.10 for your "A-joint" area and 1.35 for your Butt cap area.
Now for Step 3!!
You will now need to cut the rings, after you BORE your hole out in the middle. Depending on how you build your cues---BORE hole sizes of 0.625 or 0.624 for the joint ring(s), 0.625 or 0.75 for the "A-joint" area, and finally 0.75 for the butt area.
Now for Step 4!!

You will need other material to make plain rings of the same wood type, or linen based material to "stack" rings and make different patterns, at each area. This is where creative juices start flowing.
I will include a link here, from "Cue Crazy" who posts in "Ask The Cuemakers" forum. Some time back he posted a picture set that really showed the process in these steps, and "Kudos" go out to him.
http://colbertcues.com/slotdashchainlinkringwork.htm
Now the easy way, is just to buy them from Prathers in Oklahoma, but a "set" of ring material 3" long, and for all 3 sizes is about $ 90.00.
TIME = $$$$
Hope this helps
Richard Womeldorf
McAllen, Tx