I just wanted to thank all the people who responded to my previous thread "finish for a beginner/hobbyist?" I got some good responses and several great PM's on the subject.
I gave up on the Minwax polyurethane and polyacrylic because neither would buff out very well. I'm gaining excellent proficiency at sanding screwed up finishes off cues. I finally got smart and made some "test dowels" out of scrap maple and started testing finishes. I tried good old spray lacquer from a rattle-can and that actually produces a nice finish with very little effort but I don't think it would be all that durable. All in all though, the lacquer is pretty nice but I still don't like all the fumes in my basement. I have 2 Sailor (Racine, WI) cues with very nice lacquer finishes that have held up well for 10+ years. Next I tried a fairly thick application of System Three Clear Coat Epoxy. Took a long time to dry but it smoothed out well with wet-sanding. So far, after one buffing session I haven't been able to get it to gloss up well enough in all areas, there are some dull spots. The jury is still out on this one, I will try repeated buffing sessions over a couple days and see what happens. I think this might work better if I had a way to get the temperature up to 90+ degrees to cure the thick epoxy layer faster and more fully.
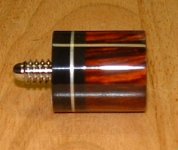
Next I tried a thin coat of System Three Clear Coat with 20 coats of thin CA (Super Glue) over the top. I've been using CA glues in various forms for 20+ years to build Radio control planes with. I know the stuff is strong because when planes crash that are built with this stuff the wood is torn apart but the glue joints are still intact. I was a little skeptical about using it as a finish but I'm not anymore. I rubbed the stuff on with paper towel as Chris Hightower describes in his book and other people PM'ed me about. After 20 coats it sure didn't look like much and I thought it wasn't going to work out. I wet-sanded with 1000, 1500 and 2000 grit paper and buffed it out with some Turtle Wax cheapo automotive polishing compound. Wow, after about 5 minutes of work I couldn't believe it! I was left with a rock-hard, glassy smooth, bright and shiny finish. I just looked at it for awhile and couldn't believe that it turned out that good. If I can get a cue to work as well as the test piece I will be thrilled. Next I'll try the CA without the epoxy underneath and see what happens and maybe test some of the thicker CA variants as filler coats prior to the thin stuff and see what happens.........now if I can just get my fingers unglued")
Thanks again everyone. I really enjoy the "mechanical" part of cue making (O.K cue ABUSING at this point) so far but I was bummed out about the finishing part. Hopefully I've found just the thing for someone like myself who will do one cue at a time and for who setting up a spray booth isn't really practical. It takes some time to do this and it ties up the lathe but the results are really nice so far. I might try to locate an affordable, variable speed wood lathe that I can put a headstock chuck, Jacobs chuck and dust collector on to use for sanding, finishing and wrapping to save wear and tear on the CueSmith Deluxe and keep it free for machining. Looks like Grizzly has a decent one with totally variable speed and both ends set up to accept whatever I want to put on them.
Ken Nelson
I gave up on the Minwax polyurethane and polyacrylic because neither would buff out very well. I'm gaining excellent proficiency at sanding screwed up finishes off cues. I finally got smart and made some "test dowels" out of scrap maple and started testing finishes. I tried good old spray lacquer from a rattle-can and that actually produces a nice finish with very little effort but I don't think it would be all that durable. All in all though, the lacquer is pretty nice but I still don't like all the fumes in my basement. I have 2 Sailor (Racine, WI) cues with very nice lacquer finishes that have held up well for 10+ years. Next I tried a fairly thick application of System Three Clear Coat Epoxy. Took a long time to dry but it smoothed out well with wet-sanding. So far, after one buffing session I haven't been able to get it to gloss up well enough in all areas, there are some dull spots. The jury is still out on this one, I will try repeated buffing sessions over a couple days and see what happens. I think this might work better if I had a way to get the temperature up to 90+ degrees to cure the thick epoxy layer faster and more fully.
Next I tried a thin coat of System Three Clear Coat with 20 coats of thin CA (Super Glue) over the top. I've been using CA glues in various forms for 20+ years to build Radio control planes with. I know the stuff is strong because when planes crash that are built with this stuff the wood is torn apart but the glue joints are still intact. I was a little skeptical about using it as a finish but I'm not anymore. I rubbed the stuff on with paper towel as Chris Hightower describes in his book and other people PM'ed me about. After 20 coats it sure didn't look like much and I thought it wasn't going to work out. I wet-sanded with 1000, 1500 and 2000 grit paper and buffed it out with some Turtle Wax cheapo automotive polishing compound. Wow, after about 5 minutes of work I couldn't believe it! I was left with a rock-hard, glassy smooth, bright and shiny finish. I just looked at it for awhile and couldn't believe that it turned out that good. If I can get a cue to work as well as the test piece I will be thrilled. Next I'll try the CA without the epoxy underneath and see what happens and maybe test some of the thicker CA variants as filler coats prior to the thin stuff and see what happens.........now if I can just get my fingers unglued
Thanks again everyone. I really enjoy the "mechanical" part of cue making (O.K cue ABUSING at this point) so far but I was bummed out about the finishing part. Hopefully I've found just the thing for someone like myself who will do one cue at a time and for who setting up a spray booth isn't really practical. It takes some time to do this and it ties up the lathe but the results are really nice so far. I might try to locate an affordable, variable speed wood lathe that I can put a headstock chuck, Jacobs chuck and dust collector on to use for sanding, finishing and wrapping to save wear and tear on the CueSmith Deluxe and keep it free for machining. Looks like Grizzly has a decent one with totally variable speed and both ends set up to accept whatever I want to put on them.
Ken Nelson

 , don't worry It is in no way worth the effort IMO, don't think I will be doing many like that in the future, It was just something I tried, became a challenge, and I would'nt give up on until I pulled it off LOL. Just another hard learned lesson. other finishes seem like a breeze compared to it, so it served it's purpose, and taught me a few new tricks.