The pivot aiming triangle : How to use your pool table as an analog computer to solve shot angles
There's an useful triangle hidden on the table and by examining it some interesting and useful things are revealed. I call it the pivot triangle. It can be used to solve the shot and show the results on the table bed. These are some observations found while trying to unravel the concept of pivot to center aiming systems. I haven't seen anything similar to this and I thought some members may find the information helpful.
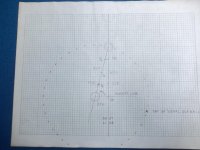
Some knowledge of simple trigonometry is useful to understand the diagram and explanation, but all that's needed is to be able to draw lines and compare how long one line is compared to another. Here are the definitions for the terms and labels.
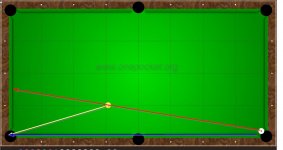
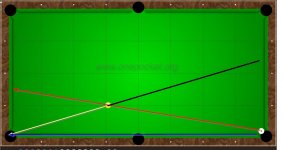
Shot line - line running through the object ball to the center of the pocket. This line is extended to the far rail and sometimes beyond it if needed
Aiming line - line running through object ball center to cue ball center (CBC). This line is ALWAYS the HYPOTENUSE of the pivot triangle. Labeled HYP on diagram.
Pivot Angle - angle of offset needed to put CB on shot line, tangent to OB. Formed by intersection of HYP and OTP lines. Labeled as PA on diagram.
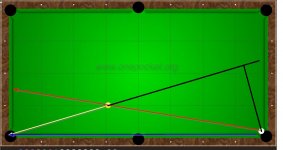
Tangent line and Tangent Point - line through CBC that runs perpendicular to the shot line. The intersection is labeled TP and the length is labeled CTP on diagram. Used to estimate the angle of PA when compared to HYP.
Object ball to TP - length of line drawn through center of object ball to tangent point. Labeled OTP on diagram. Used to estimate angle of the PA when compared to CTP.
Tangent Point Rotated - length of CTP rotated around the CBC and superimposed on HYP. TPR on diagram
Cue ball Center Rotated - length of CTP rotated around the TP and superimposed on OTP. CCR on diagram. At angles over 45* OPT is rotated over CTP and the amount of CTP not 'covered' is used.
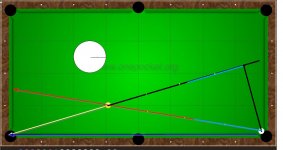
The first diagram is a 15* cut into the side pocket. The shot line is straight across the table and the tangent line is straight across the length to keep the orientation easier to see. There are some interesting things to notice, the ratios of CTP/HYP and CTP/OTP and THE LOCATION of TPR on HYP. To find the location of TPR imagine that CTP is one hand on a clock with HYP the other. Rotate CTP around the CBC until the hands overlap. If the length of HYP is imagined to be 1 BALL RADIUS and divided into 4 equal segments, TPR is found to be on the 1/4 ball mark. THE PIVOT TRIANGLE SHOWS WHERE THE PIVOT POINT IS LOCATED ON THE CUE BALL. As the cut angle needed increases, CTP gets longer. The pivot angle increases and TPR moves down the HYP line and gets closer to 1 cue ball radius and the edge of the cue ball.
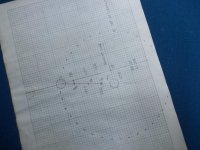
Look at the diagram and imagine the HYP line as the RADIUS of a large cue ball and TPR as the pivot point location on it. Rotate HYP 360* with CBC as the center to draw a circle around the cue ball to create a large cue ball. Dashed lines are drawn around the pivot triangle to illustrate this concept. If you 'shrink' everything down to normal size you'll have a cue ball with the pivot point on the face. Think of the circles as cue tip hits at dead center and extreme edge with HYP as the radius line.
The ratio of CTP to HYP is the sine (sin) of the pivot angle. If the sine for angles of 15*, 30*, 45*, 50*, and 60* are looked up, the results are 1/4, 1/2, 3/4-, 3/4, and 7/8 which correspond directly to points on the radius of the cue ball. If the pivot angles for 10* to 80* are looked up in a sine table the percentage of ball radius will show where the pivot point is located. The values are : 10 - 17%, 20 - 34%, 30 - 50%, 40 - 65%, 50 - 76%, 60 - 86%, 70 - 93%, 80 - 98%. The data shows that a 1/6 pivot is 10*, a 1/3 pivot is 20*, and a 2/3 pivot is 40*.
The ratio of CTP/OTP is also useful to estimate angles. This is the tangent (tan) of the pivot angle. The diagram shows that CCR is very close to the 1/4 mark on OPT. Examination of the trig tables shows that the tangent and sine values are within 1/2 degree of each other on angles below 20*. This means that CCR CAN BE USED AS THE PIVOT POINT LOCATION FOR ANGLES UNDER 20*. Use TP as the center of the cue ball and the 1/3 mark on OPT as the limit where CCR is correct. On a small angle pivot triangle with a large OPT, the angle and pivot point can be very accurately estimated.
When the CTP line is smaller than OPT, the ratios of 1/4, 1/2, and 3/4 on the OPT line give pivot angles of 14*, 26*, and 37*. The lengths of CTP and OTP become equal at 45*. When OPT is smaller than CTP, at the ratios of 1/4, 1/2, and 3/4 on the CPT line, the pivot angles are 53*, 64*, and 76*. Think of the sequence as: 15, 25, 35, 45, 55, 65, and 75 degrees and the PA will be close. By using the known pivot spots on the cue ball a small adjustment can be determined by examining the CTP/OPT relationship.
Technically the cotangent (cot) is used when OPT is rotated to CTP. When the PA passes 45*, CPT is longer than OPT. I rotated OTP to CTP because it's easier to rotate a small line onto a large one. I also used the concept of finding out how much of CPT is left 'uncovered' after the rotation on the diagrams in order to have the angles increase as the fractions on the CPT line get larger.
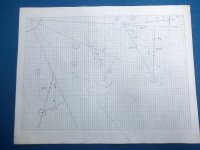
The next diagram has 5 shots that were randomly drawn with a pivot triangle for each. The shot solution is obtained by rotating CTP to HYP and marking it (TPR). The farther away TPR is from CBC, the steeper the angle and the pivot point moves down the HYP line and gets closer to the edge of the imaginary cue ball. A straight in shot doesn't have a triangle, it's a straight line. It requires a zero ball pivot or a center to center contact. After I drew the shots and pivot triangles, I made an estimation of the pivot angle using TPR and then measured them. As you examine the shots, visualize HYP as the cue ball RADIUS and TPR as the pivot point on an imaginary cue ball and try to estimate the pivot angle.
Shot 1 - TPR is half way between the 1/2 and 3/4 ball marks. Estimated angle of 40* with a measured angle of 39*
Shot 2 - TPR is not quite at the 1/2 ball mark. Estimated angle of 29* with a measured angle of 29*
Shot 3 - TPR is also half way between the 1/2 and 3/4 ball mark. Estimated angle of 40* with a measured angle of 39*
Shot 4 - TPR is a little past the 7/8 ball mark. Estimated angle of 62* with a measured angle of 60.5* Notice that CTP is larger than OPT as the pivot angle passes 45*. CCR is marked on the CTP line which is divided into four equal segments. It can be used as a confirmation of the pivot angle. CCR is a little short of the half point of CTP which predicts an angle of 60*. The predicted angles by both techniques are close to the same value for the pivot angle.
Shot 5 - TPR is between the 1/4 and 1/8 marks. Estimated angle of 10* with a measured angle of 9*
A pivot triangle will only determine the angle for the shot. It doesn't have any adjustments for the extra rotations needed for thin cuts or balls that are close to each other. Real world balls aren't point sources. They require an extra rotation in order to present the right face into the shot in order for the 'computed' pivot to work. Shot 4 in the examples given will require an extra amount of rotation. CTE, 1/8 ball aiming, and ETE are adjustments that have been found to work by dedicated users of pivot to aim systems. The adjustments are another mystery that needs investigation mathematically for increasing amounts of PA and the decreasing distance between balls.
How to turn a pool table into an analog computer to find a shot solution.
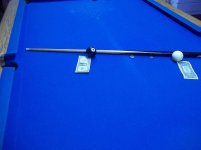
Use the 15* shot in the first diagram and set up the pivot triangle. Mark the right angle at TP with a coin. Remember when you draw the pivot triangle that HYP is the longest line and the right angle isn't connected to either ball. Find TPR on the table and mark it with a dime, then mark the center of HYP with a quarter as a reference. Place a marker like a dollar bill at the center of each ball that is perpendicular to the aiming line. Get lined up so the HYP line is straight across your field of view and get square with it. The picture should help with the process. Imagine the cue ball as the center of a larger cue ball that has the radius of HYP. When you get the connection, move the cue ball and try a few more random shot triangles. Make some thick and thin shots and try to estimate PA. Find the pivot point (TPR) and use the ratio to take the shots. Try it without the coins when you become comfortable seeing the cue ball radius line.
A pivot triangle works well on shots where it's easy to visualize but it's a bit cumbersome to use as a system on the table. On long shots the triangle gets so big it may leave the table which makes it difficult or impossible to visualize. When used on questionable shots it can be a good double check and it's use can help fine tune 2* - 30* shots. The next time you're unsure of an angle, use the circular slide rule on the table to evaluate sin PA (TPR) or tan PA (CCR). It's a new and interesting way to use a trig table.
My Vorpal Cue jabbed 'er wonky and the shot went snicker-snack. 'Twas brillig.
There's an useful triangle hidden on the table and by examining it some interesting and useful things are revealed. I call it the pivot triangle. It can be used to solve the shot and show the results on the table bed. These are some observations found while trying to unravel the concept of pivot to center aiming systems. I haven't seen anything similar to this and I thought some members may find the information helpful.

Some knowledge of simple trigonometry is useful to understand the diagram and explanation, but all that's needed is to be able to draw lines and compare how long one line is compared to another. Here are the definitions for the terms and labels.
Shot line - line running through the object ball to the center of the pocket. This line is extended to the far rail and sometimes beyond it if needed
Aiming line - line running through object ball center to cue ball center (CBC). This line is ALWAYS the HYPOTENUSE of the pivot triangle. Labeled HYP on diagram.
Pivot Angle - angle of offset needed to put CB on shot line, tangent to OB. Formed by intersection of HYP and OTP lines. Labeled as PA on diagram.
Tangent line and Tangent Point - line through CBC that runs perpendicular to the shot line. The intersection is labeled TP and the length is labeled CTP on diagram. Used to estimate the angle of PA when compared to HYP.
Object ball to TP - length of line drawn through center of object ball to tangent point. Labeled OTP on diagram. Used to estimate angle of the PA when compared to CTP.
Tangent Point Rotated - length of CTP rotated around the CBC and superimposed on HYP. TPR on diagram
Cue ball Center Rotated - length of CTP rotated around the TP and superimposed on OTP. CCR on diagram. At angles over 45* OPT is rotated over CTP and the amount of CTP not 'covered' is used.
The first diagram is a 15* cut into the side pocket. The shot line is straight across the table and the tangent line is straight across the length to keep the orientation easier to see. There are some interesting things to notice, the ratios of CTP/HYP and CTP/OTP and THE LOCATION of TPR on HYP. To find the location of TPR imagine that CTP is one hand on a clock with HYP the other. Rotate CTP around the CBC until the hands overlap. If the length of HYP is imagined to be 1 BALL RADIUS and divided into 4 equal segments, TPR is found to be on the 1/4 ball mark. THE PIVOT TRIANGLE SHOWS WHERE THE PIVOT POINT IS LOCATED ON THE CUE BALL. As the cut angle needed increases, CTP gets longer. The pivot angle increases and TPR moves down the HYP line and gets closer to 1 cue ball radius and the edge of the cue ball.

Look at the diagram and imagine the HYP line as the RADIUS of a large cue ball and TPR as the pivot point location on it. Rotate HYP 360* with CBC as the center to draw a circle around the cue ball to create a large cue ball. Dashed lines are drawn around the pivot triangle to illustrate this concept. If you 'shrink' everything down to normal size you'll have a cue ball with the pivot point on the face. Think of the circles as cue tip hits at dead center and extreme edge with HYP as the radius line.
The ratio of CTP to HYP is the sine (sin) of the pivot angle. If the sine for angles of 15*, 30*, 45*, 50*, and 60* are looked up, the results are 1/4, 1/2, 3/4-, 3/4, and 7/8 which correspond directly to points on the radius of the cue ball. If the pivot angles for 10* to 80* are looked up in a sine table the percentage of ball radius will show where the pivot point is located. The values are : 10 - 17%, 20 - 34%, 30 - 50%, 40 - 65%, 50 - 76%, 60 - 86%, 70 - 93%, 80 - 98%. The data shows that a 1/6 pivot is 10*, a 1/3 pivot is 20*, and a 2/3 pivot is 40*.
The ratio of CTP/OTP is also useful to estimate angles. This is the tangent (tan) of the pivot angle. The diagram shows that CCR is very close to the 1/4 mark on OPT. Examination of the trig tables shows that the tangent and sine values are within 1/2 degree of each other on angles below 20*. This means that CCR CAN BE USED AS THE PIVOT POINT LOCATION FOR ANGLES UNDER 20*. Use TP as the center of the cue ball and the 1/3 mark on OPT as the limit where CCR is correct. On a small angle pivot triangle with a large OPT, the angle and pivot point can be very accurately estimated.
When the CTP line is smaller than OPT, the ratios of 1/4, 1/2, and 3/4 on the OPT line give pivot angles of 14*, 26*, and 37*. The lengths of CTP and OTP become equal at 45*. When OPT is smaller than CTP, at the ratios of 1/4, 1/2, and 3/4 on the CPT line, the pivot angles are 53*, 64*, and 76*. Think of the sequence as: 15, 25, 35, 45, 55, 65, and 75 degrees and the PA will be close. By using the known pivot spots on the cue ball a small adjustment can be determined by examining the CTP/OPT relationship.
Technically the cotangent (cot) is used when OPT is rotated to CTP. When the PA passes 45*, CPT is longer than OPT. I rotated OTP to CTP because it's easier to rotate a small line onto a large one. I also used the concept of finding out how much of CPT is left 'uncovered' after the rotation on the diagrams in order to have the angles increase as the fractions on the CPT line get larger.

The next diagram has 5 shots that were randomly drawn with a pivot triangle for each. The shot solution is obtained by rotating CTP to HYP and marking it (TPR). The farther away TPR is from CBC, the steeper the angle and the pivot point moves down the HYP line and gets closer to the edge of the imaginary cue ball. A straight in shot doesn't have a triangle, it's a straight line. It requires a zero ball pivot or a center to center contact. After I drew the shots and pivot triangles, I made an estimation of the pivot angle using TPR and then measured them. As you examine the shots, visualize HYP as the cue ball RADIUS and TPR as the pivot point on an imaginary cue ball and try to estimate the pivot angle.
Shot 1 - TPR is half way between the 1/2 and 3/4 ball marks. Estimated angle of 40* with a measured angle of 39*
Shot 2 - TPR is not quite at the 1/2 ball mark. Estimated angle of 29* with a measured angle of 29*
Shot 3 - TPR is also half way between the 1/2 and 3/4 ball mark. Estimated angle of 40* with a measured angle of 39*
Shot 4 - TPR is a little past the 7/8 ball mark. Estimated angle of 62* with a measured angle of 60.5* Notice that CTP is larger than OPT as the pivot angle passes 45*. CCR is marked on the CTP line which is divided into four equal segments. It can be used as a confirmation of the pivot angle. CCR is a little short of the half point of CTP which predicts an angle of 60*. The predicted angles by both techniques are close to the same value for the pivot angle.
Shot 5 - TPR is between the 1/4 and 1/8 marks. Estimated angle of 10* with a measured angle of 9*
A pivot triangle will only determine the angle for the shot. It doesn't have any adjustments for the extra rotations needed for thin cuts or balls that are close to each other. Real world balls aren't point sources. They require an extra rotation in order to present the right face into the shot in order for the 'computed' pivot to work. Shot 4 in the examples given will require an extra amount of rotation. CTE, 1/8 ball aiming, and ETE are adjustments that have been found to work by dedicated users of pivot to aim systems. The adjustments are another mystery that needs investigation mathematically for increasing amounts of PA and the decreasing distance between balls.
How to turn a pool table into an analog computer to find a shot solution.

Use the 15* shot in the first diagram and set up the pivot triangle. Mark the right angle at TP with a coin. Remember when you draw the pivot triangle that HYP is the longest line and the right angle isn't connected to either ball. Find TPR on the table and mark it with a dime, then mark the center of HYP with a quarter as a reference. Place a marker like a dollar bill at the center of each ball that is perpendicular to the aiming line. Get lined up so the HYP line is straight across your field of view and get square with it. The picture should help with the process. Imagine the cue ball as the center of a larger cue ball that has the radius of HYP. When you get the connection, move the cue ball and try a few more random shot triangles. Make some thick and thin shots and try to estimate PA. Find the pivot point (TPR) and use the ratio to take the shots. Try it without the coins when you become comfortable seeing the cue ball radius line.
A pivot triangle works well on shots where it's easy to visualize but it's a bit cumbersome to use as a system on the table. On long shots the triangle gets so big it may leave the table which makes it difficult or impossible to visualize. When used on questionable shots it can be a good double check and it's use can help fine tune 2* - 30* shots. The next time you're unsure of an angle, use the circular slide rule on the table to evaluate sin PA (TPR) or tan PA (CCR). It's a new and interesting way to use a trig table.
My Vorpal Cue jabbed 'er wonky and the shot went snicker-snack. 'Twas brillig.
Last edited:
