Rhino 'Time' and 'Time Crystal' tips

NCC1515

New member
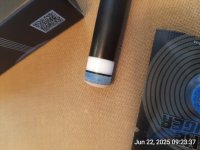
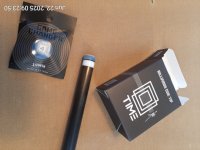
Had a teammate ask if I'd seen them so I looked them up. Searched on the web and here and couldn't find a review. Rhino is selling a tip made from layered "microfiber" cloth, in five hardnesses. Being a cloth and probably polyester (?), and available in multiple hardnesses, I would expect the binder might be polyurethane. If Rhino has a presence here, they can comment or not. They have a 'Time' and 'Time Crystal' tip and the only difference I see is that the 'Crystal' tip includes a clear pad underneath. No explanation if that clear pad is acrylic or polycarbonate. I'm not a fan of clear pads, and I favor harder tips, so I bought the 'Time' tips in medium hard, or #4. I have two CF shafts which are essentially the same, and they each had MH and H layered pigskin tips on them for almost a year now. Can't say the name because they are a product given for evaluation and I haven't seen the maker bring those tips to market - yet. Suffice to say: the evaluation tips installed and play as well as UltraSkins and I like them.

As for the Rhino Time tips: I replaced the MH tip on my 'home' shaft with a Rhino Time #4 and so far, it does everything the former MH tip did in terms of performance, so I can play all manner of shots as I normally do, including draw and extreme left or right spin, with no surprising results. Chalks easily and holds chalk well. An observation as an installer is: with my normal burnishing and finishing steps, I was unable to get any kind of 'shine' on the sides of the Time tip. So don't know how absorbent - or not - the edges of the layers are, since my assumption is that they are saturated with some aforementioned binder. Will the tip still be performing satisfactorily 6mo or 1yr from now? I guess 'time' will tell, although pricewise, they cost 3-4 times an UltraSkin.
 

Attachments

  • IMG_20250622_092337.jpg
    IMG_20250622_092337.jpg
    73.3 KB · Views: 58
  • IMG_20250622_092350.jpg
    IMG_20250622_092350.jpg
    88.3 KB · Views: 53
My avatar is a Time Crystal tip. They are pretty with the transparent layer. I find them difficult to replace, however, because the plastic black pad made it hard for me to glue and it was slippery. I tried to only remove the blue tip, keep the clear and black layers on the ferrule, but that didn't work out well.

Next time, I may just need to scuff up the black shiny pad to establish an easy-to-make seal to the ferrule.
 
Many plastics are not glue friendly. The concept is called low 'surface energy'. That's why it pays to know what the plastic is, on tip pads and ferrules. Almost nothing sticks to Delrin, for instance, because it has super low 'surface energy' - think 'teflon'. In almost every case, abrasion of a plastic surface gives it more 'tooth', to help add a mechanical component to any adhesive bond between to materials. Rhino's plastic pads could be acrylic (plexiglas) or could be polycarbonate. They should say. Clear one piece plastic break tips are polycarbonate. 'Super glues' (cyanoacrylates or CA) typically work very well on acrylics and sometimes need some extra help on polycarbonates. In either case, it never hurts to lightly abrade any plastic surface (keeping it 'flat') and wiping off any dust, before applying an adhesive. 150-180 grit sandpaper is good. You get more 'tooth' for grip and it can also help increase surface area for the bond, AND to hold some moisture. A tiny amount of moisture can accelerate a cyanoacrylate cure. That's why super glue has an almost instant bond on your skin. That doesn't mean you want wet surfaces, however. Too much moisture inhibits super glue bonding. The moisture in your breath can often be enough to start an instant chain reaction in a CA glue. Commercial CA 'accelerators' often use acetone for rapid moisture evaporation. For worst case hard to glue materials, abrasion and use of a fast set epoxy can help. If you're using a 'super glue' and it's more than a year old, throw it away and buy new, write the date on it, then keep it in the fridge'. Lastly, look at the fine print on your adhesive. Almost every CA adhesive and two-part epoxies say they will bond 'instantly' or 'in X minutes', but then they also say that ultimate bond strength is not reached until 24 hours.
 
My avatar is a Time Crystal tip. They are pretty with the transparent layer. I find them difficult to replace, however, because the plastic black pad made it hard for me to glue and it was slippery. I tried to only remove the blue tip, keep the clear and black layers on the ferrule, but that didn't work out well.

Next time, I may just need to scuff up the black shiny pad to establish an easy-to-make seal to the ferrule.
You didn't say this, but one thing, cutting grooves isn't necessary when installing any tips. I've done it in the past and it was an "old wives tale" of pool knowledge. It was kind of common knowledge that was passed around but looking at it objectively it was bad advice. It may have been more relevant when people were using old type glues and not CA.

What you want is truly flat surfaces that are perpendicular to the axis of the cue, IE flat and level. CA glue sticks better to smooth surfaces. Try some Gorilla Glue gel type glue. You don't have to use this but its the one I've had the best luck with. From every type of leather tip, ones with clear pads, several types of break tip including phenolic, lexan, bakelite, and whatever White Diamonds are. Tips stay on and don't pop off.

Now I do recommend facing the tips with sandpaper, but nothing crazy scratchy. You can do it with even 600 grit or higher so it's not about scratches. You basically want to make the plastic (black or clear) matte and no longer shiny, and it's not really about the shine, it's to guarantee it's flat. Take your time and stop when it's matte. Most tips are not flat, even Kamui clears which say you don't have to sand them. You do. "Lap" them until matte to make them flat. They are concave out of the box.

Lay your sandpaper/emery cloth flat on a flat surface and lightly make figure 8s with the tip. Rotate it after about 5 or so figure 8s and check it often, stopping as soon as the surface is uniformly matte.

You may already do this, I have no idea, but I thought I'd post this for anyone dealing with the plastic backed tips for the first time.
 
Many plastics are not glue friendly. The concept is called low 'surface energy'. That's why it pays to know what the plastic is, on tip pads and ferrules. Almost nothing sticks to Delrin, for instance, because it has super low 'surface energy' - think 'teflon'. In almost every case, abrasion of a plastic surface gives it more 'tooth', to help add a mechanical component to any adhesive bond between to materials. Rhino's plastic pads could be acrylic (plexiglas) or could be polycarbonate. They should say. Clear one piece plastic break tips are polycarbonate. 'Super glues' (cyanoacrylates or CA) typically work very well on acrylics and sometimes need some extra help on polycarbonates. In either case, it never hurts to lightly abrade any plastic surface (keeping it 'flat') and wiping off any dust, before applying an adhesive. 150-180 grit sandpaper is good. You get more 'tooth' for grip and it can also help increase surface area for the bond, AND to hold some moisture. A tiny amount of moisture can accelerate a cyanoacrylate cure. That's why super glue has an almost instant bond on your skin. That doesn't mean you want wet surfaces, however. Too much moisture inhibits super glue bonding. The moisture in your breath can often be enough to start an instant chain reaction in a CA glue. Commercial CA 'accelerators' often use acetone for rapid moisture evaporation. For worst case hard to glue materials, abrasion and use of a fast set epoxy can help. If you're using a 'super glue' and it's more than a year old, throw it away and buy new, write the date on it, then keep it in the fridge'. Lastly, look at the fine print on your adhesive. Almost every CA adhesive and two-part epoxies say they will bond 'instantly' or 'in X minutes', but then they also say that ultimate bond strength is not reached until 24 hours.
I should have read the whole thread before posting, you nailed it exactly!
 
I'm aware of 'old wives tales'. That's why what I've shared can also be found on some of the adhesive manufacturer's own web sites. Loctite, Devcon, Starbond, and others, publish extensive and helpful information and also white papers. Most people don't have the patience to read through it. Haven't seen that depth of 'sharing' from Gorilla yet but I do use their product. I will say that even at 600 grit, and a 'matte' finish, you provide way more 'tooth' than the smooth shiny surface of an unsanded plastic. Ever run into a cheap Asian cue that had a plastic ferrule which began to dissolve from the Gorilla (and probably any other CA) super glue? What #$&*! plastic was that?! Makes the tip replacement job more work than the cue is worth. BUT... back to RHINO: I can appreciate that they are trying to innovate, and 'sharing' all their R&D 'secrets' isn't good for them, but cue repair people eventually figure out what they are doing / how they are building things, even if they don't share. Rhino has brought some things to market which had to be repaired, revised and improved later, but so has Predator, and Cuetec. For now, I have the 'Time Crystal' #4 tips on BOTH my play shafts, so I can speak to their performance for me, as 'time' goes on.
 
You didn't say this, but one thing, cutting grooves isn't necessary when installing any tips. I've done it in the past and it was an "old wives tale" of pool knowledge. It was kind of common knowledge that was passed around but looking at it objectively it was bad advice. It may have been more relevant when people were using old type glues and not CA.

What you want is truly flat surfaces that are perpendicular to the axis of the cue, IE flat and level. CA glue sticks better to smooth surfaces. Try some Gorilla Glue gel type glue. You don't have to use this but its the one I've had the best luck with. From every type of leather tip, ones with clear pads, several types of break tip including phenolic, lexan, bakelite, and whatever White Diamonds are. Tips stay on and don't pop off.

Now I do recommend facing the tips with sandpaper, but nothing crazy scratchy. You can do it with even 600 grit or higher so it's not about scratches. You basically want to make the plastic (black or clear) matte and no longer shiny, and it's not really about the shine, it's to guarantee it's flat. Take your time and stop when it's matte. Most tips are not flat, even Kamui clears which say you don't have to sand them. You do. "Lap" them until matte to make them flat. They are concave out of the box.

Lay your sandpaper/emery cloth flat on a flat surface and lightly make figure 8s with the tip. Rotate it after about 5 or so figure 8s and check it often, stopping as soon as the surface is uniformly matte.

You may already do this, I have no idea, but I thought I'd post this for anyone dealing with the plastic backed tips for the first time.
Wanted to thank you for your post, especially the comments about things being 'FLAT' or not. My WM210V Chinee lathe required a LOT of accurizing work right when I got it, including re-designing the backside of the carriage to remove vertical free play there, chuck replacement and subsequent chuck jaw 'boring', tailstock work, etc. After all that, I knew I still had a small error in the factory grinding of the cross-slide saddle, yielding a wee bit of a concave facing cut, and it was so small I thought it would be inconsequential. More 'inconsequential' on flexible hyde/leather tips, I'll wager, than on super hard things like phenolic. So your 'flat'ness comments inspired me to spend time this week, removing the cross-slide and carefully mill-filing some material off the left (more to the rear) side of the saddle. Took about six remove/file/replace/test operations, but I've now eliminated that facing error.
 
Is this tip the standard that comes with the Rhino shafts?
It looked like a low quality tip and I cut it off as soon as I got the shaft and had a different tip installed....
I have a second Rhino shaft that is still unplayed and this is the tip on it:

Rhino-Default-tip.jpg


I was about to cut it off as well but now I'm thinking to try it.
As you can see, even with the factory instalation, the sides are not burnished.
 
It appears to be the 'Time Crystal' but who knows how hard. Did they say soft, medium, etc when you bought it? I'm convinced now they can't be 'burnished', in the traditional sense, because they are layers of (polyester?) 'microfiber' and some binder, probably polyurethane. Only Rhino can speak to that. I suppose you could get shiny finish on the sides by coating with some liquid acrylic but that would probably wear off quickly and/or look worse after use. I have them (#4, so MH I guess) on both my play shafts now and will report on them again at six months.
 
It appears to be the 'Time Crystal' but who knows how hard. Did they say soft, medium, etc when you bought it? I'm convinced now they can't be 'burnished', in the traditional sense, because they are layers of (polyester?) 'microfiber' and some binder, probably polyurethane. Only Rhino can speak to that. I suppose you could get shiny finish on the sides by coating with some liquid acrylic but that would probably wear off quickly and/or look worse after use. I have them (#4, so MH I guess) on both my play shafts now and will report on them again at six months.
When I got it, it didn't say anything about the tip.
Now I see on their web site that it is Time Crystal but they don't say which hardness.
I guess it is possible to contact them and ask.
 
Back
Top