100 year old Brunswick Old Mission B restoration

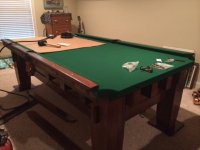
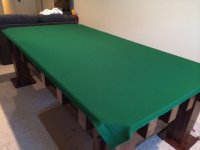
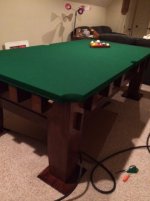
You will probably notice the plates under the legs. I got to thinking about what my wife was worried about about the table falling through into the garage, so in order to distribute the force a little more evenly, I cut 12" x 12" plates out of 3/4" oak plywood and put them under the legs. This effectively cut the PSI force down by 75% by spreading that weight across 144 sq in instead of 36 sq in. Also it gave me a hard surface to shim to instead of the carpet. So I centered the table side to side and left myself enough room on the head (window) end to shoot from. Now came the slates!!

Great idea with the plywood! Let the table sit for a while to flatten the carpet out before leveling or it will go out of level quickly.
 
Yeah, I found that out pretty quickly. I'd get it within 0.1 degree of level and come back a day later and it would be off by 0.3 degrees. I ran into a problem at this point. If you notice in the earlier pictures I was missing the middle slate support tenons. No problem i thought. I sourced an old piece of rough cut oak from a building salvage place, planed it down to 2", and reproduced the tenons based on the one that was already off the table in the earlier pics. When I set the slates on the frame, the tenons that I had made were too long and protruded into the side pockets. Off the slates came, and then the scary part. I had to bust off the two middle tenons. They are doweled and glued into a recess in the frame. All in all, I was able to get them off without too much damage to anything, then I cut them in half. I'm not sure how long the originals were, but they no longer interfere with the pockets. I set them back from the pockets about 2", which gave me about three inches of tenon. Even if I ever find an original table and can measure those, they are staying where they are at this point. I don't want to take them off again. so I got my slates all in the same plane and then started to level the frame. I got really close, within 0.1 degree of level but ran into another issue. I had bought oak shoe molding to put around the legs to hide the shims. at this point the shims were taller than the molding. So I pulled the plates out from under the legs, and cut two more to match, and painted the edges black because I didn't want to have to wait another week for stain. I figured they would be down into the carpet anyway and wouldn't be noticeable. Then I pulled all of the shims out and doubled up the plates under one end in order to move those top plates up where I wouldn't have to use as many shims and I could hide them with the molding. Now I'm back to trying to get it level again and running into issues. All of the progress you see so far has been over the last month. I picked up this table at the end of august. Making headway on it, but still trying to get leveled out. I've been working on that for the last week or so. .
 
Last edited:
The table is a good 1, with that name plate on it is telling me that A E Schmidt has done some type of service or repair on the table. Schmidt would service the table and put their name plate on the table in place of a original... Very common.

Which brand of cushions are on the rails? Any name on the bare cushion?


Rob.M

I looked this morning ant there is no name on the cushions. They are marked K-66 with a number 9 next to the K-66 mark. I figure if Schmidt replaced the nameplate they did the cushions. They should know the correct cushion to put on it. I did stick a rail on the bare slate to measure nose height. seems close but I won't know for sure until I get it covered and rails attached. Cushions seem to be OK, but again Ill have to try them out before I make the call to replace them or not.
 

Attachments

  • photo 88.JPG
    photo 88.JPG
    74.7 KB · Views: 905
  • 1.JPG
    1.JPG
    69.6 KB · Views: 915
  • 5.JPG
    5.JPG
    71.9 KB · Views: 893
In between working and working on the table, I started looking for rosewood veneer for the rails. Found a super great guy named Ben Berkshire out of MA. Excellent guy to deal with. In our conversation it came up that he also has a n antique Brunswick Novelty table. He actually shipped me two different batches of rosewood veneer to match up with my rails BEFORE I paid a dime!! His company is Berkshire veneer. I highly recommend him for your veneer needs. I can't say enough about his customer service and helpfulness. I worked on the table for about 30 mins last night and got it to within 0.1 degrees of level again. I will continue with that tonight. I also started on the rails and sourced this label (maybe the experts out there can tell me if it is the correct one for the time frame of my table):
 

Attachments

  • IMG_285.jpg
    IMG_285.jpg
    38.4 KB · Views: 841
This is an awesome project, you got going there. Best of luck with it. Cant wait to see the final product.
 
So I spent my free time this weekend working on getting the table leveled out. Finally got it but what a bear. Got my worsted felt installed too. Now on to the pockets and rails!! Looks like I might be playing at Thanksgiving!!!
 

Attachments

  • felt 1.JPG
    felt 1.JPG
    86.8 KB · Views: 781
  • felt 2.JPG
    felt 2.JPG
    85.5 KB · Views: 779
  • felt 3.jpg
    felt 3.jpg
    28.9 KB · Views: 777
Thanks!! it has been a fun one so far. Except for the leveling. That part SUCKS!! Honestly I cant wait to see it finished either.

Warned you! ;)

Carpet is the doom of pool tables. I always tell people to cut holes for the feet or the entire table and carpet the footpaths around the table for comfort.
 
Do you guys have any suggestions on affixing the shims to the slate supports? I am thinking of running a very short screw up through the shims into the slate supports just to hold them in place so they don't shift or wind up on the floor in a few months. Thoughts???
 
Table

Do you guys have any suggestions on affixing the shims to the slate supports? I am thinking of running a very short screw up through the shims into the slate supports just to hold them in place so they don't shift or wind up on the floor in a few months. Thoughts???

-


A dab of superglue from a tube, don't use the superglue in the hard push buttom applicator... The hard framed bottles don't work upside down in the way you'll be using it.

A screw will split the shim unless predrilled.


Rob.M
 
Still working on my rails. Wife wants them to show their age, so I'm not going to re-veneer them at this time. Just sand them down, leave the missing veneer missing, and give them a quick stain/topcoat. How many times do you think that rails get recovered in 100+ years? Take a look at the picture of the sub-rail and take your best guess.

On a side story, when I was a teen I was looking to purchase a cue and had a friend of a friend offer me a cue for 45$. There was no makers name on it, but it shot well and I liked it, so I bought it. All he knew about it was that it was an expensive cue made by a local guy, in Puckett, MS. I replaced the tip on it years ago as a teenager not knowing what I was doing or what I had. This cue has been through it. I've always liked that cue and have kept it through the years. When I acquired the table, I told my wife I would like another by the same maker. So I started trying to figure out who had made it. Take a look at the pics and see if you guys can ID it!! I am pretty sure I know who's it is, and will get it verified, but want y'alls opinion!!
 

Attachments

  • photo.jpg
    photo.jpg
    40.1 KB · Views: 818
  • cue 2.jpg
    cue 2.jpg
    100.5 KB · Views: 830
  • cue 4.jpg
    cue 4.jpg
    99 KB · Views: 834
  • cue 3.jpg
    cue 3.jpg
    99.2 KB · Views: 822
  • cue.jpg
    cue.jpg
    97.7 KB · Views: 819
So it's been kind of crazy the last few days with work travel keeping me away, but I finally made some progress. I had to re-stretch my felt because of a few wrinkles that developed around the side pockets after the temperature started dropping. I got my rails refinished and started covering them. That was a bit of a learning curve. I cut my cushion facings a little short on my end rails and had to order some more, but I covered them anyway to test the cushions. Once I got my felt stretched correctly, I installed my end rails and finally got to test the cushions. I got the 4 - 4.5 rail rebound I was looking for, so looks like my rails aren't dead. My new facings showed up but they were the thin ones, not the thicker ones I had ordered, so I'm at a standstill until they come in. My side rails were ready to go, so I went ahead and installed them. I've still got to nail the pockets on, but my son and I went ahead and took a few shots with just the sides on. It is really starting to look like a pool table now. I'm so close to completing the project that I can taste it. My son is super excited about getting it done too. Looks pretty good if I must say so myself!!
 

Attachments

  • photo 91.JPG
    photo 91.JPG
    87.5 KB · Views: 756
  • photo 92.JPG
    photo 92.JPG
    95.3 KB · Views: 741
Thanks!! I've only been working on it for a little over 2 months now. It does take a little patience but is very rewarding in the end. Don't get me wrong, I am ready for the end result!!!
 
Still working on my rails. Wife wants them to show their age, so I'm not going to re-veneer them at this time. Just sand them down, leave the missing veneer missing, and give them a quick stain/topcoat. How many times do you think that rails get recovered in 100+ years? Take a look at the picture of the sub-rail and take your best guess.

On a side story, when I was a teen I was looking to purchase a cue and had a friend of a friend offer me a cue for 45$. There was no makers name on it, but it shot well and I liked it, so I bought it. All he knew about it was that it was an expensive cue made by a local guy, in Puckett, MS. I replaced the tip on it years ago as a teenager not knowing what I was doing or what I had. This cue has been through it. I've always liked that cue and have kept it through the years. When I acquired the table, I told my wife I would like another by the same maker. So I started trying to figure out who had made it. Take a look at the pics and see if you guys can ID it!! I am pretty sure I know who's it is, and will get it verified, but want y'alls opinion!!

So any takers on trying to ID my cue??
 
-


A dab of superglue from a tube, don't use the superglue in the hard push buttom applicator... The hard framed bottles don't work upside down in the way you'll be using it.

A screw will split the shim unless predrilled.


Rob.M


I wound up just shooting a few 5/8" brad nails into the shims instead of screwing or gluing. That was just easier and faster.
 
Table

I wound up just shooting a few 5/8" brad nails into the shims instead of screwing or gluing. That was just easier and faster.

-


What's quick and eazy might not be the correct way tho... Now that you've nailed the shim in place you can not adjust the shim if needed...a dab of superglue is simple to break loose with the tap of a hammer...

Did you glue the cloth on.....? The cloth should not of " come loose " or relaxed...
Something has let loose or you had pulled to much slack to the side pockets....


Rob.M
 
Back
Top