The last hour of a long print is a killer.Job well done. Folks that have never 3d printed will never know the frustration of terms like spaghetti defects, z-Axis error, warping, etc. In my shop my students run three bambu X1 carbons pretty much all day everyday...nothing more frustrating to them than having a 12-13 hour print fail after getting half way done!
In fact, more and more of them just go ask if they can just go build it out of wood!
You are using an out of date browser. It may not display this or other websites correctly.
You should upgrade or use an alternative browser.
You should upgrade or use an alternative browser.
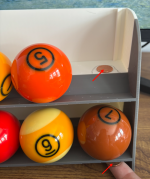
3D Printed One Pocket Ball Rack
- Thread starter iusedtoberich
- Start date
i think eliminating the top shelf allows balls to sit on top of the row of ballsI took the quick print to the pool room and put it on a shelf. It was surprisingly stable, even though it was only as wide as the balls.
On the table (where it was intended), it sticks out less than the Diamond wire metal rack, and doesn't get in the player's leg's way. My leg/shin bangs into the diamond wire rack sometimes. As seen in the picture, it can be optimized to fit into that space better.
View attachment 899839
if the trough the balls sit in is deep enough to not allow the balls to fall out easily it should be good enough for the few times that feature will be needed
just my humble opinion
I did some more work last night and printed this out. (ran out of filament and didn't have the same color). I winged this one just to test the concept. The shelves need a slightly bigger ledge. They hold the balls fine, but they can fall out if someone grabs the holder and takes it back to the table carelessly. The player name paper holder needs to be a touch wider, as its bending the paper. The shelves are a different shape than the other designs because I'm laying it on its back to print, without support. The concept works though, I'm quite pleased!


I've refined the model quite a bit today. Haven't printed it yet.
Made the lip on the shelf a sharper angle and deeper to retain the balls better. Added support in the middle to help prevent any sagging.

Added a lip for the bottom of the paper name card to keep it from bowing.

Concepting a few penny holder designs


Made the lip on the shelf a sharper angle and deeper to retain the balls better. Added support in the middle to help prevent any sagging.
Added a lip for the bottom of the paper name card to keep it from bowing.
Concepting a few penny holder designs
Today I worked on the coin holder.
Printed these 3 to try. The one on the left didn't hold them well. The one on the right is a double version of the middle.

I was also thinking of using the back of the top shelf, with maybe a ledge to guide the coin. The ball doesn't hit that area. Plus, anytime a coin is needed, the ball tray would be empty. I decided against this as I think it's nice to show off where the coin goes, as a purposeful feature. I was also thinking of a slot below the lower shelf. That would be in the print direction so good for printing. I decided against that as if its dropped, it will end up underneath the whole tray. (These two ideas didn't go further than a thought, no sketches or CAD).

I ended up combining the two ideas in the first picture. I'm happy how it functions and looks. The only thing I didn't like was the aesthetic where the arrow is.

I angled those surfaces where this arrow is and it looks better now. I'm going to go with this.

Printed these 3 to try. The one on the left didn't hold them well. The one on the right is a double version of the middle.
I was also thinking of using the back of the top shelf, with maybe a ledge to guide the coin. The ball doesn't hit that area. Plus, anytime a coin is needed, the ball tray would be empty. I decided against this as I think it's nice to show off where the coin goes, as a purposeful feature. I was also thinking of a slot below the lower shelf. That would be in the print direction so good for printing. I decided against that as if its dropped, it will end up underneath the whole tray. (These two ideas didn't go further than a thought, no sketches or CAD).
I ended up combining the two ideas in the first picture. I'm happy how it functions and looks. The only thing I didn't like was the aesthetic where the arrow is.
I angled those surfaces where this arrow is and it looks better now. I'm going to go with this.
Attachments
Today I worked on the coin holder.
Printed these 3 to try. The one on the left didn't hold them well. The one on the right is a double version of the middle.
View attachment 902445
I was also thinking of using the back of the top shelf, with maybe a ledge to guide the coin. The ball doesn't hit that area. Plus, anytime a coin is needed, the ball tray would be empty. I decided against this as I think it's nice to show off where the coin goes, as a purposeful feature. I was also thinking of a slot below the lower shelf. That would be in the print direction so good for printing. I decided against that as if its dropped, it will end up underneath the whole tray. (These two ideas didn't go further than a thought, no sketches or CAD).
I ended up combining the two ideas in the first picture. I'm happy how it functions and looks. The only thing I didn't like was the aesthetic where the arrow is.
View attachment 902449
I angled those surfaces where this arrow is and it looks better now. I'm going to go with this.
View attachment 902450
All that I can say is once a mechanical engineer always a mechanical engineer. Engineers like to take things apart to make them work better.
My son is an engineer, not mechanical though. He likes to take things apart and make them better too.
If you put a small fillet on all the inside corners, it will make it a little stronger
Great print! I like it. It is clean and clear. Good Job! i hope you do keep printing them. the pool world needs more makers.Few more pics:
View attachment 890737
It was very important to me that the balls had zero chance to hit any hardware.
View attachment 890739
I came up with this counter-bored design which is both ball friendly and print friendly.
View attachment 890741
I knew access would be difficult, so I used torx drive screws, so the driver wouldn't slip during installation. The tape was to prevent the tool from scratching the parts.
View attachment 890740
I'm super happy with how it came out! The balls stay in SOLID, even when manhandling the holder. 3rd row fits good. Pennies fit good. Paper fits good. Its easy to get the balls in and out.
Two minor issues, the 3rd leg in the middle hits the ground first and it teeter-totters on it. I was suspecting that would happen. Parts warp on 3D printing as much as injection molding. You still have to design for warp. I'll shorten it a hair. 2nd is its a bit difficult to pick up due to the smooth surfaces and tapered front. I don't want handles on the side because as a protrusion they will bump into things a lot and could break over time. I might cut a couple of finger holes into the back and see how that improves.
Two minor issues, the 3rd leg in the middle hits the ground first and it teeter-totters on it. I was suspecting that would happen. Parts warp on 3D printing as much as injection molding. You still have to design for warp. I'll shorten it a hair. 2nd is its a bit difficult to pick up due to the smooth surfaces and tapered front. I don't want handles on the side because as a protrusion they will bump into things a lot and could break over time. I might cut a couple of finger holes into the back and see how that improves.
In the slicer, you may consider adding a modifier to the area you want people to grip and make it fuzzy skin in that area.I'm super happy with how it came out! The balls stay in SOLID, even when manhandling the holder. 3rd row fits good. Pennies fit good. Paper fits good. Its easy to get the balls in and out.
Two minor issues, the 3rd leg in the middle hits the ground first and it teeter-totters on it. I was suspecting that would happen. Parts warp on 3D printing as much as injection molding. You still have to design for warp. I'll shorten it a hair. 2nd is its a bit difficult to pick up due to the smooth surfaces and tapered front. I don't want handles on the side because as a protrusion they will bump into things a lot and could break over time. I might cut a couple of finger holes into the back and see how that improves.
duplicate post
Last edited:
11 ball capacity
Last edited:
InsertCleverNameHere
Well-known member
Can I buy 2 of these? One Green, One Yellow. Masters colors. Just lmk how much. Feel free to DM. Thanks
I sanded the bottom flat on my tablesaw top surface with 100 grit paper. It worked great. Only took about 30 sec of sanding. (wasn't much). I generally don't like secondary operations after manufacturing a part with 3D printing or injection molding, but it might be the best solution in this case. I'll fool around with the design a bit, and also the printer settings, to see if I can eliminate the sanding.


Congrats!!!
Hope you sell a truckload of these!!!

How hard was it to figure out the gradient so the balls would roll, without making it look slanted or crooked??Congrats!!!
Hope you sell a truckload of these!!!
Thanks 4 da pics Nick!!Congrats!!!
Hope you sell a truckload of these!!!
Those are clean, sharp, have fine lines and are very professional looking. Any hall owner would be pleased with these for their players.I sanded the bottom flat on my tablesaw top surface with 100 grit paper. It worked great. Only took about 30 sec of sanding. (wasn't much). I generally don't like secondary operations after manufacturing a part with 3D printing or injection molding, but it might be the best solution in this case. I'll fool around with the design a bit, and also the printer settings, to see if I can eliminate the sanding.
View attachment 902878
View attachment 902879
Sure would help on the tournament trail as well!!
You go Papa!!