soyale
Well-known member
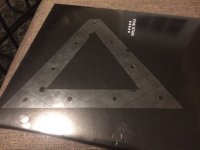
Hey everybody, I just wanted to share the results from making my own racking templates using Dr. Dave / Bob Jewett's method listed at the bottom of the page here https://billiards.colostate.edu/faq/break/racking/tight/ . Major thanks to both of those fellas for everything they do.


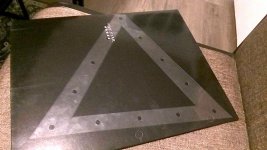
It took a little fiddling at the office depot to get the sizing just right on account of the online clients "keep size" not working properly, but i ended up with a couple free sheets of the stuff because of it. My total cost was less than $2.17 and from what i can tell this should work pretty well. I went ahead and printed an 8 and 9 ball out of regular cardstock as well to use as a template to make the templates, as i wanted to make a 10-ball rack and perma rack template (which i installed freehand on a friends table and am absolutely in love with).
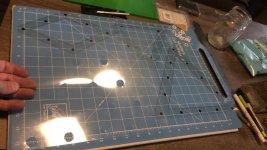
The biggest issue was that even with a brand new hole punch, i couldn't get through the transparency sheets in one punch, i had to un-punch and give it a gentle push forward to get the holepunch unstuck, and i was left with a little hangy circle. After some trial and error, i realized the best way to do it was to use the hole punch on all of the holes at once, and then press them back down flat and use an exacto knife to cut the little 1/8th circle that was left.
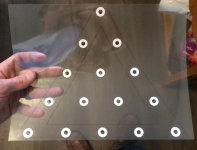
For the permarack, i first punched out the holes of the cardstock for the 8 and 9 ball racks (which worked very easily) and layered them one at a time over a blank piece of the transparency paper to trace the holes with a fine felt tip marker (it smears very easily, so be careful). The only hole left without a guide was the center ball, but i just had to scoot the cardstock template around, aligning the template holes with the two to each side of center. Once i had the 1/4" holes punched, i used 15 of the 1/4" reinforcement labels and lined them up as square as i could. Next, i used the exacto knife to cut an extra mm or two around each donut, so there's enough room to press down when installing the labels without snagging the sheet.
All of this might seem like basic common sense to a lot of you folks, but it was what i spent my day doing and i thought it might be helpful to others that might be thinking about undertaking the same task. I own a v-rack and praise it HIGHLY, and as i mentioned earlier am in love with the perma rack that i put on my buddies home table, however, i've never even used a template rack before. I'm very much looking forward to seeing how it performs and testing it for roll-off, and i was pleasantly surprised with how well the balls racked up even on my makeshift coffee table test cloth.
Whether this helps your broke ass make your own templates, or just makes you laugh at how cheap it is, i hope you enjoyed my post.
link to pdfs:
link to office depot copies file uploader
 www.officedepot.com


It took a little fiddling at the office depot to get the sizing just right on account of the online clients "keep size" not working properly, but i ended up with a couple free sheets of the stuff because of it. My total cost was less than $2.17 and from what i can tell this should work pretty well. I went ahead and printed an 8 and 9 ball out of regular cardstock as well to use as a template to make the templates, as i wanted to make a 10-ball rack and perma rack template (which i installed freehand on a friends table and am absolutely in love with).
The biggest issue was that even with a brand new hole punch, i couldn't get through the transparency sheets in one punch, i had to un-punch and give it a gentle push forward to get the holepunch unstuck, and i was left with a little hangy circle. After some trial and error, i realized the best way to do it was to use the hole punch on all of the holes at once, and then press them back down flat and use an exacto knife to cut the little 1/8th circle that was left.
For the permarack, i first punched out the holes of the cardstock for the 8 and 9 ball racks (which worked very easily) and layered them one at a time over a blank piece of the transparency paper to trace the holes with a fine felt tip marker (it smears very easily, so be careful). The only hole left without a guide was the center ball, but i just had to scoot the cardstock template around, aligning the template holes with the two to each side of center. Once i had the 1/4" holes punched, i used 15 of the 1/4" reinforcement labels and lined them up as square as i could. Next, i used the exacto knife to cut an extra mm or two around each donut, so there's enough room to press down when installing the labels without snagging the sheet.
All of this might seem like basic common sense to a lot of you folks, but it was what i spent my day doing and i thought it might be helpful to others that might be thinking about undertaking the same task. I own a v-rack and praise it HIGHLY, and as i mentioned earlier am in love with the perma rack that i put on my buddies home table, however, i've never even used a template rack before. I'm very much looking forward to seeing how it performs and testing it for roll-off, and i was pleasantly surprised with how well the balls racked up even on my makeshift coffee table test cloth.
Whether this helps your broke ass make your own templates, or just makes you laugh at how cheap it is, i hope you enjoyed my post.
link to pdfs:
link to office depot copies file uploader
Office Supplies, Furniture, Technology at Office Depot
Shop office supplies, furniture & technology at Office Depot. For paper, ink, toner & more, find trusted brands at everyday low prices.