You are using an out of date browser. It may not display this or other websites correctly.
You should upgrade or use an alternative browser.
You should upgrade or use an alternative browser.
How to install a brunswick gold crown light?
- Thread starter breakandrun
- Start date
poolpariah
Registered
How to Install a Brunswick GC Light
With the light on the floor, mount a 1x4 along the entire length in the middle of the light. Then screw in 3 plumbing flanges into the 1x4 in the “appropriate” places. I mounted mine evenly across the light because my studs were in the wrong place in the ceiling. I ended up using Saf-T-Braces for the 2 outer fan poles and using the existing fan junction box for the middle one. If you have studs you can use, then measure and mount accordingly. Take a plumb bob and run it from the middle of the center junction box and line it up to the center of the light. This will be where you screw your center flange in. Screw the other 2 flanges in on the 1X4 where needed. Then screw fan posts into the plumbing flanges. Most will use the outer 2 fan posts to bear the weight and only run electrical in the center. All 3 are weight bearing in the one I did. Obviously you will want to install the junction boxes in the ceiling and the fan bracket to hook your fan posts into. Make sure the bottom of the light skirt is 78" from bottom of floor when mounted. You will want to trim the fan posts accordingly to fit that measurement. Good luck on your install.
- John
So no one has answered how the ceiling fan rods are mounted to the light would be nice if the people who have hung there's with the rods would show a picture or explain how they mounted them.
Thanks
With the light on the floor, mount a 1x4 along the entire length in the middle of the light. Then screw in 3 plumbing flanges into the 1x4 in the “appropriate” places. I mounted mine evenly across the light because my studs were in the wrong place in the ceiling. I ended up using Saf-T-Braces for the 2 outer fan poles and using the existing fan junction box for the middle one. If you have studs you can use, then measure and mount accordingly. Take a plumb bob and run it from the middle of the center junction box and line it up to the center of the light. This will be where you screw your center flange in. Screw the other 2 flanges in on the 1X4 where needed. Then screw fan posts into the plumbing flanges. Most will use the outer 2 fan posts to bear the weight and only run electrical in the center. All 3 are weight bearing in the one I did. Obviously you will want to install the junction boxes in the ceiling and the fan bracket to hook your fan posts into. Make sure the bottom of the light skirt is 78" from bottom of floor when mounted. You will want to trim the fan posts accordingly to fit that measurement. Good luck on your install.
- John
poolpariah
Registered
Thank you very much for the excellent instructions, now I will be taking mine down and redoing it like this. Looks much cleaner than the 4 chain hook up I have.
You are welcome. Glad I could help. Make sure to take some before and after pictures!
- John
Gold Crown Light Installation
John,
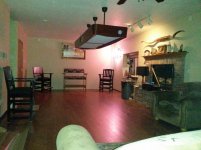
I followed your instructions--thanks! Took a few photos while my son and I put it up...wish I had taken a couple more. I don't know if all Gold Crown lights are the same on the topside or not, but mine had four cross channels, two towards each end. The outer channels did not have a center hole, so I drilled a hole centered on that channel and used a 2 1/2 inch long 5/16" bolt through it to attach the 1x4 maple hardwood strip on each end. The inner channels had a bolt mounted in a center hole that was holding some of the lamp parts to the channel. We replaced that 1/4" bolt with a longer 2 1/2 inch long 1/4" bolt that had two separate nuts on it. One was the original locknut that we tighten in the original location but it was underneath the maple 1x4. We then tightened the maple 1x4 to this same bolt with a second nut, thus allowing the original intent of that bolt holding the light components to be carried out by the first nut and the 1x4 being mounted across the top of the channels with the second nut. Marked the desired locations on the maple 1x4 for the plumbing flanges and attached those...marked the desired locations on the ceiling and mounted the ceiling fan mounting hardward...and it all lined up. I used joists in the ceiling for supporting the weight of the light.
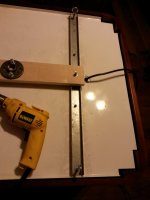
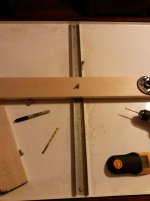
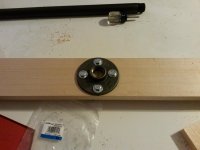

With the light on the floor, mount a 1x4 along the entire length in the middle of the light. Then screw in 3 plumbing flanges into the 1x4 in the “appropriate” places. I mounted mine evenly across the light because my studs were in the wrong place in the ceiling. I ended up using Saf-T-Braces for the 2 outer fan poles and using the existing fan junction box for the middle one. If you have studs you can use, then measure and mount accordingly. Take a plumb bob and run it from the middle of the center junction box and line it up to the center of the light. This will be where you screw your center flange in. Screw the other 2 flanges in on the 1X4 where needed. Then screw fan posts into the plumbing flanges. Most will use the outer 2 fan posts to bear the weight and only run electrical in the center. All 3 are weight bearing in the one I did. Obviously you will want to install the junction boxes in the ceiling and the fan bracket to hook your fan posts into. Make sure the bottom of the light skirt is 78" from bottom of floor when mounted. You will want to trim the fan posts accordingly to fit that measurement. Good luck on your install.
- John
John,
I followed your instructions--thanks! Took a few photos while my son and I put it up...wish I had taken a couple more. I don't know if all Gold Crown lights are the same on the topside or not, but mine had four cross channels, two towards each end. The outer channels did not have a center hole, so I drilled a hole centered on that channel and used a 2 1/2 inch long 5/16" bolt through it to attach the 1x4 maple hardwood strip on each end. The inner channels had a bolt mounted in a center hole that was holding some of the lamp parts to the channel. We replaced that 1/4" bolt with a longer 2 1/2 inch long 1/4" bolt that had two separate nuts on it. One was the original locknut that we tighten in the original location but it was underneath the maple 1x4. We then tightened the maple 1x4 to this same bolt with a second nut, thus allowing the original intent of that bolt holding the light components to be carried out by the first nut and the 1x4 being mounted across the top of the channels with the second nut. Marked the desired locations on the maple 1x4 for the plumbing flanges and attached those...marked the desired locations on the ceiling and mounted the ceiling fan mounting hardward...and it all lined up. I used joists in the ceiling for supporting the weight of the light.


Replaced a couple burnt out fluorescent tubes on my Gold Crown light the other day. Just to note, I have now seen photos of Gold Crown lights with eight 4' long tubes, like I have, and also lights with four 8' long tubes. Perhaps Brunswick changed the design over the years, perhaps folks swapped out components. I have also seen people post about their T8 tubes...well, mine has T12 tubes. Most T12 tubes were phased out by government decree at some point in 2014, but I think some design improvements to meet the energy efficiency requirements have allowed production to continue. Both T8 and T12 tubes have the same pin spacing at the end of the tombs and will fit into the same size tombstone light holders. T12 tubes were designed to function with a magnetic balance, while T8 tubes use an electronic balance. The power outputs are different; however, each tube will light with either ballast, with the result of having mismatches causing under-powering of the tube or overheating of the tube: both shorten the tube life.
I just ordered my LED tubes and will take photos of the conversion process and post when done in another week or two after the tubes arrive. There is no typical standard set out there for LED and many manufacturers differ in their solutions. There are tubes which will just be a simple replacement in an older fluorescent fixture and will work with one or both types of ballasts. Some tubes can be used with the existing ballasts or with them removed. Other tubes will only work without ballasts. Depending upon whether one wants dimming capability, a particular light temperature, or a high CRI, your options will be with a given subset of tubes or manufacturers.
I just ordered my LED tubes and will take photos of the conversion process and post when done in another week or two after the tubes arrive. There is no typical standard set out there for LED and many manufacturers differ in their solutions. There are tubes which will just be a simple replacement in an older fluorescent fixture and will work with one or both types of ballasts. Some tubes can be used with the existing ballasts or with them removed. Other tubes will only work without ballasts. Depending upon whether one wants dimming capability, a particular light temperature, or a high CRI, your options will be with a given subset of tubes or manufacturers.
Light
I converted 25 table room from 72 inch T12 to 48 inch T8 bulbs and ballast, fairly simple process if your handy. You might want to contact a commercial electrical supplier for the light retainers, the ones at hardware stores are just not my cup of tea but will work if you must use them.
If you need insight I can send you a few pointers on how to relocate the light retainers/tombs.
Rob.M
Last edited:
I converted 25 table room from 72 inch T12 to 48 inch T8 bulbs and ballast, fairly simple process if your handy. You might want to contact a commercial electrical supplier for the light retainers, the ones at hardware stores are just not my cup of tea but will work if you must use them.
If you need insight I can send you a few pointers on how to relocate the light retainers/tombs.
Rob.M
My current light is already set up for eight 48" T12 tubes and I am replacing them with eight 48" LED tubes which can use both shunted and non-shunted tombstones. I'll just need to remove the ballasts, run the hot wire to one side of each light's tombstone and the common to the other end of each light. I haven't pulled the light apart just yet, I suspect there are a couple of ballasts in there...should be pretty straight forward cutting and splicing. I know many of the LED lights just run the electrical wires to one side of the tube, but the ones I am getting from Hollywood Lights LED require the wiring run to each side.
I converted my Gold Crown light from fluorescent tubes to LED tubes a couple weeks ago. I went with a direct wire LED tubes, so I removed the ballasts and wired the common to one end of the tubes and the hot wire to the other end of the tubes, all in parallel. It was actually quite straightforward once I removed the wiring covers. I used Hollywood Lights LED tubes (frosted) from B&M Lighting. Color temp is 3700K with a CRI of 90-92. These are also dimmable and compatible with a TRIAC dimmer. I'm very happy with the results. Didn't lose any brightness, did lose the ballast hum, and the color rendition is much better than what I had with the fluorescent tubes.
If you want to put LED tubes into your Gold Crown, there are a lot of variants out there. Some you can find at Home Depot or Costco and they will state they are direct-replacement, meaning they will work will the ballasts in place. Maybe. Some may work for electronic ballasts but not magnetic ballasts. I think you might find one type of ballast in a Gold Crown light made one year and a different type in another from a different production run. Other types need to be direct wired...this type is the most energy efficient if you are looking for Green points. Most LED tubes are not dimmable. Dimming is not really a needed function for play...I turn my lights up fully when playing; I just kind of wanted an ambiance thing if I was sitting down there listening to music and enjoying a drink when not playing, as I do on occasion. If you do go for dimmable LED lights (this applies to all LEDS), check with the bulb manufacturer to find the list of compatible dimmers--there is not an industry-wide standard that allows all tubes to work with all dimmer switches. The Color Rendition Index (CRI) has never been great for fluorescent tubes and I would just say the balls being a little bit prettier to the eye is another small intrinsic benefit that really won't have any real effect on play.
About 2/3rds of the way through completely re-lighting that billiards room...hope to be posting final photos not later than next month. I have been amazed at the number of water pipes, drains, and electrical wires running through that ceiling!
