Since I am not deleting my posts I will post new info as I complete it.
The attachment is too large so I have to use three posts.
KICKING ACADEMY – PART 2
THE PLUS SYSTEM
DEAD BALL PLUS SYSTEM – BILLIARD
THE SID SYSTEM
PLUS / SID VARIATION - BILLIARD
Before I begin I forgot to mention something of GREAT importance. The “BILLIARD” systems I show MUST be compensated for when playing 9 ball. When you play “billiards” you are NOT hitting the cue ball hard, the object is to just strike the final ball; in 9 ball you have to make sure you contact a cushion AFTER the hit. This means that a “ball width” to one quarter diamond must be factored in because you are hitting the cue ball more firmly than in “billiards”. I will show this in Diagram 3 of “the dead ball plus system”.
Another thing I forgot to mention, I’m doing this “off the cuff with no script” so as I remember things I will insert them; that is why it’s important to SAVE these posts. REMEMBER, most of these systems I show are BILLIARD systems; billiard balls are BIGGER and HEAVIER than pocket billiard balls; AND, when billiards players shoot they “dig” into a lot of their shots; MEANING, they play many shots at the EXTREME edge of the cue ball so they have to dig into the cue ball so as not to miscue and also get the desired action on the cue ball. SO, when you see anything that uses EXTREME english be sure to “dig” into the cue ball so you don’t miscue.
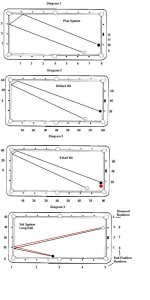
The “Plus System” is the easiest of the three and uses the “RUNNING ENGLISH” as in “The Diamond System” Simply add the long rail diamond number to the short rail (first rail) number and hit that TOTAL on the third (short) rail. Diagram 1 has the cue ball at diamond 7 on the long rail and the object ball at third rail number 10. To hit this object ball just use a bit of running english and shoot THROUGH the opposite short rail number 3.
Later, as I said in Part 1, I will show you more systems that let you know where the cue ball hits rails in between the start and end points so you can determine if “obstructing” balls will hinder the cue ball’s path. Putting these systems together will aid you in navigating around obstructing balls.
By “dead ball” plus system I mean you do NOT use running english on the cue ball; dead ball hits usually mean a dead center cue ball hit but can also be extended to three tips above center hits. In this system we have our standard diamond numbers (converted to 10’s) along the LONG rail and 10’s on the short rail. Diagram 2 shows that the cue ball at diamond 70 on the long rail can get to the object ball at diamond 20 on the short rail by subtracting 20 from 70 and hitting that number on the “first” short rail, which is 50; 70 minus 20 equals 50. We hit the cue ball above center about two tips with NORMAL speed. REMEMBER, this is NOT a billiard table and you will run out of room on the first rail when you get close to the corner pocket, 55 is about the best you should be able to hit.
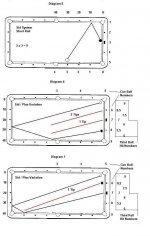
Now we get to Diagram 3 and how it applies to 9 ball. If we shoot the same shot in Diagram 2 with speed to make the object ball or cue ball do something we desire we have to compensate for this extra firm hit; again, I compensate a ball’s width to one quarter diamond. Let’s say we now have two object balls on the short rail and want to pocket the ball closest to the corner pocket; if we use the billiard stroke we will just “tap” the first object ball and the other object ball will not have enough speed to get to the pocket. So, we have to hit the cue ball more firmly to get enough speed on this object ball to fall into the corner pocket; we do this ball moving forward as the diagram shows and hitting the cue ball hard. Over time you will develop a “feel” for these type of shots and become very accurate at hitting and pocketing these types of shots.
Next, we come to the Sid System; this is probably the second most recognized kick system in pool, at least most players have at least heard the name mentioned. This system is a SHORT rail first system, Diagram 4 shows the numbering for the diamonds; this system just multiplies the ball position on the short rail with the hit spot on the opposite short rail to get the final hit point. In diagram 4 the cue ball is at diamond 3 and the object ball is at ball position 3 on the long rail, 3 times 3 equals 9; that is the hit point on the opposite short rail. REMEMBER, you are hitting THROUGH the diamond. This system can also work in reverse. Let’s put the cue ball in the object ball’s place and the object ball in the cue ball’s place. Well, 3 times 3 equals 9; the hit point should be 9 on the first (short) rail but it’s NOT. Going in reverse we must adjust this hit approximately by a half ball’s width as seen by the red line in the diagram.
END PART ONE
The attachment is too large so I have to use three posts.
KICKING ACADEMY – PART 2
THE PLUS SYSTEM
DEAD BALL PLUS SYSTEM – BILLIARD
THE SID SYSTEM
PLUS / SID VARIATION - BILLIARD
Before I begin I forgot to mention something of GREAT importance. The “BILLIARD” systems I show MUST be compensated for when playing 9 ball. When you play “billiards” you are NOT hitting the cue ball hard, the object is to just strike the final ball; in 9 ball you have to make sure you contact a cushion AFTER the hit. This means that a “ball width” to one quarter diamond must be factored in because you are hitting the cue ball more firmly than in “billiards”. I will show this in Diagram 3 of “the dead ball plus system”.
Another thing I forgot to mention, I’m doing this “off the cuff with no script” so as I remember things I will insert them; that is why it’s important to SAVE these posts. REMEMBER, most of these systems I show are BILLIARD systems; billiard balls are BIGGER and HEAVIER than pocket billiard balls; AND, when billiards players shoot they “dig” into a lot of their shots; MEANING, they play many shots at the EXTREME edge of the cue ball so they have to dig into the cue ball so as not to miscue and also get the desired action on the cue ball. SO, when you see anything that uses EXTREME english be sure to “dig” into the cue ball so you don’t miscue.
The “Plus System” is the easiest of the three and uses the “RUNNING ENGLISH” as in “The Diamond System” Simply add the long rail diamond number to the short rail (first rail) number and hit that TOTAL on the third (short) rail. Diagram 1 has the cue ball at diamond 7 on the long rail and the object ball at third rail number 10. To hit this object ball just use a bit of running english and shoot THROUGH the opposite short rail number 3.
Later, as I said in Part 1, I will show you more systems that let you know where the cue ball hits rails in between the start and end points so you can determine if “obstructing” balls will hinder the cue ball’s path. Putting these systems together will aid you in navigating around obstructing balls.
By “dead ball” plus system I mean you do NOT use running english on the cue ball; dead ball hits usually mean a dead center cue ball hit but can also be extended to three tips above center hits. In this system we have our standard diamond numbers (converted to 10’s) along the LONG rail and 10’s on the short rail. Diagram 2 shows that the cue ball at diamond 70 on the long rail can get to the object ball at diamond 20 on the short rail by subtracting 20 from 70 and hitting that number on the “first” short rail, which is 50; 70 minus 20 equals 50. We hit the cue ball above center about two tips with NORMAL speed. REMEMBER, this is NOT a billiard table and you will run out of room on the first rail when you get close to the corner pocket, 55 is about the best you should be able to hit.
Now we get to Diagram 3 and how it applies to 9 ball. If we shoot the same shot in Diagram 2 with speed to make the object ball or cue ball do something we desire we have to compensate for this extra firm hit; again, I compensate a ball’s width to one quarter diamond. Let’s say we now have two object balls on the short rail and want to pocket the ball closest to the corner pocket; if we use the billiard stroke we will just “tap” the first object ball and the other object ball will not have enough speed to get to the pocket. So, we have to hit the cue ball more firmly to get enough speed on this object ball to fall into the corner pocket; we do this ball moving forward as the diagram shows and hitting the cue ball hard. Over time you will develop a “feel” for these type of shots and become very accurate at hitting and pocketing these types of shots.
Next, we come to the Sid System; this is probably the second most recognized kick system in pool, at least most players have at least heard the name mentioned. This system is a SHORT rail first system, Diagram 4 shows the numbering for the diamonds; this system just multiplies the ball position on the short rail with the hit spot on the opposite short rail to get the final hit point. In diagram 4 the cue ball is at diamond 3 and the object ball is at ball position 3 on the long rail, 3 times 3 equals 9; that is the hit point on the opposite short rail. REMEMBER, you are hitting THROUGH the diamond. This system can also work in reverse. Let’s put the cue ball in the object ball’s place and the object ball in the cue ball’s place. Well, 3 times 3 equals 9; the hit point should be 9 on the first (short) rail but it’s NOT. Going in reverse we must adjust this hit approximately by a half ball’s width as seen by the red line in the diagram.
END PART ONE