KICKING ACADEMY – PART 4
Today I will deal with another well known system, the “ 2/3’s System”; along with the Triangulation System, and expand on Part 3’s “Multiplier System”.
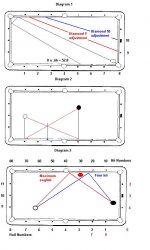
Diagram 1 shows the layout for the 2/3’s System, this is a fairly simple system; just multiply the cue ball position number by .66. For all you mathematically challenged people just multiply by 6 then multiply by 6 again; for example: 6 x 8 = 48 AND 6 x 8 = 4.8 (or 5), now just add them together for a total of 53. Or you can just multiply by 7, 7 x 8 = 56; you can see you need to make about a quarter diamond adjustment on the final hit point. As you move up table this adjustment becomes less; for example: 6 x 5 = 30, AND 6 x 5 = 3.0 for a total of 33; but, 7 x 5 = 35. For quickness sake an adjustment of a quarter diamond should be just fine.
The other point to remember is the first rail hit point. REMEMBER, our pocket billiard table has pockets, NOT corners; so, the closest we can come is about ¼ diamond away from the corner pocket. All the hits for the rail numbers are to this point until you get to diamond 9 and 10, these changes are illustrated in the diagram.
The cue ball hit point can be anywhere from 2 tips above center ball to dead center, start at 2 tips above center and work your way down until you get the “feel” for “your” stroke on how to hit this kick.
Triangulation is another very simple concept, this is a good system when balls are in the middle of the table. Just imagine straight lines from the cue ball and object ball to the kicking rail, make an imaginary “X” between the balls and rail points; where this “X” crosses draw a line to the rail, that is the hit point. This is a dead center ball hit; REMEMBER, if there is an obstructing ball you can either move up from the hit point and use english OR move down and hit the cue ball firmer.
Diagram 2 shows this concept. Black lines show lines to rail from balls, red lines show the “X”, blue line shows line to rail, blue dot shows hit point.
Making this “X” isn’t as difficult as it looks, even over long distances; after a few practice sessions you should be able to do it by eye, but it’s okay to use your cue stick, this is legal. As a matter of fact your opponent will probably wonder what you’re trying to do, then when you hit the object ball dead center he/she will look at you like you have frogs crawling out of your ears; and will certainly want to know HOW you did that.
Diagram 3 is a variation of the “Multiplier System” from Part 3. Let’s say the cue ball is at rail number 7 and the object ball is at rail number 4, 7 x 4 = 28; 28 is out hit number. But we have a problem, there is an obstructing ball there. There are two things we can do to get around this problem. First, move back 10 units to number 38 and use maximum english (3 tips side); second, move down about 1 diamond (or enough to clear the obstructing ball) and hit the cue ball firm, this will shorten the cue ball angle and direct it towards the object ball.
J.R.
Today I will deal with another well known system, the “ 2/3’s System”; along with the Triangulation System, and expand on Part 3’s “Multiplier System”.
Diagram 1 shows the layout for the 2/3’s System, this is a fairly simple system; just multiply the cue ball position number by .66. For all you mathematically challenged people just multiply by 6 then multiply by 6 again; for example: 6 x 8 = 48 AND 6 x 8 = 4.8 (or 5), now just add them together for a total of 53. Or you can just multiply by 7, 7 x 8 = 56; you can see you need to make about a quarter diamond adjustment on the final hit point. As you move up table this adjustment becomes less; for example: 6 x 5 = 30, AND 6 x 5 = 3.0 for a total of 33; but, 7 x 5 = 35. For quickness sake an adjustment of a quarter diamond should be just fine.
The other point to remember is the first rail hit point. REMEMBER, our pocket billiard table has pockets, NOT corners; so, the closest we can come is about ¼ diamond away from the corner pocket. All the hits for the rail numbers are to this point until you get to diamond 9 and 10, these changes are illustrated in the diagram.
The cue ball hit point can be anywhere from 2 tips above center ball to dead center, start at 2 tips above center and work your way down until you get the “feel” for “your” stroke on how to hit this kick.
Triangulation is another very simple concept, this is a good system when balls are in the middle of the table. Just imagine straight lines from the cue ball and object ball to the kicking rail, make an imaginary “X” between the balls and rail points; where this “X” crosses draw a line to the rail, that is the hit point. This is a dead center ball hit; REMEMBER, if there is an obstructing ball you can either move up from the hit point and use english OR move down and hit the cue ball firmer.
Diagram 2 shows this concept. Black lines show lines to rail from balls, red lines show the “X”, blue line shows line to rail, blue dot shows hit point.
Making this “X” isn’t as difficult as it looks, even over long distances; after a few practice sessions you should be able to do it by eye, but it’s okay to use your cue stick, this is legal. As a matter of fact your opponent will probably wonder what you’re trying to do, then when you hit the object ball dead center he/she will look at you like you have frogs crawling out of your ears; and will certainly want to know HOW you did that.
Diagram 3 is a variation of the “Multiplier System” from Part 3. Let’s say the cue ball is at rail number 7 and the object ball is at rail number 4, 7 x 4 = 28; 28 is out hit number. But we have a problem, there is an obstructing ball there. There are two things we can do to get around this problem. First, move back 10 units to number 38 and use maximum english (3 tips side); second, move down about 1 diamond (or enough to clear the obstructing ball) and hit the cue ball firm, this will shorten the cue ball angle and direct it towards the object ball.
J.R.