KICKING ACADEMY – PART 6
The following are three systems that I use often, I’d say I will use one of these three kicking systems in every match. The first one is a billiard system which I first used against a well known pro, he told me I couldn’t hit the ball at that angle; after I did it he wanted to see the shot again.
The next two are Grady’s gems.
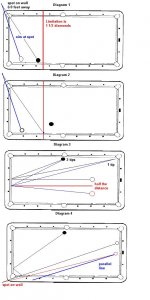
Diagram 1 shows the billiard system to make impossible hits. It has a limitation of 2 ½ diamonds. Just draw a line from the hit point through the corner pocket, find a spot on the wall about 6 –9 feet away, go back to the cue ball and aim at that spot on the wall. You have to hit the cue ball with maximum high english and EXTEMELY hard. DO NOT play this shot by “feel” because it simply “looks” like you will NEVER hit your target, just aim at your spot on the wall.
Diagram 2 shows a kick where the object ball is past the limitation point but a three rail kick is used to hit the ball. Aim for the BLUE dot on the rail and kick off the third rail into the object ball.
The next two systems can be used in almost every game of 9 ball since 9 ball is about 80 percent luck if you’re not playing at the pro level, you will consistently find yourself snookered after a weaker player misses; this is because they usually have no clue as to what they are doing and when they miss they miss BIG TIME, and the final resting place of the balls is in the hands of the Pool Gods. These next to kicks are going to come up all the time in 9 ball.
Diagram 3 is a nifty shot to go at the side or corner pocket. Place the cue ball on the head spot and aim at the middle diamond on the foot rail with 2 tips of side english to go to the side pocket, and 1 tip of side english to go to the corner pocket. Now, this is where the nifty comes in; let’s say the cue ball is one diamond left of the head spot, it doesn’t matter where the cue ball is on the table; take half that distance and look straight down table and get your hit point (red line), go back to the cue ball and with 2 tips of english aim at that spot (blue line) to send the cue ball towards the side pocket. Trust me, if you’re a 9 ball player you’re going to love these two kicks. If you’re not sure what 2 tips of english is, get out a stripped ball and use it as the cue ball; the edge of the stripe is approximately 2 tips of english.
Diagram 4 shows another solution to get to the side pocket. For my stroke the hit point is ½ diamond from the corner pocket, I believe Grady used 1 diamond; find the hit point that goes to the side pocket with your stroke, this is a “running english” cue ball hit. REMEMBER, running english is 1 tip side, ½ above center. The starting point for this shot is the first diamond on the short rail, you make adjustments when the cue ball is elsewhere by using the “spot on the wall” technique; just look from this first diamond through to your hit point and find a spot on the wall about 9 feet away, go back to the cue ball location and aim at that spot with running english and you should hit a ball at the side pocket. With “my” stroke I can use a parallel line (the blue line is parallel with the black line), both methods are shown in the diagram.
J.R.
The following are three systems that I use often, I’d say I will use one of these three kicking systems in every match. The first one is a billiard system which I first used against a well known pro, he told me I couldn’t hit the ball at that angle; after I did it he wanted to see the shot again.
The next two are Grady’s gems.
Diagram 1 shows the billiard system to make impossible hits. It has a limitation of 2 ½ diamonds. Just draw a line from the hit point through the corner pocket, find a spot on the wall about 6 –9 feet away, go back to the cue ball and aim at that spot on the wall. You have to hit the cue ball with maximum high english and EXTEMELY hard. DO NOT play this shot by “feel” because it simply “looks” like you will NEVER hit your target, just aim at your spot on the wall.
Diagram 2 shows a kick where the object ball is past the limitation point but a three rail kick is used to hit the ball. Aim for the BLUE dot on the rail and kick off the third rail into the object ball.
The next two systems can be used in almost every game of 9 ball since 9 ball is about 80 percent luck if you’re not playing at the pro level, you will consistently find yourself snookered after a weaker player misses; this is because they usually have no clue as to what they are doing and when they miss they miss BIG TIME, and the final resting place of the balls is in the hands of the Pool Gods. These next to kicks are going to come up all the time in 9 ball.
Diagram 3 is a nifty shot to go at the side or corner pocket. Place the cue ball on the head spot and aim at the middle diamond on the foot rail with 2 tips of side english to go to the side pocket, and 1 tip of side english to go to the corner pocket. Now, this is where the nifty comes in; let’s say the cue ball is one diamond left of the head spot, it doesn’t matter where the cue ball is on the table; take half that distance and look straight down table and get your hit point (red line), go back to the cue ball and with 2 tips of english aim at that spot (blue line) to send the cue ball towards the side pocket. Trust me, if you’re a 9 ball player you’re going to love these two kicks. If you’re not sure what 2 tips of english is, get out a stripped ball and use it as the cue ball; the edge of the stripe is approximately 2 tips of english.
Diagram 4 shows another solution to get to the side pocket. For my stroke the hit point is ½ diamond from the corner pocket, I believe Grady used 1 diamond; find the hit point that goes to the side pocket with your stroke, this is a “running english” cue ball hit. REMEMBER, running english is 1 tip side, ½ above center. The starting point for this shot is the first diamond on the short rail, you make adjustments when the cue ball is elsewhere by using the “spot on the wall” technique; just look from this first diamond through to your hit point and find a spot on the wall about 9 feet away, go back to the cue ball location and aim at that spot with running english and you should hit a ball at the side pocket. With “my” stroke I can use a parallel line (the blue line is parallel with the black line), both methods are shown in the diagram.
J.R.