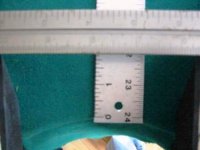
I am pretty happy with the pocket openings which are now at about 4.75 inches. Keep in mind these were well over 5 inches and I am looking to increase playability and not trying to go to some crazy pocket size. I have measured my current set up for the slate shelf and am about 1.75 inches measured from the median of the points for the pocket openings to the drop off point on the shelf. If I put a ball against the cushion facing and at the drop off point then I would say you could see about 35% of the ball sighting down the cushion. I am not sure what is correct here????
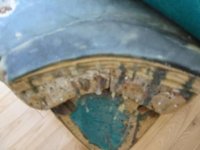
I am at a point where I am not sure how to proceed. The pocket shelves are wood on the older tables. They were beat and broken when I originally got the table ten years ago. So, I made up some new ones increasing the radius and extended the shelves a bit. I tried to do a decent job at the time bit it was never a good repair. I used plywood which got me close to the level of the table and then used bees wax for the last 1/8" or so. From there I would take a block plane and plane down the bees wax to get it flush. When done it was level but would not last as the wood was attached to the boards on the back of the slate and there was always is some movement. I know the antique tables use the wood because the machinery to cut the slate was not around. But, even if I went with wood again and got these attached to the slate with some epoxy or something I am not sure if this is the best way to do this. Make a mold and form the shelf using liquid steel??? Any thoughts?
I am at a point where I am not sure how to proceed. The pocket shelves are wood on the older tables. They were beat and broken when I originally got the table ten years ago. So, I made up some new ones increasing the radius and extended the shelves a bit. I tried to do a decent job at the time bit it was never a good repair. I used plywood which got me close to the level of the table and then used bees wax for the last 1/8" or so. From there I would take a block plane and plane down the bees wax to get it flush. When done it was level but would not last as the wood was attached to the boards on the back of the slate and there was always is some movement. I know the antique tables use the wood because the machinery to cut the slate was not around. But, even if I went with wood again and got these attached to the slate with some epoxy or something I am not sure if this is the best way to do this. Make a mold and form the shelf using liquid steel??? Any thoughts?