Pool table restoration

Gumbo

Registered
I am newly registered to this forum that I've been following for some time and I live in Italy.
I have recently purchased a 9ft table from a pool room that was closing down. I got it for dirt cheap but the table needs a restoration.
I have a very well equipped woodworking shop, although the table needs basically a cosmetic restoration since it seems to be structurally sound.
The table is 20-30 years old and a well known italian brand (De Blasi) and it seems to be built based on an international/carom structure, very strong and heavy.
The slate is a 1-1/2 thick three piece slate, and it is heated. The heating unit was tested and seems to be fully functional although I understand this is not a very common feature for a pocket billiard.

I have some questions regarding the restoration.

The slate is not backed with MDF on the underside but has wood wood on the sides. So the felt was stapled to the sides of the slate but it had to be glued onto the underside of the slate in the pocket areas. I wonder if it it would be a good idea to glue some mdf on the underside of the pockets to staple the felt onto instead of gluing it.

I am on a very tight budget with the restoration still I'd like to have a worsted cloth. I have found an internet merchant, gameroomsusa selling an affordable worsted cloth, 10-90%, and I wonder if anyone here has ever heard of this. I know Simonis and Gorina are better but they are beyond my budget. Also since this is my first restoration I think it might make some sense to experience with a cheaper cloth, just in case anything goes wrong, or not perfect.
I am not sure about the rubbers, they seem ok, but I think I will need to replace them since the restoration will require heating to remove the old finish that is all chipped and dented. Anyway is there some way to evaluate the rubber on an unmounted billiard ? And in what price range am I supposed to shop for a new set of rubbers ? I see most shops offer full sets in the price range of 50-70$. Is that good rubber in that price range ?

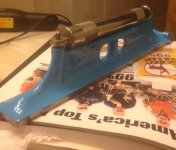
One last question. I have read Realkingcobra's tutorial about levelling the slate. Now, I have a 12 inch starret machinist level but the bubble just carries two reference signs, while I see that the tutorial requires exact numerical evaluation of the level which probably requires a graduated bubble. I hope there's a way to use my starret level and that and I don't have to buy a new one.
I hope I didnt ask too many question or anyting stupid.

Any help will be greatly appreciated !!
 
Table

Your table sounds like its a unique table, you want to measure the cushions you have now before you try to replace them and find there is no replacements available, the Starrett with only two lines in the field is sensitive to .025" per foot. the Starrett with multi graduated lines is sensitive to .005.
I'm not sure of the glues/contact adhesive you have access to where you live but that isideal for cushion/cloth instillation. If all else fails you can use staples to install the cloth and spray adhesive and duct tape to attach the cloth on the underside of the pockets. Contact adhesive/cement or resign glue is a must for installing cushions to adhere.
post pictures of your table, they are worth a thousand words'

Rob.M
 
Rob, It is not a unique table, it was rather common in the 90's here, and several pool rooms still have them. I will check the cushion's size anyway.
Since I need to buy a new level, I would like to know if the smaller starrets 8", are good for the purpose or if I have to get a new 12" and if the lufkin is as good as the starret. Il looks just like the starret to me.
Contact cement I can buy in any hardware shop here, unless the one used for gluing the felt is special.

I would need some advice regarding the cloth and rubbers. A friend will come visiting from US in september and may bring me what I need so I can spare some money on the shipment.
The cloth I mentioned previously can be found looking up Vantage Worsted Cloth on google (I can't post links yet).
I don't have enough posts to add pics to my messages. I'll post pics as soon as I can.
 
Last edited:
Table

After a web search I found this site
http://www.biliardideblasi.it/company.html
Hey' even they claim its a unique design.
Which model do you own?

I've never heard of the cloth, I checked out a web site and sounds lighting fast at 21oz weight and at that price it's worth you trying and giving us feedback on it.

The lufkin no.58 level with graduated vial is the same type of level as the Starrett-98. The 8 inch level is a task that will be tricky for a first timer, I'll suggest the 12 inch level.
If your into precision work you could give your old Starrett level a "hand scraped surface " or lapping to flatness required for you to replace the glass vial with a .005 replacement available from Starrett- glass vial about ($25 US dollars).

Hand scraping and lapping might be available in your area at a shop if your not up for the task, if you flatten your own block planes its basically the same process. Most wood shop stores sells surface plates that are .0025" or better
or- buy yourself a newer Starrett or lufkin level.
But I like the idea of you refreshing the level instead of retiring it.

Your table is going to be fast and show any rolls in the slates with fast cloth and a heated slate..with a heated slate the playing surface can be in ideal condition for spot on play.
You might as well get a surface plate if you don't already have one and use it to flatten your level and use it for lapping the slates once the three pieces are together and leveled for a dead flat playing surface.

Here's a link to the surface plates I'm referring to. I was pointed in the direction awhile back by Dr.mark gregory to the use of the surface plates to Lapp and flatten slates and tools.
http://m.woodcraft.com/Catalog/ProductPage2.aspx?id=2004864&ProdId=7535&

Best of luck.
Rob.M
 
Last edited:
Replacing the bubble would be a good idea.
However I read somewhere that taking apart the bubble container is not easy, so I am a little worried about that, more then lapping the sole of the level.
 
As to the model of the table it is very similar to Ancona2, other than the size, the cushions and the fact that mine is a pool table and not an international.
 
Here are some pics of mine before it was disassembled, and some details of the parts.
Interesting detail are the brass fittings on the slates. They should grant a perfect alignment and level of the head and foot slate to the center slate. The structure seems very solid, 3.5" thick. Unfortunately the table was abused and will require stripping of the polyester resin finish down to the bare wood and a new finish. Other than that it seems to be in good shape.

1.jpg

2.jpg

DSCF1265.JPG

DSCF1266.JPG

DSCF1267.JPG

DSCF1268.JPG
 
Level

I like to be creative, so why not.. This one was more work than I hoped it to be but I think I'll like it once I get it done and finished.
I'm rooting for you and I will answer any questions that i can to help you along to get your level updated.

Here's a peek of a project in the works..
That old nickel plating can really shine'
Rob.M
 

Attachments

  • image.jpg
    image.jpg
    85.7 KB · Views: 584
Thank you so much for all the help Rob !

The jig you built to pry it open. Is it two pieces of T-bar bolted to another piece. Then you pry the two bars open by hand ? Using the lenght of the t-bar for leverage ?
Did you have to bolt the whole jig onto a bench or something ?
The tiny leaf spring, is it located between the part that is coming off and the main body of the vial ?
 
My level is a little different. It has a small vertical bubble in the middle of the two holes in the base. There's no small vial on the end of it.
I repainted mine as the base was chipped, but the sole was good. I removed the tube from the base when I repainted it, so I know how to do it and the washers.
Excellent restoration job you did. I love the "tournament blue" color you chose for the base !
I couldn't polish my tube so well as it is somewhat scratched and worn.
I'll post a picture of it.
 
Post

Thank you so much for all the help Rob !

The jig you built to pry it open. Is it two pieces of T-bar bolted to another piece. Then you pry the two bars open by hand ? Using the lenght of the t-bar for leverage ?
Did you have to bolt the whole jig onto a bench or something ?
The tiny leaf spring, is it located between the part that is coming off and the main body of the vial ?

-
And yes the leaf springs " there is two friction springs" they rests in a notch on the bottom side in between the inner and outer tube. They are small and easy to misplace so keep them on a magnet while your working.

RIP Mike Yamamoto, He wrote the book on dial indicator repair and touched a little in the book on the of repair and calibration of machinist tools&levels. I contacted him many years before his death in 2010, he was very helpful and sent me photos of his push/pull devise to separate the ears. It's very well built unlike mine but he also had access to a machine shop.
He is the only person with a book on repairing dial indicators/machinist hand tools.
I ran a few ideas i had by him that I had for a devise and he basicliy told me I was thinking way to hard and complex and that it can be done many ways but he perfected it on a all in one devise/fixture that aligned the ears going back into the inner tube. i believe he had a devise that it on to a lathe bed.
He told me to keep it simple and use leverage. That's when I realized I had everything I needed on hand.


Picture of one of the leaf/friction springs below, they are no longer replacements available from Starrett, Starrett changed the design of the friction fit tube to a piece of Teflon in a grove around the ends between the tubes. So... Again' don't lose the springs!
Rob.M
 

Attachments

  • image.jpg
    image.jpg
    45.7 KB · Views: 501
Last edited:
Back
Top