You are using an out of date browser. It may not display this or other websites correctly.
You should upgrade or use an alternative browser.
You should upgrade or use an alternative browser.
Signing Cues...
- Thread starter Zims Rack
- Start date
Zims Rack said:What is the best pen/marker to sign cues with before the finish is applied?
I'm assuming you would seal the cue, then sign it, then apply the finish.
Zim
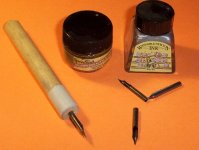
Use a calligraphy pen and ink with a small tip, cost about $1.00 and ink about $5.00. I actually just use the tip stuck to a piece of dowel I seem to be better with something bigger in my hand then the thin holders you buy. You can get ink in gold, silver, black and other colors. You sign it mid way through the finishing just before the last couple of coats. There is no pressure on you getting it perfect, if you mess up just wipe it off with a damp tissue and do it again. When you like what you did, let it dry and finish the cue. It is best to dull the spot a little where you are signing with something like 0000 steelwool before you sign to make the ink go on smoothly. You can do a beautiful job with a little practice. Look at some of the signing and personalizing on old Rambow cues. Just practice on some scrap. The tips in the picture are size 102 and 107. With a small tip you can write so small it can hardly be read. I see some cues signed that look like it was done with a magic marker, they look awful. With an ink & pen like these you can do a really classy job.
There may be other ways to do the signing but this is as good as any and better then most.
I should add that with the gold and silver inks to write small with a small tip you need to thin the ink. It is easy though, I just use a toothpick and dip it in the ink and put a good size drop on piece of wax paper. Then I use a toothpick and add a little water and try it on a piece of scrap. When it flows on nicely and has a good amount the ink solids in it so it shows up good, you are ready to work. With black it seems you can just dip the pen tip in the bottle and use it just like it is.
Attachments
Last edited:
Zims Rack said:Sounds pretty good! I really like your "tip holder", I've got to get one of them! haha!! Simple, easy and works great! Seriously, the cut off shaft end is a fantastic idea!
Thanks for the tips,
Zim
Here's what it looks like, I am sorry the picture is a little blurry.
Attachments
Zims Rack said:Looks good! Thanks!
There is something else that can be done that is very easy and can be unique. You can use a decal on the cue with your logo and before you say no way, let me tell you how it is done. I bought some thin clear transfer sheets, they were like 25 sheets for $20.00 8 1/2 x 11. You can just print on them with a ink jet printer. You cut out the piece and let it soak in a cup of water for a few minutes and transfer it to the cue. It is absolutely impossible to tell it was not written or printed right on the cue once the finish is applied. I have used them to put someone's name on the cue in like an old english or gothic script. It looks unbelievable when it is done. It is especially good for a cue maker who is doing some production cues like a jump cues or jump break cues they want to give a name. You just make you logo with the "Happy Hopper" or "Break Master by So and So" and it takes on a real professional production look, all done in house without any real additional cost. Just some food for thought.
Last edited:
Do you have a photo of this finished?macguy said:There is something else that can be done that is very easy and can be unique. You can use a decal on the cue with your logo and before you say no way, let me tell you how it is done. I bought some thin clear transfer sheets, they were like 25 sheets for $20.00 8 1/2 x 11. You can just print on them with a ink jet printer. You cut out the piece and let it soak in a cup of water for a few minutes and transfer it to the cue. It is absolutely impossible to tell it was not written or printed right on the cue once the finish is applied. I have used them to put someone's name on the cue in like an old english or gothic script. It looks unbelievable when it is done. It is especially good for a cue maker who is doing some production cues like a jump cues or jump break cues they want to give a name. You just make you logo with the "Happy Hopper" or "Break Master by So and So" and it takes on a real professional production look, all done in house without any real additional cost. Just some food for thought.
Zims Rack said:Do you have a photo of this finished?
I'll print one up tomorrow and stick it on something.
macguy said:Use a calligraphy pen and ink with a small tip, cost about $1.00 and ink about $5.00. I actually just use the tip stuck to a piece of dowel I seem to be better with something bigger in my hand then the thin holders you buy. You can get ink in gold, silver, black and other colors. You sign it mid way through the finishing just before the last couple of coats. There is no pressure on you getting it perfect, if you mess up just wipe it off with a damp tissue and do it again. When you like what you did, let it dry and finish the cue. It is best to dull the spot a little where you are signing with something like 0000 steelwool before you sign to make the ink go on smoothly. You can do a beautiful job with a little practice. Look at some of the signing and personalizing on old Rambow cues. Just practice on some scrap. The tips in the picture are size 102 and 107. With a small tip you can write so small it can hardly be read. I see some cues signed that look like it was done with a magic marker, they look awful. With an ink & pen like these you can do a really classy job.
There may be other ways to do the signing but this is as good as any and better then most.
I should add that with the gold and silver inks to write small with a small tip you need to thin the ink. It is easy though, I just use a toothpick and dip it in the ink and put a good size drop on piece of wax paper. Then I use a toothpick and add a little water and try it on a piece of scrap. When it flows on nicely and has a good amount the ink solids in it so it shows up good, you are ready to work. With black it seems you can just dip the pen tip in the bottle and use it just like it is.
Hey,
What kind of finish are you using?
I am using epoxy and super glue for now. Can i use this method with that finish? do different finishes effect the ink?
Thanks,
Owen
Question ...
I thought the 'best' way to sign a cue was to have it done by laser.
A good friend of mine, Jamie 'The Kansas kid' Sanders, has his signed on the
shaft near the joint, and he told me it cost him $50 to have it done.
By the way, you sign the shaft, not the butt, so if it is ever sold to someone
else, you can replace the shaft easier than the butt.
can you send a picture of the photo to me also. Thanksmacguy said:I'll print one up tomorrow and stick it on something.
Hannphie said:can you send a picture of the photo to me also. Thanks
I am sorry, I completely forgot about it. I will post something today.


I am wondering, does the image have to be reversed when printed on the film?Zims Rack said:You know what they say; "the mind is..." ohh crap, I forgot how the saying goes!
Haha!!
I think he forgot again also!
Zim
(waiting patiently)
Tracy
RSB-Refugee said:I am wondering, does the image have to be reversed when printed on the film?
Tracy
No you just print on it and then apply it. It is a decal and transfers right on the the piece. I "Will" post it today I have the transfer material sheets in one of my files I just have to look for them.
Let me get this straight...macguy said:No you just print on it and then apply it. It is a decal and transfers right on the the piece. I "Will" post it today I have the transfer material sheets in one of my files I just have to look for them.
1) Print design of choice onto the clear sheet.
2) Cut design out.
3) Soak in water for a few minutes.
4) Press onto cue in desired location for a few minutes.
5) Let dry xx hours before applying the finish over the decal
* If the ink is printed on one side of the sheet and then you soak it in water, then press on the cue, wouldn't it be a mirror image when complete? Or does the ink soak thru the sheet and into the wood?
Thanks for explaining and for the photo(s)...coming soon!
Zim
It doesn't press on, it slips off the backing the thin clear film is on directly on the piece. Did you ever build a car model and apply decals? It is th same type stuff. You only soak it for a few seconds and when it is on it dries in a few minutes. When you first apply it you can slip it around a little to get it in the right position.Zims Rack said:Let me get this straight...
1) Print design of choice onto the clear sheet.
2) Cut design out.
3) Soak in water for a few minutes.
4) Press onto cue in desired location for a few minutes.
5) Let dry xx hours before applying the finish over the decal
* If the ink is printed on one side of the sheet and then you soak it in water, then press on the cue, wouldn't it be a mirror image when complete? Or does the ink soak thru the sheet and into the wood?
Thanks for explaining and for the photo(s)...coming soon!
Zim