I do not build cues for a living it is just a hobby for me although i do have access to all at least i believe the correct equipment. I have never in fact sold any of the cues I have created they are either given to a friend or they are “MINE” all “MINE” Lol I love the look of short spliced points that come together and touch just above the A joint much like a full splice construction and I have tried to replicate this with my last two cues with moderate success. My limited understanding leads me to believe that in order to get points to come together it is necessary to cut the point v groove either past center or as close too center as possible on your forearm stock. This obviously weakens the forearm tenon at the base of the forearm causing the piece to flex a little regardless of how light a cut I take as I get closer to final depth leaving me with slight inconsistencies in depth/length of the v groove. I also can only cut 2 point grooves at a time (on opposite sides) glue in my point stock and then cut the remaining points at a later time tying up one of the lathes at least a day or more. Small inconsistencies in point length can certainly be corrected while turning the piece down at a later date but I would rather build it as perfect as possible initially and avoid this worry. Is my method as flawed as it seems? Do others employ different techniques they are willing to share? I have heard Mr. Searing can do this entire process all at once and still end up with points that come together and are obviously pristine. I hope I have explained myself succinctly any and all help or opinions welcome.
You are using an out of date browser. It may not display this or other websites correctly.
You should upgrade or use an alternative browser.
You should upgrade or use an alternative browser.
spliced points touching at the A joint
- Thread starter kid5020
- Start date
Only cutting two at a time leaves plenty of meat. If you have flexing you really need to look at your cutting method. You can scroll through these pictures and see my point cutter. http://www.jimboarmy.com/phpbb3/viewtopic.php?f=6&t=4254&p=53579&hilit=shop+tour#p53579
Sent from my ADR6300 using Tapatalk
Sent from my ADR6300 using Tapatalk
I do not build cues for a living it is just a hobby for me although i do have access to all at least i believe the correct equipment. I have never in fact sold any of the cues I have created they are either given to a friend or they are “MINE” all “MINE” Lol I love the look of short spliced points that come together and touch just above the A joint much like a full splice construction and I have tried to replicate this with my last two cues with moderate success. My limited understanding leads me to believe that in order to get points to come together it is necessary to cut the point v groove either past center or as close too center as possible on your forearm stock. This obviously weakens the forearm tenon at the base of the forearm causing the piece to flex a little regardless of how light a cut I take as I get closer to final depth leaving me with slight inconsistencies in depth/length of the v groove. I also can only cut 2 point grooves at a time (on opposite sides) glue in my point stock and then cut the remaining points at a later time tying up one of the lathes at least a day or more. Small inconsistencies in point length can certainly be corrected while turning the piece down at a later date but I would rather build it as perfect as possible initially and avoid this worry. Is my method as flawed as it seems? Do others employ different techniques they are willing to share? I have heard Mr. Searing can do this entire process all at once and still end up with points that come together and are obviously pristine. I hope I have explained myself succinctly any and all help or opinions welcome.
Here's how I do it, I put a re-cut fixture on the 14" forearm( it allows me to take it out of the lathe after cutting the point grooves on opposite sides)fill them and glue them and then back to the lathe and cut the other two point grooves. You can do the same thing without the re-cut fixture with a little imagination.
You do have the basic idea...It's very possible that Dennis Searing has a way of doing it all at once but I cannot answer for him.
")
Mario
Thanks for the pics. I guess i wasnt completely clear. I cut the first two just past center then glue in the point stock. This still leaves a small portion of the tenon that is slightly hollowed for lack of a better description. I fill this with epoxy to try to maintain some strength however when i cut the remaining two point at a later time as I am dialing in closer and closer to my final depth I now have a tenon that is really just held together by small amounts of wood and the epoxy from perpindicular points. The reason I think that the wood is flexing is that it is the last point cut in that always seems to come up just a little shorter so instead of just dialing all 4 points to a given depth i am manually manipulating the last point and guessing to try to match the other three. I don't know if this makes anything clearer than my original post. If it makes a difference I do not have an end mill I use a Router with a 45 degree birdsmouth bit to cut the point grove
I machine my point stock to fill the gap perfectly.

Sent from my ADR6300 using Tapatalk
Sent from my ADR6300 using Tapatalk

Thank you to everyone for their help including Mr. Neighbors who I believe sent me a reply but just did it in another thread by mistake. I believe based on your answers and pics the biggest issue is I am cutting the grove too deep as well as extending the grove too far out over the tenon I use. I cut my forearms at 12 inches with an additional 3/4" tenon at the joint and 1 1/2 at the A joint. I normally don't stop the point grove right at the back of the forearm but extend into the tenon just to give me some room when gluing to slide the point stock up and down to ensure a good seal before tying with surgical. I think this is going to turn out to be the issue in that the tenon with groves for 4 points extending into it gets very week and more than likely causes the flex i feel i get. Thanx again to all:thumbup:
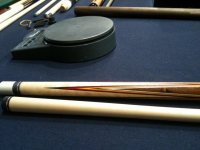
Thanks Chris I am very happy with the way this cue is turning out. It is much better than the first attempt made at this process. Here is a couple of others in progress. The two on the left are mine the other on the right alhough beautiful I can't take credit for. Suprisingly the wrapless is to this point still my favorite although the touching points is a sure bet to replace it. When I get time away from my real job and back to my happy place in the shop I'll update some photos of the coco cue's progress. In the proper forum of course.
Attachments

Here's one I'm almost done with. I don't use a CNC Mill for my points, so when I do a normal cue, I cut the final passes on each point one right after the other so they are the same length.
For this, I cut all 4 points most of the way, then locked down my mill and cut one point. Glued in the point without taking it from the machine. Then rotated the cue 180 degrees and did the same to the opposite point. When I glued both of these points in, I made sure they filled the entire gap. I then cut the final two points at the same time.
I have a large cutter, but even with that, I couldn't get the last two points in without turning down the forearm with the 2 points a bit first. Once I cut it down close to where I started, I glued in the last two points. I had to sand the back-bottom of one of them since they went all the way through the cue a the bottom.
That's all there is to it. Just a lot more work. It takes me 2 days to do 4 points this way.
Here are some photos of the cue in the works.
Wow Tony what a fantastic looking cue. Your level of expertise along with everyone else on here is what continues to drive me to the shop to strive to achieve. Well combined with my Irish cheapness and stuborn refusal to pay someone else to do build me one. lol Thank you again to everyone
Beautiful work Tony. Maybe one of these days... Thanks for the inspiration.
not the best pics i guess but is only an Iphone. Btw the wrapless is in the middle the other two are waiting for wraps
Beautiful pictures of work in progress like that and no name attached to your post, now that's a shame.
Thanks Mike for the nice words but as I stated I don't do this for money I just do it for fun. If I ever make a cue I dont want to keep myself or one of my friends doesn't snap up that might change. I just have the lucky fortune to have access to a friends shop who unfortunately has lost almost all interest in making cues himself. Great equipment, tons of fantastic seasoned wood, a wealth of knowledge to tap into (except he doesn't like his points like I do hence this thread) and all I have to do is help move some slates occasionally for his table business. I can't lose
Thanks Mike for the nice words but as I stated I don't do this for money I just do it for fun. If I ever make a cue I dont want to keep myself or one of my friends doesn't snap up that might change. I just have the lucky fortune to have access to a friends shop who unfortunately has lost almost all interest in making cues himself. Great equipment, tons of fantastic seasoned wood, a wealth of knowledge to tap into (except he doesn't like his points like I do hence this thread) and all I have to do is help move some slates occasionally for his table business. I can't lose
Well, that's great, if you don't charge, Please send me one for my collection. I guarentee, it will never be sold. But Please sign it somewhere.
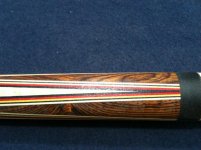
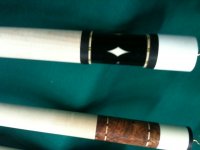
For those who are interested here is some more pics of my second attempt at touching points. It is coming together nicely am just waiting to work up the courage for its final sand before finish as much like Zinzola coco really kicks me in the a** but i just love the way it looks