When I attempt the basic 3 rail bank from one corner pocket to the adjacent corner pocket I'm coming up almost a whole diamond short. When I drop down to the diamond right above the side pocket I can pocket the ball. I'm using the required top right running english. I measured the bed of the table best that I could. From one end of the head rail to the foot rail there is almost 1/4" difference from one side to the other. This is a GC III table. Would this difference in length be the cause of my banking issues?
You are using an out of date browser. It may not display this or other websites correctly.
You should upgrade or use an alternative browser.
You should upgrade or use an alternative browser.
Table not banking properly
- Thread starter yankee817299
- Start date
The starting point would be to Make sure the top is installed square. Do an "X" measurement. Then check the cushion nose height all the way around. See if it varies any. Those are as good of starting points as any.
The "X" measurement looks to be 1/4" off. 127" one side 127 and 1/4" on the other diagonal. The cushion nose is 1 1/2" all the way around. Looking under the table the corner pocket castings are about a quarter to 3 eighths of an inch from the aprons. They are all a bit different. Also looks like the aprons are being forced together on a couple of the corners.
1 1/2 is too tall. That would definitely affect the bank angle and speed off to cushion. They need to be between 1 3/8 and 1 7/16.... with optimal height at 1 13/32.The "X" measurement looks to be 1/4" off. 127" one side 127 and 1/4" on the other diagonal. The cushion nose is 1 1/2" all the way around. Looking under the table the corner pocket castings are about a quarter to 3 eighths of an inch from the aprons. They are all a bit different. Also looks like the aprons are being forced together on a couple of the corners.
Sounds like someone put the wrong cushions on it? No way to know without seeing what's going on.
Ok Buckshot. I took a common carpenters tape measure and measured from the playing surface to the center of the cushion nose. Is there a more precise way to measure? Where to on the cushion should I measure?
I use this... it measures to 1/32".Ok Buckshot. I took a common carpenters tape measure and measured from the playing surface to the center of the cushion nose. Is there a more precise way to measure? Where to on the cushion should I measure?
Measure as close as possible to the center of the round part of the nose. Tip...if you use your phone, you can get a snails eye view with the benefit of lighting.
Last edited:

I bought a super cheap carpenters square and cut a couple of pieces off of it and sanded them to an exact measurement.
There's some great info in this post: https://forums.azbilliards.com/thre...ails-to-everyone-and-rail-calibration.379678/
I dug out a digital depth finder that I have. 1.5 seems to be the consistent height around my table. I have not had the rails changed in the 10 years that I've owned the table. The previous owner??
Yep... too tall. 1 7/16 max. No way to tell for sure what's going on. Here is a possibility....I dug out a digital depth finder that I have. 1.5 seems to be the consistent height around my table. I have not had the rails changed in the 10 years that I've owned the table. The previous owner??
Remove a rail and look at the cloth where it is stapled. The cloth should be trimmed so the CLOTH RELIEF is seen. If this is not done, the cloth will act like a shim and raise the cushion nose height. I have an example on a table I am working on. His cushion height was too tall also...
Good pictures. I will check the rail covering and see how it sets with the relief. Also, in the GC3 picts, the cloth looks like it is bunched up in places which I'm sure would cause a height issue.
While I have a rail off can someone show explain to me how to measure the sub rail thickness. I read what RKC has said in the linked thread above but I am not exactly sure what he is referring to??? Also, is there any torx specifications on the rail bolts?
I think I am understanding that the underside of the rail that rests on the slate should be nothing but wood. Any cloth, staples, or folds and ripples would all raise the rail height.
Rail thickness affects the angle needed to get the nose height needed. If you put the wrong profile rubber on the wrong thickness rail, the body of the cushion will not be in the right place, and it will not play correctly.
12-15 ft-lbs for normal 3/8" rail bolts.
12-15 ft-lbs for normal 3/8" rail bolts.
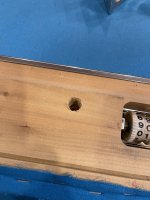
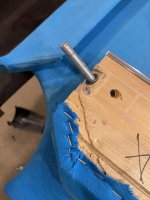
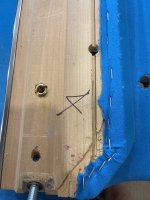
I took the rail off and the cover is definately over the relief cut in the rail which would cause a change in rail nose height. Also some minor mounting problems that I can take care of fairly easily. Two of the thread inserts are protruding from the rail bottom also causing a height adjustment. Also one of the corner caster bolts was replaced with a stud and a nut. Not sure why. I'm thinking of a recover by the local brunswick dealer here in Ft. Worth, Tx. But I will definately be watching.
Attachments

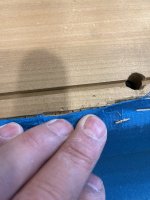
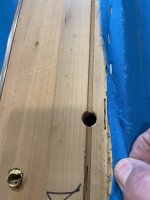
Well one of the threaded inserts in the other rail that the corner casting connects too has stripped out when putting the removed rail on. What is the best option to repair this? The way the rail end is routed out, there does not look like much room to drill the hole out and put a dowel rod in. Is there any special bonding epoxy that anyone has used with good results?
The protruding inserts should screw back in with a flat tip screwdriver.... assuming the wood isn't hollowed out.
Yes, I figured that they backed out a bit when I removed the bolt. Also, the threaded inserts for the corner cast have a screw that goes in at a diagonal toward the insert. I'm not sure, but are these suppost to go into a slot that is cut into the end of the insert. The one that stripped out I was able to secure with this screw. Now it is not 100%, but it was close enough to put the rail back on.
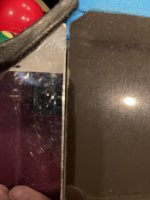
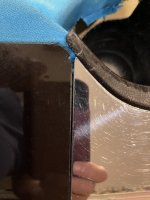
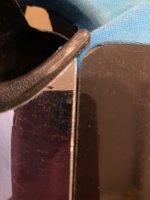
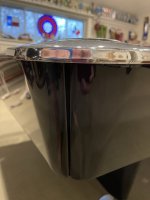
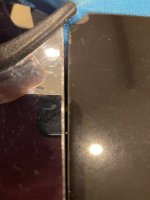
On another note, the cloth on the rails was pulled and bunched on the end where the face of the corner cast meets. This was causing the corner to sit crooked which in turn caused nothing to line up properly. All around my table there is a diagonal gap with the 4 corner casts. I cut as much cloth from the end of the rail as I could. Now the corner casting actually fits more like it should. Also, the two short pieces of skirting that are on either side of the ball box have a straight line where they meet their opposing side skirting. There use to be a gap toward the top of this joint and tight at the bottom. Just this little bit that I did has made the table's appearance a bit better.
On another note, the cloth on the rails was pulled and bunched on the end where the face of the corner cast meets. This was causing the corner to sit crooked which in turn caused nothing to line up properly. All around my table there is a diagonal gap with the 4 corner casts. I cut as much cloth from the end of the rail as I could. Now the corner casting actually fits more like it should. Also, the two short pieces of skirting that are on either side of the ball box have a straight line where they meet their opposing side skirting. There use to be a gap toward the top of this joint and tight at the bottom. Just this little bit that I did has made the table's appearance a bit better.
I'd get the better threaded inserts that are installed with Allen socket drives. If you try to force that insert in you may damage the ears then you've got another problem on your hands.

 www.mcmaster.com
www.mcmaster.com
McMaster-Carr
McMaster-Carr is the complete source for your plant with over 595,000 products. 98% of products ordered ship from stock and deliver same or next day.
McMaster-Carr
McMaster-Carr is the complete source for your plant with over 595,000 products. 98% of products ordered ship from stock and deliver same or next day.
Last edited:
Lluckily, that is the only one on that rail that has the ears. All the others are wrench driven. Probably going to see more though as I disassemble the table.
I put a couple links in my post above.Lluckily, that is the only one on that rail that has the ears. All the others are wrench driven. Probably going to see more though as I disassemble the table.