xzero table top

pescadoman

Randy
Silver Member
This is the worst part of the entire assembly... I measured about 5 times and then completed one piece of table top. I then used 1-2-3 blocks to square up 2 piece UNDER the first completed piece and it worked out just fine.

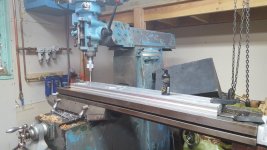
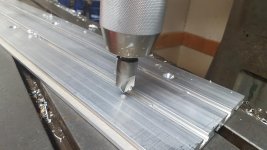
NOW, this is NOT something I would have wanted to do on a drill press. However, I have a nice mill at my disposal. I know Eddie Cohen managed somehow, but he also said it was a pain. He did the countersinks by hand.... I used the quill stop, so all of them were the same depth.

All told, it was 80 holes that were all countersunk......
 

Attachments

  • 20160309_145954.jpg
    20160309_145954.jpg
    100 KB · Views: 539
  • 20160309_171323.jpg
    20160309_171323.jpg
    98.3 KB · Views: 529
Couldn't they provide a CAD picture so you can have it CNC'd somewhere ?

It was too big for my friend's TM-1, and almost to big for mine, with one setup. He offered, but then measured the necessary travel. I think he would have still done it, but I told him to forget it. A 48" gantry machine could have probably done it. Most machinists seem to want to decline to do one offs like this anyway, as they aren't very profitable. I also thought it was stupid to farm out with a 10x50" mill in my garage. If I can't drill 80 holes in aluminum, I'd better sell it.

I'm sure there was an easier way, but this is what we/I came up with.

Once the first piece was done correctly, it was just a matter of lining things up. We thought of many different ways to do this, but this seemed the best balance between practicality and accuracy.

After all the holes were drilled I simply switched to a 82 degree countersink, set the correct depth, aligned with a t slot(so I didn't hit the table) and moved the Xzero table under the tool, allowing it to self align. Countersinking was the easiest part and went quickly.
 
Couldn't they provide a CAD picture so you can have it CNC'd somewhere ?

It's simply 2 holes repeated at whatever the distance is between your mounting points. But I agree, it's a PITA doing all those holes manually. Nice job, Randy. Some pics when the top is mounted would be nice!
 
When I did mine, I took a helpful hint from another owner: I mounted an aluminum angle inside the 80/20, and then mounted the top to that (I mounted it from the bottom using T bolts, so no reason to drill anything other than the angle). I think I may have shimmed the angle so that it was angled down SLIGHTLY and couldn't possibly cause any significant bow.

The reason for this is the 80/20 isn't perfectly flat, and it also may not be dead square when you assemble it. If you crank down the top, you can actually deflect it in the middle. Not such a big deal, especially if you flatten a tooling board or mounting plate on top, but something to keep in mind.

Anyhow, just watch out for this when you assemble it. Not a big deal to work with and/or correct, but at least you know to look for it if it happens.
 
Last edited:
BTW, the simple fix if you run into it (which is probably obvious, but I'll mention it anyway) is to use some shim washers/stock so it doesn't bow.
 
When I did mine, I took a helpful hint from another owner: I mounted an aluminum angle inside the 80/20, and then mounted the top to that (I mounted it from the bottom using T bolts, so no reason to drill anything other than the angle). I think I may have shimmed the angle so that it was angled down SLIGHTLY and couldn't possibly cause any significant bow.

The reason for this is the 80/20 isn't perfectly flat, and it also may not be dead square when you assemble it. If you crank down the top, you can actually deflect it in the middle. Not such a big deal, especially if you flatten a tooling board or mounting plate on top, but something to keep in mind.

Anyhow, just watch out for this when you assemble it. Not a big deal to work with and/or correct, but at least you know to look for it if it happens.

I've always been impressed with Bob(how can you not be?), so I just followed his lead. I used economy t nuts though.

I ran into one problem though. One of the pieces of table top isn't straight and needs to be replaced. I'm waiting on George.

I've been assembling the MiniRaptor and taking pics as I go along, so I'll be posting those along with tips and instructions. The REALLY frustrating part of the design is the inability to access the motor side of the coupler. This means if one needs replacing, or you FORGET(they came in another box that I forgot to grab and bring into the shop) to install them at the right time, MOST of the machine needs to come apart. The Y and Z aren't a big deal, but the X requires removing the entire axis IF you used the supplied guide pins. I suppose, if you didn't use the pins, the motor side gantry upright could be removed if you support the gantry. I personally wouldn't want to do this AND if anyone has a better suggestion I will HAPPILY take it. I suggested to George that an access hole be drilled so this wouldn't be a problem, but he declined. All that being said, it isn't the end of the world with a mini or likely a regular Raptor. HOWEVER, the Predator is more than 5 times the size and that gantry is HEAVY.

Mini Raptor assembly has been delayed because I was shipped 2 x axis mounts and no z. There is another issue that needs to be addressed, but I won't comment until it is resolved.

The MX4660 controller looks easy to wire up and, upon first inspection, seems to be better built than the Gecko. I don't think you can beat George's prices on the motor kit, so I don't think the hassle of trying is worth the trouble. All steppers are Leadshine.
 
I believe I had the same issue on the machine I got (not sure if it was the Predator, but it was whichever their heavy duty one was at the time). It also sucks that you can't lube some of the linear rail slides with disassembling the Z access machine, at least on the one I had.

There are some definite design flaws, and George is a very nice guy but can be a complete PITA to deal with when you get shorted parts That said, I doubt you'll find anything stiffer/more accurate for the money. Once you're up and running, I think you'll be very happy.

On my 3X4 machine, and with my own home routine and steppers, I could hold an absolutely positioning tolerance of just about .001" from one corner (home position) to the other. That's not bad for a cheap machine!
 
Back
Top