You are using an out of date browser. It may not display this or other websites correctly.
You should upgrade or use an alternative browser.
You should upgrade or use an alternative browser.
any interest in stand alone inlay machines at $1000
- Thread starter Mojocues
- Start date
I think everyone on here would be interested at that price....any pics
Serious interest would depend on the details and pictures. Pictures of the machine, pictures of inlays you have successfully done completely with that machine. Does it come with a spindle? Dremel tool? Ratio? Etc.
Kelly
++++1:thumbup:
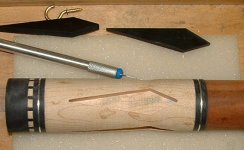
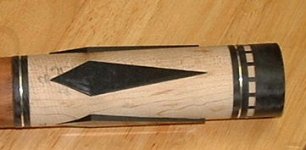
well as i posted i just wrapped it up today and just put a taper on a couple cues blanks to inlay on tomorow
ratio 1:1
spindle? no but an indexing apperatus and tailstock
pictures ill put up tomorow bear in mind i didnt build mine to be a show piece
imade a couple parts from scrap that i would profesionaly fabricate for ones id sell
not looking to compete with chris or anyone else mainly looking for a way to offset the cost of getting inlay templates made
well as i posted i just wrapped it up today and just put a taper on a couple cues blanks to inlay on tomorow
ratio 1:1
spindle? no but an indexing apperatus and tailstock
pictures ill put up tomorow bear in mind i didnt build mine to be a show piece
imade a couple parts from scrap that i would profesionaly fabricate for ones id sell
not looking to compete with chris or anyone else mainly looking for a way to offset the cost of getting inlay templates made
You can probably make some of Your own templates on a 1:1 machine. I built the machine that use, It's not pretty either, built from scrap and a few parts that I bought, but It can do the job with enough patience. I can cut Corian and brass with It, and have made My own templates before. I do have one of Chris's plates though, and being the same ratio It works on mine as well.
RBC
Deceased
How do you keep your tool straight up and down, perpendicular to the center line of the cue?
If the cutter travels up and down in an arc, it will only be straight up and down at one exact point, and if your not at that point, then the sides of your inlay will not be vertical and you will have inlay fit issues.
Don't give up, keep working on it!
If the cutter travels up and down in an arc, it will only be straight up and down at one exact point, and if your not at that point, then the sides of your inlay will not be vertical and you will have inlay fit issues.
Don't give up, keep working on it!
the way i have the pattern table set in relationship with the indexing head and tailstock AS LONG AS you are making a standard diameter cue
it will be cuting perpendicular
an oversized cue would cut a pocket a few thousanths deeper
an undersized or compound tapered but would be either a little shallower pocket or maybe off perpendicular by 2 degrees depending on where you
chose to chuck your endmill
it will be cuting perpendicular
an oversized cue would cut a pocket a few thousanths deeper
an undersized or compound tapered but would be either a little shallower pocket or maybe off perpendicular by 2 degrees depending on where you
chose to chuck your endmill
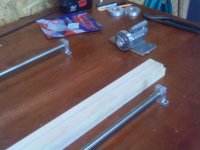
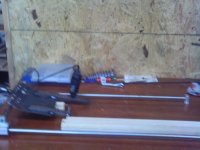
It reminds Me of a carving duplicator. I'm not sure what all problems you may run into using It to inlay, but My guess is You will end up deciding on adding a "Z" axis to It, because It will make life a lot easier for ya. The good part is you already have 3 rods, and your indexer looks like It may work out well. 1 more rod and another set of bearings plus something for the "Z" is probably all You would need, looks like You are capable of fabricating the rest of the stuff to mate It all together.
I made a centering slide under My z, so that I can adjust It independent of the stylus bar, and It really comes in handy for centering the bit on the cue even If My template is not cut perfectly on center. I also have a stabilizer on It, not only reduce vibration, but a bonus feature was that It also helps to adjust the pitch of the bit in one direction, so My router mount only has to be perfectly square in the other direction. the centering slide was Made from a surplus pneumatic air slide that I bought for well under $10 I believe well worth It for the added ease of use, I made a threaded lead nut and screw to lock It in position. this is the only picture I have on here of It. http://forums.azbilliards.com/attachment.php?attachmentid=5169&d=1111568927
I made a centering slide under My z, so that I can adjust It independent of the stylus bar, and It really comes in handy for centering the bit on the cue even If My template is not cut perfectly on center. I also have a stabilizer on It, not only reduce vibration, but a bonus feature was that It also helps to adjust the pitch of the bit in one direction, so My router mount only has to be perfectly square in the other direction. the centering slide was Made from a surplus pneumatic air slide that I bought for well under $10 I believe well worth It for the added ease of use, I made a threaded lead nut and screw to lock It in position. this is the only picture I have on here of It. http://forums.azbilliards.com/attachment.php?attachmentid=5169&d=1111568927
Last edited:
Greg your correct on the carving duplicator
i too have a slide i bought off ebay if i find i need a z axis
i was , have been collecting parts of this type for a while
BUT a month ago i watched a friend who builds custom
guitars ,inlay a fretboard with one and and it was making
nice work ..
i too have a slide i bought off ebay if i find i need a z axis
i was , have been collecting parts of this type for a while
BUT a month ago i watched a friend who builds custom
guitars ,inlay a fretboard with one and and it was making
nice work ..
I thought about making one of those for roughing out carvings & parts. I've seen pantos like it, so It make work for you, but I'm pretty sure you'll want to take It further, and end up adding that z. Speaking of guitar makers, I saw a few videos recently with some guitar makers that made pantos out of some wood, drawer slides and other odds and in's, pretty ingenious setups, although l don't know how well something like that would work for our purposes. Working and being ideal in this hobby don't always go hand and hand unfortunately if you know what I mean. Often We have to keep on improving on things as we go.
I made My panto the same way as your doing, a little at a time, only about 8-10 years back. It took years for me to find deals on stuff that I thought I could modify to work. and save enough stuff up to complete It. I have to admit for what It was It was kind of a long road for me, but eventually I got there.
I could machine many of the parts Myself today, but back when I was building It, I was sort of roughing It. I did not have much more then common hand tools to work with, and later on a small metal lathe, so I did the best I could with surplus parts. It was inspired By Chris's Machine, but originally the only part that was truly the same was a Taig milling attachment that I used for the "Z". It was cheaper for me to buy that then to make It at the time. After I got a deluxe lathe, A machinist friend and customer of mine at the time Made a couple of bracket/adapters that fit the dovetail for me, and that I bolted to the assembly so that I could mount It to the lathe, then use the indexer, and cross slide on that to hold My cues, and inlay slabs.
Eventually I wanted It stand alone, and so bought a 4 foot bed way and a few other Things from Chris, and mounted It to a piece of 80/20.
It's very tedious work using pantos to begin with, when making one the way I did, and being limited on what I had to work with. It's even more so, especially squaring everything up, running into imperfections, and flaws in the setup, and improving as you go. I had to do a lot of tweaking, and It took a lot of practice before I was able to make everything work properly. It worked, but getting It to work as well as possible, and knowing what the limitations were took some doing. I spent a lot of time with a continuous neck ache from sitting over It and looking down while testing and working with It, but with enough patience I improved upon It, and got better at using It.
Suggestions that may help you as you go, some of this is assuming that you will end up going with a z axis.... Don't cut your rod, keep that wider platform you have going there, and just buy another one if You don't already have one by some chance. It will be much more stable with a wider platform. Mine being built out of stages has a skinnier platform, It's pretty darn rigid just the same, But I'm thinking about adding adjusters to stabilize It even more, because I do have a little bit of weight up top, and I'm concerned about that possibly wearing on parts over time. Your wider platform would automatically do that, and eliminate the need for them.
Your indexer... while I can't see It up close to fully examine, It looks very usable in the pictures, and I applaud Your ingenuity on that. You want to have a way to level the cue out, as I'm sure you have already figured, with the taper of the cue you have to offset for that somehow. 2 ways I see of doing this. (1) use a offset center (which Chris may sell to You) (2) make your tail stock so that you can adjust the height of It to account for that (actually I would make It as adjustable as possible, side to side adjustment would not hurt either).
On the bed way....I can think of many ways to make one and/or mount the HS&TS, and there are probably 10 other ways for each one, but If you can find a deal on a suitable piece of t-slot extrusion long and wide enough to work It will make things a lot quicker and easier.
Last thing build It as rigid as possible, but try to keep It lightweight too. The bed way and indexer don't matter as much weight may even help, but Use mostly aluminum on the moving parts, because It has both characteristics. May get away with phenolic plate also but I prefer alloy. Wood could work for somethings I suppose, but on average is not as rigid so I would avoid It if possible.
I could probably think of many other things, but It's a process and you'll figure out all the little kinks as you go and experiment. Nothing wrong with going ahead with what you have now to play around, think of It as an erector set, You have a bunch of parts and will probably keeping adding and modifying along the way, so the main thing is don't do anything to any of the main parts, that can't easily be undone and changed later when/if you make changes in the design.
Probably the best piece of advice I can give you, Is save Yourself a lot of heartache as well as anyone that may be thinking of purchasing, by not committing to any sales too soon. Please don't take what I say the wrong way because I'm being sincere when I say that, and chances are you may thank me for It after you get to playing around with the machine for the first time. I could be wrong but My experiences tell me different.
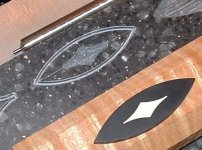
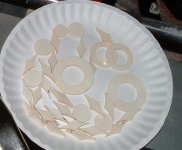
Good luck with It, looks like your off to a good start.:smile: If You build Your machine rigid enough Then you can cut Your own templates. I made this one out of Corian, but I can cut them from brass bar as well.
Greg
I made My panto the same way as your doing, a little at a time, only about 8-10 years back. It took years for me to find deals on stuff that I thought I could modify to work. and save enough stuff up to complete It. I have to admit for what It was It was kind of a long road for me, but eventually I got there.
I could machine many of the parts Myself today, but back when I was building It, I was sort of roughing It. I did not have much more then common hand tools to work with, and later on a small metal lathe, so I did the best I could with surplus parts. It was inspired By Chris's Machine, but originally the only part that was truly the same was a Taig milling attachment that I used for the "Z". It was cheaper for me to buy that then to make It at the time. After I got a deluxe lathe, A machinist friend and customer of mine at the time Made a couple of bracket/adapters that fit the dovetail for me, and that I bolted to the assembly so that I could mount It to the lathe, then use the indexer, and cross slide on that to hold My cues, and inlay slabs.
Eventually I wanted It stand alone, and so bought a 4 foot bed way and a few other Things from Chris, and mounted It to a piece of 80/20.
It's very tedious work using pantos to begin with, when making one the way I did, and being limited on what I had to work with. It's even more so, especially squaring everything up, running into imperfections, and flaws in the setup, and improving as you go. I had to do a lot of tweaking, and It took a lot of practice before I was able to make everything work properly. It worked, but getting It to work as well as possible, and knowing what the limitations were took some doing. I spent a lot of time with a continuous neck ache from sitting over It and looking down while testing and working with It, but with enough patience I improved upon It, and got better at using It.
Suggestions that may help you as you go, some of this is assuming that you will end up going with a z axis.... Don't cut your rod, keep that wider platform you have going there, and just buy another one if You don't already have one by some chance. It will be much more stable with a wider platform. Mine being built out of stages has a skinnier platform, It's pretty darn rigid just the same, But I'm thinking about adding adjusters to stabilize It even more, because I do have a little bit of weight up top, and I'm concerned about that possibly wearing on parts over time. Your wider platform would automatically do that, and eliminate the need for them.
Your indexer... while I can't see It up close to fully examine, It looks very usable in the pictures, and I applaud Your ingenuity on that. You want to have a way to level the cue out, as I'm sure you have already figured, with the taper of the cue you have to offset for that somehow. 2 ways I see of doing this. (1) use a offset center (which Chris may sell to You) (2) make your tail stock so that you can adjust the height of It to account for that (actually I would make It as adjustable as possible, side to side adjustment would not hurt either).
On the bed way....I can think of many ways to make one and/or mount the HS&TS, and there are probably 10 other ways for each one, but If you can find a deal on a suitable piece of t-slot extrusion long and wide enough to work It will make things a lot quicker and easier.
Last thing build It as rigid as possible, but try to keep It lightweight too. The bed way and indexer don't matter as much weight may even help, but Use mostly aluminum on the moving parts, because It has both characteristics. May get away with phenolic plate also but I prefer alloy. Wood could work for somethings I suppose, but on average is not as rigid so I would avoid It if possible.
I could probably think of many other things, but It's a process and you'll figure out all the little kinks as you go and experiment. Nothing wrong with going ahead with what you have now to play around, think of It as an erector set, You have a bunch of parts and will probably keeping adding and modifying along the way, so the main thing is don't do anything to any of the main parts, that can't easily be undone and changed later when/if you make changes in the design.
Probably the best piece of advice I can give you, Is save Yourself a lot of heartache as well as anyone that may be thinking of purchasing, by not committing to any sales too soon. Please don't take what I say the wrong way because I'm being sincere when I say that, and chances are you may thank me for It after you get to playing around with the machine for the first time. I could be wrong but My experiences tell me different.
Good luck with It, looks like your off to a good start.:smile: If You build Your machine rigid enough Then you can cut Your own templates. I made this one out of Corian, but I can cut them from brass bar as well.
Greg
Attachments
Taper
How about a standalone taper machine for that price!!!
;-)
Just interested in seeing how much interest would be out there ..
just wrapping up my first one and will most likely have a bug or two to work out ..
but if there is enough interest in making 4 or 5 i would make a batch
How about a standalone taper machine for that price!!!
;-)
Greg ,
Thank you for taking the time to reply ..... it sounds like our traveled
paths have been kinds similar .. I sure have wished once or twice I was one
of the fortunate ones who could just drop 20 k and get all the cool toys
Question for you .. how long does it take to cut say a 7.5 inch floaitng
point
Greg ,
Thank you for taking the time to reply ..... it sounds like our traveled
paths have been kinds similar .. I sure have wished once or twice I was one
of the fortunate ones who could just drop 20 k and get all the cool toys
Question for you .. how long does it take to cut say a 7.5 inch floaitng
point
You and I both, I'd rather have a CNC like many others do, and hope to one day, but I've had to work with what I had or could afford.
Hard to say how long floating points take, I mostly only use It for the smaller stuff, but I have done them, and there are many variables, Like depth of cut, hardness of material, and the fact that It is being fed manually. You have to be careful not to break bits, and sometimes taking It a little slower helps reduce that. The best answer I can give is expect working with a panto to be time consuming. You can try to go faster, but as I mentioned You may break more bits, and your final product may not look as clean. Sometimes when You break a bit It can ruin the part, It's kind of a toss of the dice as to whether the part can be saved or not. That's one other reason I choose to take It slower. I can put a larger, stronger bit in It and go to town, no problem there, but the bits used to actually make the pocket fit the part are too small to allow for that and I have to be more careful. It's hard for human hands to produce a perfectly consistent feed rate.With CNC though, It's something that can be tested and controlled within the programing. Once set, repeatability would be much easier, and I imagine the time It takes to finish an identical part would be closer to the same from one to another. As where with a panto, that more less depends on the consistency of the person, and their ability to match feed rates by hand.
These are old Pictures, but all that I had quick access to.
Attachments


Last edited:
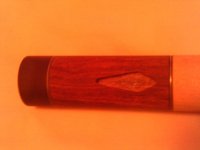
Pm sent cue crazy....those inlays look very clean
How about a standalone taper machine for that price!!!
;-)
Cuemakers sure are cheap!!:smile: