Restoring '46 Brunswick Anniversary - Castings Concern

Yea well unfortunately I can't afford a mechanic either. I'm on my own with this. :(

I'm going to try to save my feather strips so I can reuse them, need to make some kind of long tool to pry under them further than a screwdriver will reach to try to keep them from snapping. Any that I break I'll have to make replacement strips myself for with a circular saw and some wood I already have, I just can't afford to put anything into fixing this table. I've still spent less than $10 total on fixing it so far. I already had the bondo and most of the sandpaper etc I've used. My biggest expense so far was just super glue and that was only $6 total on sale. :)


I was testing my rails yesterday to see if the rubber was still good, especially where it was oil soaked, and really jumping for joy because they seem as lively as any rails I've ever played. I would have been really screwed if my rubber had been bad, can't afford that for sure. It's amazing the old rails they used 47 years ago would still be good but other things I've read show this was some of the best rubber ever and I guess it's not even unusual for this rubber to still be good at this age.
 
Last edited:
... I've still spent less than $10 total on fixing it so far. I already had the bondo and most of the sandpaper etc I've used. My biggest expense so far was just super glue and that was only $6 total on sale. :)

That's incredible! I probably have $75 in abrasives and finishing chemicals alone

I was testing my rails yesterday to see if the rubber was still good, especially where it was oil soaked, and really jumping for joy because they seem as lively as any rails I've ever played. I would have been really screwed if my rubber had been bad, can't afford that for sure. It's amazing the old rails they used 47 years ago would still be good but other things I've read show this was some of the best rubber ever and I guess it's not even unusual for this rubber to still be good at this age.

None of my rails have hardened up and they are over 60 years old. And if I didn't have a small chunk missing from one of my Monarch cushions, I'd probably keep mine for the same reason. I just wish they could be safely removed and completely intact for re-sale.
 
"That's incredible! I probably have $75 in abrasives and finishing chemicals alone"

Same here if not more but I didn't have to buy it, I already had all that stuff from previous projects. I've remodeled most of this house I'm in and had 1.5 gallons of chemical stripper left, over $30 worth of abrasives if not more, 1/2 gallon or so of the stain/clear, a full gallon of bondo I never used on a car I got rid of a couple years ago, a couple containers of paint thinner, a couple kinds of wood filler etc etc. Most of it is about end of shelf life or well past it now, but I still managed to use them.

You only got to see a portion of the garage but it's well stocked with stuff. For example I probably have enough boxes of leftover nails and screws here to build another whole house from scratch. One box of common construction nails alone is 25lbs. :)

I used to have a problem when remodeling that I'd have to run to home depot just about every single day because I ran out of something, then started to just buy wholesale in bulk and buy more of things just in case I might not have enough.

I haven't always been dirt poor, used to make a good living and actually buying stuff that way in bulk at wholesale was ultimately cheaper than small quantities at retail anyway. It's sad that a lot of the stuff is going bad though, even in sealed containers. Most of that chemical and paint and filler and stuff has a pretty limited shelf life so it's good that I managed to use some of it up on this project.
 
Last edited:
None of my rails have hardened up and they are over 60 years old. And if I didn't have a small chunk missing from one of my Monarch cushions, I'd probably keep mine for the same reason. I just wish they could be safely removed and completely intact for re-sale.

I have heard of people reusing and remounting them before. I read a thread somewhere on here about a mechanic who tightened up pockets by adding a bit of stretch when reapplying them so they go on just that 1" longer or whatever. I don't know how you get them off without damaging them but someone has. I know you said one has a chunk out of it but I bet there are folks with just a dead rail or two who could use whatever you could salvage and they might sell for something...

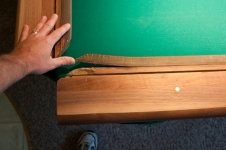
Mechanic/player thanks, I missed your super glue post on featherstrips. That would help if mine didn't come out in so many pieces, maybe I can get the rest of them off in fewer pieces if I can make a tool to reach further under them and pry them out better. Thanks for the tip.


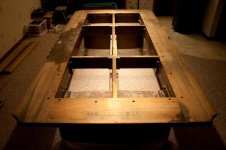
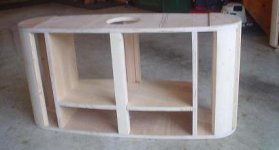
Here are some more pics of progress and it's starting to take shape. The slate is all screwed down now and leveled and seamed and sanded. I just used a deck of old playing cards as shims, worked well and wasn't that hard to do really. Mostly just used a long straightedge with a light behind it for the leveling beween and across slate pieces. I had to go back and forth many times trying different placement and numbers of cards as it changed when tightening the screws, but was just tedious and time consuming not really hard. The table itself was leveled as well as I could get it before I even started leveling the slates individually, spent a good amount of time on that slow rolling balls so I think it should be pretty close to decent. At least I hope so... I even took all the backing off the slates and cleaned up the mating surfaces and got all the dust out and then reassembled them so it would hopefully come out better with less shims than if I had left all those years of grit and junk between them. Seemed to help, only one corner took 3 cards as shims thickness wise, the rest of it just mostly one or two cards. I made sure to shim where needed at every screw point so I think it's a decent job with proper support.


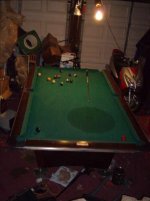
I tried to clean the stains in the cloth just for giggles with paint thinner and then break cleaner as I read in another thread here, just so I could get it together for a while to play on and look for any flaws in the table's level or surface before good cloth goes on, that sure didn't help... All it did is make the thing stink and it's just one big wet spot still, going to probably take a while to dry. Boy this cloth is slow as dirt though, it's so thick and slow I doubt anything but the biggest most rediculous flaws would even show up. It's not going to help me any with trying to see how well I did fine leveling the table or slates which is really unfortunate. I had hoped to have it all spot on before stapling on any new cloth but that doesn't seem possible now.

I'm really lucky you're sending that used simonis because now that it's together, I can't imagine seriously trying to play on this garbage. You have to really whack the hell out of the ball just to get it to come around 3 rails. I'm not at all used to that. I guess that's just the way it was in the old days but I don't recall it's been so long, plus there's just no place I've played in a very long time that doesn't use simonis anymore.

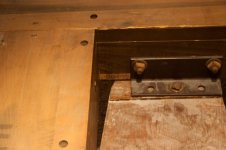
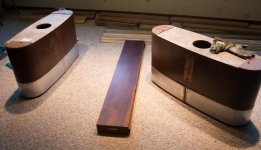
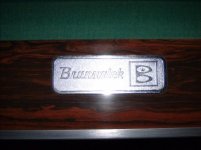
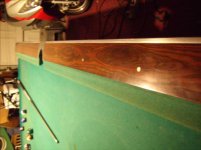
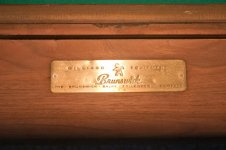
Anyway here you can see the castings, not high gloss but ok. And the badge I removed all the previous color and coating from, it shined up nice but shows some fingerprints and scratches now. More so in pictures with flash than in person. but looks like I have a bit more work to do on them. And the rub rails are pretty nice now too, except looks like I'll have to polish them more also. You can see the rails don't look too bad, the formica held up pretty well.

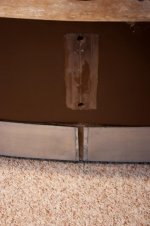
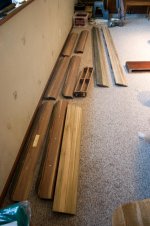
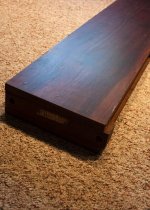
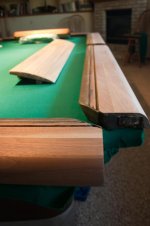
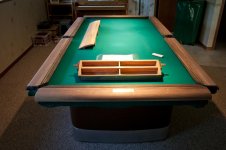
One last rail to fit, have to make a feather strip and put cloth on but will probably just wait. I don't want to put a bunch more staples in just to take them out in a couple weeks. This cloth on the bed isn't stapled at all, just the friction of the rails are holding it on somewhat tight atm. I think I need to take an angle grinder with buffing wheel to the whole thing though and polish it all a little more and then shine it up with some more wax. It's really showing fingerprints a lot on everything. Remember all those metal parts were painted a couple times before I got it to cover scratches that were all the way through the metal coating on top, and I stripped all the paint then sanded them from 80 grit and completely removed all the original coating of nickel or whatever it was and polished up to this which is only around 600 grit. It's not perfect, flash shows scratches that the naked eye doesn't see too, but still it's really a vast improvement.

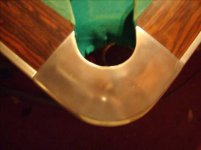
Next on the to do list is fixing the plastic pockets which are cracking at the base. I think I can fix them...Going to try a little plastic welding, or maybe hit them with this wonderful bondo. Not going to spend a lot of time on those or anything though, just need to keep them from getting any worse really. As long as they don't completely crack apart and balls don't fall out onto the floor they'll be ok for now. Worst case scenario, there's always duct tape. :)

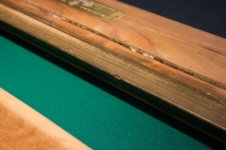
If you're looking at the cloth on that head rail and thinking it looks more like rough thick canvas made from hemp or cotton than wool, you might be right. It feels and plays like rough canvas.
 

Attachments

  • GEDC0001.jpg
    GEDC0001.jpg
    29.8 KB · Views: 725
  • GEDC0002.jpg
    GEDC0002.jpg
    30.3 KB · Views: 714
  • GEDC0003.jpg
    GEDC0003.jpg
    34.8 KB · Views: 724
  • GEDC0008.jpg
    GEDC0008.jpg
    22.7 KB · Views: 719
  • GEDC0009.jpg
    GEDC0009.jpg
    30.1 KB · Views: 728
Last edited:
Calling all mechanix...

What, if anything, can be done for the these cushion issues? I'm only asking because these are the only two things wrong with these ancient Monarchs that still played quite well, and if this can be fixed adequately, it just might be that I actually keep these and save the $275 the Artemis replacements are going to cost.
 

Attachments

  • CRW_8863.jpg
    CRW_8863.jpg
    82.6 KB · Views: 706
  • CRW_8862.jpg
    CRW_8862.jpg
    78.5 KB · Views: 708
Anniversary Restoration Progress photos

@ Oregonmeds...
After seeing your latest photos, it gives me extra motivation to get my Simonis cloth off my table as quickly as possible. I should have it off this weekend, and probably ship on Monday. For your pocket cracks... wouldn't a simple rubber cement compound be strong yet remain flexible enough?

Below are some progress photos I took just this morning (as well those in my previous post about the cushion imperfections).

The ball storage unit is ready for finishing, but still needs a narrow strip of black walnut to add to the bottom so it is the same height as the aprons.

The brass nameplate cleaned up nicely but still has some scratches that I need to clean up (and will do so this weekend).

After I remove the cloth, I'll start taking off the slate so I can get at the frame, cross beam, and oval legs, which have some veneer damage I hope can be repaired at low cost.
 

Attachments

  • CRW_8858.jpg
    CRW_8858.jpg
    73.3 KB · Views: 723
  • CRW_8859.jpg
    CRW_8859.jpg
    89.6 KB · Views: 728
  • CRW_8861.jpg
    CRW_8861.jpg
    56.4 KB · Views: 721
  • CRW_8857.jpg
    CRW_8857.jpg
    85.4 KB · Views: 739
Well the loose rail rubber looks like it could just be reglued, but I can't imagine any way to fix the chip out of the rubber edge on that one piece unless you were lucky enough to find someone else selling one used full section of the same original rubber to replace it. Might need to start a new thread asking if there's a way to fix it, or if someone has a piece you can buy to replace it. If you do replace them all but can save the old ones I'm sure some folks will come along with similar situations needing to buy one of your old pieces eventually.

I'm not in a rush for that cloth yet, I still have work to do, don't worry about it. I really was just hoping the old cloth would help me touch up any level issues BEFORE stapling new cloth. I'm a little concerned that if I do have to play with the feet any that my now non-pinned slates could pop a seam or something and if that were to happen after fully installing cloth with staples that would be a real *****. But then again I bondo'd the seams not just wax or water putty, and the bondo does go at least 1/8" if not more into the seams so hopefully they can't pop apart so easily. I did tape the edges of the slates though with masking tape except for the very top 1/8" or so, so they wouldn't get completely coated with bondo and permanently glued together.
(fingers crossed) Not sure I did the right thing there or not, but I hope so.

I still have to clearcoat all the side skirts and I haven't even started to strip the ball storage box, then have to stain and clear that too so the cloth doesn't hold me up at all. Plenty of work left to keep me busy. Plenty... Not even counting the fact that I couldn't play the table at all until the whole garage is cleaned up so there's room to get around it better. We're talking a weeks worth of work just for that cleanup alone.

Check your pm's gc4, I'm sending you a link I found that might set me back on my work even more.
 
Last edited:
I'm not in a rush for that cloth yet, I still have work to do, don't worry about it. I really was just hoping the old cloth would help me touch up any level issues BEFORE stapling new cloth.

Today, a co-worker made me a tool to help get those staples out cleanly. It was made from a short version of a mason's mortar tool called a 'tuck pointer'. He tapered the end to a point using an 18" diameter diamond wet-blade chop saw! So now I have the point, steel strength, and an easy prying angle. Shouldn't take long now and I'll have time to work on it tonight. :thumbup:
 
Great, thanks. I'm still not even ready for it yet, but I appreciate it.

It was too hot to do much the last several days but I did manage to do some cleaning of the garage and test out the slate with the pockets installed as is and rails as is. Turns out there is a funny roll on one edge towards the corner that I'll have to figure out a way to fix. Amazingly it did show up with this slow cloth so it must be pretty bad.

Were your slates perfectly flat after all these years? My overall level is spot on but there's still that funny roll away from the edge in that one area...
 
Great, thanks. I'm still not even ready for it yet, but I appreciate it... ... Were your slates perfectly flat after all these years? My overall level is spot on but there's still that funny roll away from the edge in that one area...

I managed to get the old cloth off tonight... just finished. It was freshly vaccuumed just prior and honestly, could hardly find much wrong with them. The surface cloth was a real bear getting off. Though they were effective, I wouldn't recommend the 1/4" round head staples if there was ever the intention of getting the cloth off cleanly. The new tool I mentioned earlier was so pointed that it in fact broke right at the fine tip so it became almost useless within 5 minutes of use. I did use it for the majority of the cloth removal, just not the way I intended. It was quite adept at getting under the cloth and prying it away from the staple, leaving just a tiny hole, but no tears. There must be 200 staples still in my slate frames that I'm not so eager to work on getting out. With each removal comes a small chunk of hardwood it seems.

By the way, the rail cloth will need a good brushing and/or vaccuuming when you get them, but there are no stains on any of them. Just ran out of energy to clean them up better.

Slates: Balls rolled quite true. My cousin did a good job leveling everything over 3 years ago. For my carpeted billiard room, the key was to do frame leveling and basic slate leveling, but it was necessary to wait 2 weeks for the weight of the slates to completely compress the carpet and pad... before leveling again. One thing that didn't seem to terribly impact anyone's game is when someone must have sat on one of the rails which is the most likely the cause for one beeswax-filled seam to pop. It was tactfully detectable over the cloth, and the balls would even jump, but never changed their course. The fix would have been to remove the cloth of course, and re-seal the seam, then scrape smooth with a razor.

Slates continued... there seems to be an ink stamping on the edge of my slates from a carpenter's union in virginia dated to 1939... thought that was interesting. These stamps can only be seen on the right side edges (standing at the head end). There are what serial number like markings on the other side. I'm convinced 2 of the 3 slates are matching, but only 50% sure of the third. I've concluded though that even if all three are not matching, as long as they're smooth and level, I doubt there would be any detectable performance difference.

Your cloth will be picked up at my office via UPS parcel, around 2:30pm tomorrow. It will be shipped via standard ground rates. I'll PM you a tracking number when I know what it is. The label might make it look like it's coming from Natural Stone Veneers International.
 
Anniversary's Oval Leg Veneer

One source has told me the veneer used on the ovals is Birch, and he also believes the stretcher is veneered with Birch. When I get my slates off, and the ovals stripped, i'll have a better idea of what I'm working with. The damage on one oval doesn't look all that repairable. I'm considering Woodcraft's walnut veneer that comes in 4' x 8' pieces and just recover the ovals. However, that veneer's grain will run horizontal along the 8 ft edge. I've seen only one other Anni that had such grain.

Would anyone downgrade the value potential if the leg grain wasn't vertical? BTW, the vneer is only about $110.00 or that 4' x 8' piece.
 
cool...:cool: I'm excited and looking forward to it.:thumbup:

Your slates are supposed to be a matched and pinned set just like the gc, so how would you pop a seam with pinned slates? Pins ground off? If the pins are there but it still doesn't level the seam perfectly and keep it that way, it probably does have a piece that doesn't match the set. That's when people do grind off the pins and level like a normal table. I've read about that before in other threads.

My table is on a concrete garage floor with a slope to it, and there is carpet but no pad, just a loose piece of carpet. My carpenters level wasn't accurate enough to even level the table worth a damn as just slow rolling balls was so there may be some settling I couldn't see with the level or some issue with the shimming I did, guess I'll have to see what I find when the cloth is off again.

You can match the seams perfectly to put the veneer vertical in two pieces rather than horizontal in one piece, as long as you hand pick the sheet and get one without damaged side edges, or run it through a table saw with a guide on the far side to clean up the edges. Or an edge planer if your neighbor has one. Many wood shops will cut pieces for you with very accurate saws for a small fee, if you have exact dimensions when you go in, but it can be very hard to measure properly around a curve like that, it's easier to take the piece with you and wrap the veneer and scribe where to cut than measure. Or they can clean up edges for you.

It will wrap tight easier around the piece with vertical grain, it's much harder to bend wood against the grain. Seams with the grain also tend to hide much better naturally than end grain seams and are just easier to work with. Vertical seams will be really hard to see if just cut straight enough. It's up to you, some people wouldn't notice the grain direction either way and some probably would. Even put on horizontal you'll still have one seam to do on each piece. Personally I'd rather do twice as many vertical seams if given the choice just because of how much cleaner they cut and fit, than seams cut against the grain.

My only woodworking training was in high school though to be honest, and while I did get an A it wasn't that hard of a class and I suspect our teacher wasn't the best woodworker in town so ymmv.

You may have to look very close to find where the seams are stock, but they have to be there somewhere, at least one seam...

Good thing you're getting a tracking number. If my free cloth is late I'm going to expect a full refund of my purchase price, just so you know. :grin:
 
Last edited:
Anniversary Frame Assembly & Oval legs

I have the Anni completely disassembled. The attachments won't show that but I thought I'd post these two pics, the second of which has a number of sorts on the frame which is different from the numbers on the top. The number on the inside of the frame assembly reads, "PB2467", but the numbers on the top all say "5171". Each top piece of the frame reads that same number, 5171.

I started taking off the aluminum banding on the ovals (not show here, but will add photos tomorrow). I then realized since I'm going to re-veneer at least one of the legs, it would be easier to refinish the aluminum while they are still molded to the leg's shape. I don't have to concern myself with damaging the veneer. I may simply cover over the existing veneer. If I do that, the banding will be stretched out just a bit more which will cause the need to create new wider aluminum holding strips... not a big deal though. The other leg is in much better shape so when I strip it, I can tell what kind of wood was used on that veneer. Also going to reveneer the stretcher most likley.
 

Attachments

  • Frame assembly.jpg
    Frame assembly.jpg
    86.5 KB · Views: 823
  • Frame w serial number.jpg
    Frame w serial number.jpg
    72.7 KB · Views: 804
I mentioned in the previous post the table was "completely disassembled"... not really true as I left the frame assembled and simply leaned it onto the wall. I keep toying with the idea of removing the blotches of stain on the frame, but why bother with that if it will never be seen in an assembled table? I am curious however if a 'purist' would refinish even the frame. Seems some of it has stain, other parts don't. What about some sort of simple wood protectant?

These pictures will simply show the oval legs and their ridiculous brown paint, a pile of stripped and sanded wood, and the stretcher. The close up of the stretcher shows the same ID number the frame had on it. I guess that's a good thing. That close up will also reveal the slightly rippling veneer, though it's overall finish appears still original. My neighbor has enough veneer in his garage where I won't need to buy much or any from Woodcraft at this point. :thumbup:
 

Attachments

  • CRW_8897.jpg
    CRW_8897.jpg
    70.1 KB · Views: 816
  • CRW_8896.jpg
    CRW_8896.jpg
    98.5 KB · Views: 804
  • CRW_8899.jpg
    CRW_8899.jpg
    89.5 KB · Views: 795
  • CRW_8900.jpg
    CRW_8900.jpg
    98.2 KB · Views: 802
Veneering isn't that hard to do. The veneer on those legs are applied in verticle strips. You can remove the individual panels. Take a heat gun and a sharp putty knife. Heat the veneer slowly and evenly at first, then concentrate the heat a the starting point. The old glue will loosen suprisingly easily. Slide the putty knife slowly as you go.

If just a small area needs replacing, score verticle lines through the veneer using a straight edge on both sides of the damage. Make sure you make it wide enough to get your scrapper tool into.

Clean the old glue residue using sand paper.

Cut the new piece to size using a sharp exacto or razor knife. Use a straight edge and go slow. Don't try to cut all the way through on the first pass.

Use a glue made for veneering. Woodcraft stocks a power glue that you mix just prior to glueing. This stuff goes a long way so don't mix too much at a time. Do not use standard wood glue for this. The veneer will bubble. Use an acid brush to apply. It's sticky and the brush will be ruined after use. You can by them in the plumbing section with the soldering flux/paste.
 
@ ChevyBob: If i remove the veneer using your method outlined above, would I still need to strip the paint off of it first? And secondly, if it were you restoring these legs, would you consider simply covering the existing veneer vs removing old, installing new? The reason covering over existing veneer has some appeal to me is two-fold; 1) much more adhesive surface to adhere veneer too for a stronger, tighter bond (instead of just frame work which is probably why the original veneers had been nailed on) and 2) simply less work involved. :cool:
 
Veneer isn't put over an open frame, veneer is applied on top of solid wood or plywood. In your case it's just the top 1/16ths inch or whatever layer of the outer plywood. It probably looks like it's part of the plywood to you and that you'd have to replace all of it, but that's not the case. He's talking abot stripping that top layer off alone and leaving the plywood which is the backing for the veneer.


I would strip chemically first to see what you've got to work with, then decide. Not much you can tell with that brown paint on there. The only reason I see not to just go over the top of the old veneer on those legs would be the band of aluminum wouldn't quite fit right any more.
 
Veneer isn't put over an open frame, veneer is applied on top of solid wood or plywood. In your case it's just the top 1/16ths inch or whatever layer of the outer plywood. It probably looks like it's part of the plywood to you and that you'd have to replace all of it, but that's not the case. He's talking abot stripping that top layer off alone and leaving the plywood which is the backing for the veneer.

I would strip chemically first to see what you've got to work with, then decide. Not much you can tell with that brown paint on there. The only reason I see not to just go over the top of the old veneer on those legs would be the band of aluminum wouldn't quite fit right any more.

I know the wood veneer part is just a thin layer on thin plywood. I understand now what you both are trying to get across (just remove the decorative veneer portion).

I've attached a photo of a new, built-to-order unclad oval leg. These hollow spaces really do exist on the originals, which I believe explains why they were nailed down every couple of inches. Regardless, I will be chemically stripping one of the ovals to see what kind of condition the veneer is in. I still think it would be easier to just do a rough sanding of the existing veneer, then adhere new veneer to the ovals, and re-band around them. I do have to make new connectors because they got all bent up trying to remove them without damaging the bands.
 

Attachments

  • Anni Oval Leg.jpg
    Anni Oval Leg.jpg
    24.6 KB · Views: 765
Back
Top