Restoring '46 Brunswick Anniversary - Castings Concern

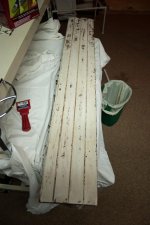
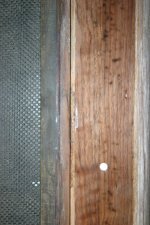
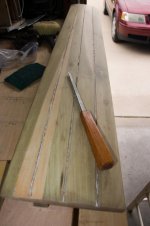
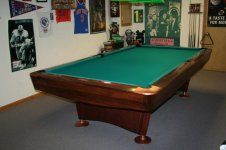
Yea you're getting the unevenness I was talking about, but it actually doesn't look bad on those pieces just makes them look more antique like distressed wood look. That's a look people do extra work for on new pieces it just depends on what you want it to look like.

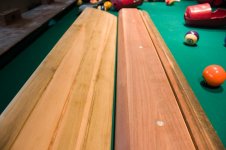
If you were going for the blonde table look or the reddish table, with more even color and not the splotches like distressed wood then you'd need to use thinned shellac or some other sealer to get the color toned down.

I bet if you seal and then use that same color danish oil you already have it would come out more the color of the blond table. Once sealed it takes less stain in, so the color is lessened unless you do serveral coats of stain.

It would give you more control over the final color, and shellac is cheap.
Up to you...

Seriously looks antique.

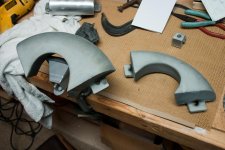
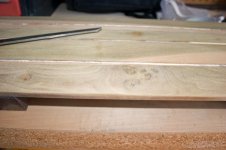
My rails had grey primer and the last of it woulnd't come off with stripper either, I had no choice but to sand everything substantially with all the scratches etc anyway. Some pieces I probably took 1/8" of material off where I wanted to sand scratches out but I made it even across the whole board so I don't think the difference will ever show. All I used was an electric palm sander and 100 grit, I still have to go to 200 grit or so before stain.
 
Last edited:
I almost grabbed that Varathan Pre-Stain conditioner for the same reasons, but wanted to see how this stain would take to the wood. Still undecided on whether to use the conditioner, again, for the same reason you mentioned... that distressed look. I am second guessing the "Dark" walnut stain vs a medium version of it. I should have stripped a rail before buying the dark. I like the dark a lot, but it's possible the medium would be more appealing. My rails are supposed to be Walnut, not Mahogany. Some Centennial tables were built with mahogany, but best as my research indicates, not the Anniversaries.

Do you have any photos to post of your progress? I saw someone else's goldcrown refinishing effort that turned out really nice. It's good to look at other's masterpieces for continued motivation to be patient.
 
I know what it's like to be undecided on finish, I'm undecided still also and I'm almost at the point I don't have any more time to think about it. I've been looking at all the various pics I can find, have them on screensaver to see which looks I get sick of first and with the help of that I've narrowed it down to two very different options which I'll attach below.

No pics of my work yet, the pics from how it was when I bought the thing are on my desktop and it's still dead so I can't get to them, I'm just using a laptop atm. It had white legs that looked antiqued with cigarette smoke, baby poop brown skirts with lots of streaks and runs and marks, and heavily scratched up metal all over it that someone tried to disguise with hooker red nail polish colored paint. About as sick looking as you can imagine.

Money's tight around here being unemployed, and I decided to spend on the pool table now instead of fixing the desktop, since I have the laptop anyway.

But I can take post some pics tomorrow of the progress I've done so far. Just a stack of sanded and polished parts so far, not much to look at, all dissasembled.

Here are the options I have gotten it down to. Either all this shade of green with the same brunswick decals like these, except legs and skirts both green and with polished aluminum metalwork.

Or all stained same color as this other one, also with polished aluminum metalwork. Maybe the brunswick decals on the stained option, but not sure.
 

Attachments

  • runssit2.jpg
    runssit2.jpg
    98.3 KB · Views: 1,577
  • 6.jpg
    6.jpg
    48.5 KB · Views: 1,538
Last edited:
nice, too bad it had all the cigarette burns but it still looks nice now. May I ask how much did you pay for a pink and brown painted anniversary in need of work?

This is freaky, I'm doing my usual local craigslist search and bam:

http://portland.craigslist.org/grg/atq/2531606591.html

But if I had that kind of cash I'd take a trip to ohio where there are six anniversaries for 900 ea... Someone should snatch all those and give me one as a finders fee. :)
 
Last edited:
$800 for the red brown monster.

My pool teammate bought 1 of those 9 tables in cleveland area and we set it up about a month ago.Great deal and it plays perfect without adding anything. The only drawback was the blinds were replaced with smooth wood and the color didnt match the rails.

Side note about rail sights,I had a machinist buddy make replacements out of aluminum stock to match the corner castings.Its a real nice detail.

Hamm
 
When I had my Centennial I removed the old anodize finish using the old (smelly) formula Oven Off. Two or three applications and the anodize finish was gone

I then polished the aluminium using 'The Worlds Easiest Metal Polish' and this stuff really works - I achieved a great shine by hand.

here is a link for the polish:

http://www.satingloss.com/metal%20polish.htm
 
It was great seeing that ol' red and brown Anni resurrected from shamedom. I don't know what I'll find under the butt ugly brown paint atop the rails I have, but the aprons had 3 different colors.

Attached are some more photos of this on-going effort. In an earlier post, I said I would show a pic of what the de-anodizing looks like coming out of a Drano bath (and then simply rinsed.) There's also a pic of a casting that was de-anodized, rinsed and then wiped with a terry cloth. You'll notice the dark charcoal color comes off. A wire brush on a drill makes quick work to clean off the rest of the residue.

Finally an image of a stripped, but not sanded, apron. Still don't know what that white stuff is, but it won't come off with the stripper.
 

Attachments

  • De-anodized casting_after rinse.jpg
    De-anodized casting_after rinse.jpg
    91.6 KB · Views: 761
  • De-anodized casting_wiped.jpg
    De-anodized casting_wiped.jpg
    98.2 KB · Views: 755
  • Rear apron stripped.jpg
    Rear apron stripped.jpg
    94 KB · Views: 760
$800 for the red brown monster.

Side note about rail sights,I had a machinist buddy make replacements out of aluminum stock to match the corner castings.Its a real nice detail.

Hamm

I like that idea using the aluminum stock for sites. I guess I can let the cat out of the bag... we'll see how this goes, but I don't necessarily desire the mother-of-pearl sights. I'm into the lapidary arts as a hobby, and know how to cut and polish gemstones. However, I've been taking gemstone faceting lessons, and I have emeralds (emeralds in a quartz matrix, not gem grade Columbian style - the ones I'm talking about are found in the mountains of North Carolina) that I want to do "brilliant-cuts" to. Since I don't own a faceting machine, I will in the meantime cut round translucent cabochons (flat on the bottom, slightly domed on top, polished) that match the Simonis tourney green color. Alternatively, they don't even have to be domed to keep them flush with the rails. Then the thought is to drill tiny holes under the center of the sight, and backlight the gems with tiny LEDs (battery powered). Crazy? or Cool? Could be the world's first pool table adorned with genuine gems! (I'm certain someone else has done this but I haven't found any pics.) Though I never told her this, after meeting her I always thought Loree Jon's pool cue with her family birthstone's embedded in it was a cool idea, and am just transferring that idea to a pool table.
 
Last edited:
I'm kind of suprised it still cost that much after the pink paint. That means somene both knew the value of what they had, but still screwed it up painting it pink.

I like the idea of replacing the sites, nothing fancy about the stock plastic fake abalone stuff on mine, but then I'd also want to replace the formica my rails have with real wood and that would be a nightmare.

Aluminum sounds cool and easy enough, but lighted gemstones doesn't sound easy at all. If you accidentally knock the cue ball off the table and it hits a gemstone on the way down will they shatter?

Making the cabachons won't be that difficult. The hardness of the stones is completely dependent on which I end up using. Emerald in quartz matrix or green moss agate are both harder than aluminum if that helps answer the toughness question, but you do have a point about a dense phenolic billiard ball crashing down on a domed stone, could in deed cause some damage... I may need to make them flush after all. Well, that simplifies things while still making the table unique.
 
Anni's walnut rails... burn/charr marks.

Here's a challenge I did not anticipate, but after seeing an earlier post from an Anni's restoration, I started researching how to deal with it. I can just imagine the smoke filled billiard room this table was once in, and players extinguishing their cigars and cigs using the walnut rails (:angry:) Egads! Well, a table like this either includes some nostalgia, patina, or a lot of both... or can attempt to at least reduce the presence of all the black splotches. One technique I read about is bleaching, and another is simply scraping. Sanding has proven fruitless.
 

Attachments

  • IMG_8466.jpg
    IMG_8466.jpg
    100.5 KB · Views: 724
Well it sounds cool. I think you just cost me more time on my renovation though since now I'm thinking about replacing that laminate on all my rails. The sites don't really bug me but I have a nasty ding in one rail's laminate and never really did like the stuff anyway especially since it limits my color options. If I can change my rails color then that opens up a whole new load of color options on my finish, so I'm kinda back to square one deciding on even the color of the whole table with more decisions to make than before. Two steps backwards...

:thumbup:
 
Here is the foot end apron, stripped of its coatings but had to use a small wood chisel to clean the grooves out. I probably should have tried one more coating of stripper in there, but was getting a little impatient.
 

Attachments

  • CRW_8468.jpg
    CRW_8468.jpg
    72.7 KB · Views: 745
  • CRW_8469.jpg
    CRW_8469.jpg
    66.2 KB · Views: 739
Sadly, I'll be parting with the original Brunswick-Balke-Collander cushions... a little damage here. I couldn't find where it should say "Superspeed", but it may be this cushion was too short to reveal it. I had already planned to replace them with Artemis Intercontinentals anyway. They played well, but the head end cushion (not shown here) has a small gouge on the ball-contact surface so it had to be replaced anyway.

As for the 2nd photo, I'm a little confused that the underside of the rail shows a different number than my aprons...only off by one digit, but not sure if that should be expected.
 

Attachments

  • IMG_8464.jpg
    IMG_8464.jpg
    98.3 KB · Views: 736
  • IMG_8465.jpg
    IMG_8465.jpg
    100.5 KB · Views: 727
Somehow I missed the pics you posted showing the cigarette burns.
I don't know if you were seriously thinking people put their cigs out on the pool table, that's not it. It's from setting down a cig while shooting in a normally harmless manner with the burning part off the table and the butt end on the rail but balanaced to sit there, but every time someone took too long to get back to the cigarette it had burned down to where the coal part burned the rail. Not intentionally destroying the thing, that was just a habit of the time. Either that or even if they were using an ashtray on the rails often a cig will burn down and loose balance to stay in the ashtray then fall out of the ashtray and onto the rail still burning.

Silly to type all this explaining it, you probably knew this already, but I know for sure because I literally grew up in a bowling center from birth to 13 years old my parents owned the place and they had pro tables there and people smoked that way. The laminate on most commercial tables is burn resistant for that reason because it was so common.


Technically if you wanted them perfect, since your rails are solid walnut and you planned to remove the sites anyway, you could just take them in to any woodworking shop and have some even amount of thickness planed perfectly flat off the top. Wouldn't cost much.
Whatever tickness of walnut veneer you can find, have that exact amount removed then replace that top layer and sand even with the curve at the end of the rail, easy fix and practically invisible if done well. But then if you wanted to retain and old antique look just minus all the burns you'd have to beat up the new wood a bit or it would look too perfect.
 
Last edited:
I do not know where my brain went... you are absolutely right... I, unfortunately, practically grew up in bars up here Cheeseconsin... and certainly recall the cigar/ettes hanging precariously on the rails, burning down to nothing. (just smacked myself aside my head)

As for your table, if the aprons are mahogany, I'd go with a red mahogany stain just like that other forum contributor did. I don't know what you're going to be up against if the formica is removed from your rails, but I understand the desire. As for my walnut rails, I'm completely stoked! Cannot believe that my neighbor was able to get 100% of the burns sanded out. He said he had to continually raise the grain with a water soaked rag, but eventually that allowed him to sand out the burn without scraping. They look brand spanking new! I could not be more pleased.

The ball box is currently being modified so it doesn't look like it was ever a table that came with a ball return. It will still prove challenging to effectively strip those compartments of their thick baby poop.

I'll be offline until Wed night - camping, hiking, kayaking. Oregonmeds, good luck with your G.C. effort!
 

Attachments

  • CRW_8477.jpg
    CRW_8477.jpg
    75.6 KB · Views: 732
Nice work, much better without the burns.

I wish I could afford to go do something, it's because I can't that I'm here working on this thing and actually getting it done though.

I just finished my first round of sanding everything finally. The legs and stretcher were a real pain, they had at least a hundred or maybe two hundred small perfectly round dings from balls hitting them. I could even tell which sides were facing other tables because most of the balls came from a few directions only. This table must have been against a wall in the pool hall because one side of the stretcher had none.

Got those all sanded out. This thing is going to have a really hard time passing for old since I sanded everything past that aged wood and past the white layer to new wood and it looks really clean now, like the parts just came from the factory. (Except for just a handfull of tiny areas that still need a little help for one reason or another.)


Forget the formica for now, I can do that at another time. I think maybe at the next recover. I hope to be breaking a rack on this table by the end of next week and still have slate to fix. I'm getting really tired of all this work...


Have fun on vacation for those uf us who can't afford one. :)
 
Last edited:
Y'all are doing some really nice work on these tables.

They are real beauties.
 
Your rails are newer than your table or your table is newer than you think. I believe your table to be a 1950's model. The figure 8 nut plates give it away. The nut plates started as a 3 hole plate. The next was a 5 hole nut plate. The figure 8 plate was used on the last models.
 
Back
Top