Restoring '46 Brunswick Anniversary - Castings Concern

You might want to try putting them on the buffing wheel after 220 grit. It might save you some time. It's amazing how fast the hard woven wheel removes metal.

If your slates are original, look for a coding on the edge of the backer board or slate. I think it is a date.

Someone posted in a thread a long time ago that Brunswick had a fire that burned all of the records needed to cross reference those manufacturing numbers.
 
IMG_1660.jpg

This is the stamp I was posting about. My buddy thinks it's a date. Feb 6, 1947. I'm unsure.:confused:
 
castings and slate

@oregonmeds... it was supposed to be a hardcoated anodization process in "natural" color. The surfaces looked like they had some kind of texture, but really didn't. The opposite sides of every piece certainly were less smooth. I did not post a photo of the Drano effect (de-anodizing), but I will because i think it's important to show what that looks like before the sand/polish effort. They come out looking charcoal gray, which quickly scrubs away with the wire brush attachment to my drill. Regarding the 80 grit, I think you're right because I could probably get the remaining pits and scratches out.

@chevybob... I will do as you suggest, or at least experiment with the buffing wheel attachment i have for my drill. My birthday is tomorrow, so maybe my brother will get me a bench grinder!

I don't have the slates off the table yet, but that will happen soon enough. Hard to refinish those legs without doing so. I'll check for that stamping at that time, and photograph for documentation. While I'm working on those legs, do you think that banding is anodized too? I kinda doubt it, but am hoping they clean up easy. Removing them for refinishing shouldn't be too much trouble.

I talked to Ken Haash (Classic Billiards) and he dated my table to late 40's, very early 50's (has the brass rectangular nameplate, and cross member between the ovals, and is a model D-C. Too bad about the fire and lost records.
 
Anni wood refinishing

As I continue work on the castings, I periodically visit hardware stores to eyeball the right stain. With the rails being one type of wood (supposedly Walnut) and the aprons made of something else (poplar???), I'm expecting at least a little challenge getting the color to match to my satisfaction.

During a lunch break today I picked up a 1/2 pint of Cabot's Antique Walnut stain to try on a stripped section of apron wood, and will try on the back side of one of the rails. Maybe it won't matter much between the two wood types. I intend to apply Minwax's Wipe-On Poly in satin over the stain. Maybe all i need is the poly over the walnut rails, and stain the aprons???

I saw sanding sealer products and am curious if that's a necessary and recommended step, or not needed. I'm thinking, strip the paint, do some quality sanding, and wipe with tack cloth and mineral spirits before staining.

Comments/suggestions are always very much appreciated.
 
I can answer this, I've done a lot of furniture before.

Don't get mineral spirits on anything you want to stain or paint, it will interfere with the finish, it leaves an oily residue and then your stain won't penetrate evenly after it. Just wipe with a tack cloth or clean cloth and vacuum well after sanding. If you are painting or clearcoating in a garage either clean the whole garage like mad so it's dust free, or wet the floor with water and let dust in the air settle and stick to the wet floor before you begin.

Sanding sealer is only needed on things that are really porous and would otherwise soak up too much expensive paint and leave an uneven finish without it. Not for staining anything ever. You might use sanding sealer or primer if you were painting with automotive thin paint, stuff that's too expensive to just let it soak in and recoat, but not normal thicker paint you probably are using with a roller or paintbrush and not for stain or clearcoat.

If your rails are real mahogany wood you would still stain and clear them the same as the rest of the table, but you may need a different color stain on the two woods to make them match closer. The only way to find out is test, the underside of the rails is a good place to test.

I don't think satin is appropriate for the top rails, they're almost always semi glossy or better on really nice tables and I think that looks better for the whole thing too, but that's personal preference. I just don't really like the look of satin much on the rest of the table either but many people do. More than semi gloss or up to high glosss can be difficult to apply and keep stuff floating in the air from getting into it and shows imprefections more though, so many people stick to satin just because it's so much easier and more forgiving but sanding and polishing right will fix that with any clear.

Clearcoat with a foam brush (if it's compatable with your clearcoat formula) to avoid a lot of streaks like a paintbrush would leave if you don't have a spray gun. Try to borrow or rent a spray gun if possible though, it makes for much less work sanding and polishing.


If you decide to go glossy or have imperfections in your satin especially on your top rails, you can always wet sand the clear with very fine paper and then polish or recoat. If doing multiple coats of clear wet sanding a little between clear coats always looks best, but then there's the dust issue and all the cleaning needed to keep it out between coats. Getting a great finish is never easy, it's a lot of work, but the amount of work you put in and attention to details and the number of coats of clear and amount of sanding you did are very obvious afterwards. You can almost always spot a piece that has been refinished by an amateur at home by the use of satin, it's flat appearance, brush streaks or dust particles left in the finish, and that it wasn't wet sanded out after clearcoating with very fine polishing levels of sandpaper or polished etc etc by it's rough to the touch texture and or somewhat sticky feel to the finish. The sticky feel is like the difference between stroking with a nice clean wood cue vs a fiberglass cue that doesn't slip and slide smooth as glass through your fingers.

There are video's all over youtube showing how to refinish furniture like a pro, if you've never done it watch some before you begin. You should talk to a paint professional at a dedicated paint store about your project to get reccomendations for stains and clearcoat brands. Many clears for home use remain tacky and somewhat sticky for a long time, or softer than you would want on your top rails. You need something that can be wet sanded between coats, dries rock hard and slick to the touch, and hopefully doesn't yellow with age as much as alot of home stuff does. Make sure you are actually talking to a pro that knows there stuff at the paint store, a lot of places are just staffed with people that don't actually know anything and just read directions off the cans.

Here's a decent video: http://www.youtube.com/watch?v=zN-9vCSJWDQ&feature=related
 
Last edited:
Anni wood refinishing

@Oregonmeds...
I wish I could see a photo of the hand rubbed finish these 60+ year old tables once had, but that might pre-date color photography for all I know. I guess I want the table to still look like an antique, but in like new condition if that makes any sense. I'm not completely new to refinishing, but have limited experience, and certainly have never attempted an antique. If you look closely at my avatar, you might see the rails (and aprons) had been painted baby-poop brown by some former fool of an owner. A neighbor is helping me strip the old paint off and do some sanding. Research suggests the age of the table to be late 40's, very early 50's further suggesting it probably has walnut rails. (Mahogany rails I believe were installed on some 50's era Centennials.)

In my post, I typed sanding sealer, but omitted pre-stain conditioner. I'll take that advice and not use the sanding sealer, but Minwax's website is suggesting the conditioner for dense woods because they don't evenly absorb the stain. For the wet sanding, do I stay with 220? Or go higher?

If the rails prove to be walnut, was also thinking Watco's Danish Oil, like others have used, then clear satin over that. But the poplar skirts will take some experimentation no doubt. I might go with black paint in the grooves instead of the traditional white or cream, or maybe burgundy because I want to get the burgundy leather drop pockets from Classic Billiards, though burgundy will be hard enough to see. Undecided on the stripes.

I sincerely appreciate the advice and can't wait to dive into these rails. I might build a plastic tent to minimize the dust potential, or do these in the basement with a window open.
 
If you use a foam brush to apply a finish, then make sure you soak the brush in a thinner that's applicable for the type finish you are applying. This will keep the air bubbles down. Work the brush in the stuff aggressively.

I prefer to let the stain dry for 24 hours (48 hours if finishing with water based stuff). Just before applying the sealer or top coat, I wipe the wood with alcohol and a lent free rag. I'll spray it as soon as it evaporates.

Polyurethane is the hardest finish (most protective). It will have to be brush applied. Oil based poly will yellow over time. Water based is not as durable, but dries faster.

If you spray the finish, lacquer is the best choice. I used Acrylic on my rails. I'm not 100% satisfied. It doesn't have the hardness of poly. I used Deft brand. I'm sure there's another brand that out performs Deft, if not, run away fast. Acrylic is expensive, dries slow and will fish eye easily if the stars aren't in phase.

I grew up working in a cabinet shop. I think the lacquer fumes are the cause of my short term memory problems. Wear a mask with the cartridges rated for those fumes.

I prefer satin finishes because I can't stand shinny finishes. Semi- gloss looks fine too. Pick a finish based on your likes. It's all good.

I don't know what the original finish was but it might have been varnish. Varnish is a b*tch to apply and yellows fast.

Take your time and be clean with your work.
 
Funny you mention baby poop brown paint, I just chemical stripped half of my gold crown skirts today and the most recent color was exactly that, super ugly.

At first I thought they were originally white but now after stripping I see there was first grey, which may just be primer, then mustard which I think is the original finish, then white then the brown. Took four applications of chemical stripper to get that all off and they look suprisingly good after that with no sanding yet. I guess four applications of thick paint, so thick it had lots of runs and drips and brush marks did a good job protecting them all these years.
You gotta love chemical paint stripper, it'll save save a ton of work. I actually tried a small part without it and it was obvious I'd have been sanding forever to get all those layers of paint off. Miracle time saver and worth every penny. It would have cost more in sandpaper to do the job without it, not to mention a few extra days worth of work it saved. Get the big can, you'll need it.


Anyway when I sand between coats of clear it's just to get imperfections rubbed out, so usually higher than 500 grit, maybe even 6-800 depending on what paper I have on hand. Just enough to knock down any dust partcles and brush strokes to where it feels smooth to the touch. You don't always have to sand between coats, it depends on type of finish and what the directions say and how it looks or if the finish raises any grain in the wood or you get a lot of dust in it. Windows open guarantees a good supply of dust unless there's absolutely no wind outside but you have to breath too, so just expect to have to sand and polish it out afterwards and get some 1000-1500 grit for that last sanding on your final coat, then some wax to seal it afterwards. It'll look perfect after all that no matter what (reasonable amount of) dust was in the air. Dont sand between coats if you don't have the time to let each coat cure properly or sanding will make a real mess of it. You can't properly sand anything that's not fully cured and dried, follow the directions on the clear you use.


Jnyrad on here did a nice looking gold crown in minwax red mahogany stain with 2 coats of semi-gloss minwax poly applied via foam brush, see if you like this color and finish, look over his pics in this thread:
http://forums.azbilliards.com/showthread.php?t=215616&highlight=gold+crown I think the blinds look great, but the legs look too flat to me, that's satin for you... Or maybe he just didn't do as much work on the legs as he did the blinds, as far as sanding and polishing afterwards. A gold crown has dark mahogany colored fake laminate rails but that stain he used seems to have turned the light colored poplar wood sides and base into a good match. I like the redness to that and it's a common brand you can find anywhere just about. I'm not sure how the clear he used turned out hardness wise, I didn't ask and he didn't say. I guess you can ask it's a recent thread.


I'm not sure but I think danish oil is more often used for wood that's left unsealed and natural with no clearcoat and just hand rubbed afterwards. You don't want that, you need a clearcoat to keep your hand oils and chalk and dirt from discoloring all your work since you'll have your hands all over it all the time, or it just won't look good very long at all. I don't think your rails will need anything but a nice stain and clear, no pretreater or whatever you called it but the only way to know how it will look for sure is test a decent size area and see how you like it before you do the whole thing.

If I were you I'd do the stripes on the sides the original off white color or gold color or whatever it was. They mimic the stripes on a vintage boat of that era and the table just wouldn't look right with mahogany dark wood and dark stripes that barely show up. That table doesn't look right or the same at all without them. Those simple little stripes are one of the most significant visual features of that model table.
19Barrel-Back-17d-group2.jpg
 
Last edited:
Anni wood refinishing

Attached is a collage of photos from a single table that I just found on EBay. It represents the closest intention of how I want my finished rails to look. One thing I noticed in my research of restored Anni's, is that some of the oval legs had horizontally grained veneer, and others showed vertical grain (with vertical being more common leading me to believe that is how they came from Brunswick). I think they should have been done in horizontal to begin with because everything else has that for grain direction and it just makes "designer" sense. I won't know what mine looks like until I get the paint off of them. Here is the link to the listing in case anyone is interested in buying a very fine example which I think best represents what this table was supposed to look like:

http://cgi.ebay.com/Restored-1945-B...443?pt=LH_DefaultDomain_0&hash=item3f0c8d5863

@oregonmeds: that is a sweet boat! Love those ol' CrisCrafts and the like.
 

Attachments

  • anni 4sale ebay.jpg
    anni 4sale ebay.jpg
    91.3 KB · Views: 1,129
Attached is a collage of photos from a single table that I just found on EBay. It represents the closest intention of how I want my finished rails to look.
http://cgi.ebay.com/Restored-1945-B...443?pt=LH_DefaultDomain_0&hash=item3f0c8d5863

Just to put the info out there, that table on Ebay was restored by Arthur Ball of Ball Billiards in Plano, Tx. I have seen quite a few table he has done and they all look great in person, including the one I had to sell when I moved. The pictures do not do justice to his work.
 
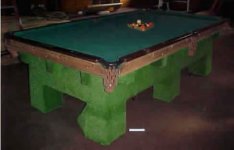
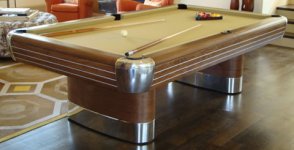
Heck of a deal on that "modern" table on cl. I don't think it holds a candle to how the anniversary looks though, for some reason the legs just don't seem as nice as the anni, and there you see the sides with no stripes, looks kind of plain without them.

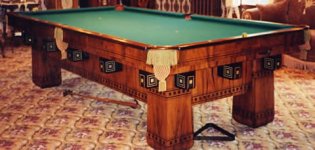
That anniversary you posted a pic of is nice, but just like those cris crafts people typically do restore them looking as good as possible, even if that means a better finish than they had new. But I bet these tables and those boats shined way more than the anniversary in that pic when they were new, that looks authentically aged. Maybe with an older refinish or maybe it's still the original finish, either way it could look a lot better imho with a bit more pop to the color and finish.

Up to you maybe it is period correct, but you only get one shot at it...

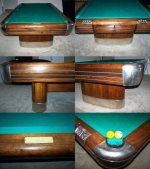
I have looked at this billiard restoration site before and these guys seem to do very correct restorations, and it looks like the finish you show except a little more refined, newer but the same, so you may be right.
anniversary-high-polish.jpg


Notice the name of the pics say anniversary high polish though, so maybe once again the pics don't do the real thing justice.

The anniversaries I've seen always have the grain on the legs vertical, horizontal grain isn't OEM, someone must have reveneered that one you saw.

Look at all the anni's on the billiard restoration's site link below, there are a couple variations to finish color and these guys seem to know their stuff. I think the darker color is the prettiest, but again that's all personal preference. If anyone could tell you which colors are correct I bet they could if you wanted to ask them. Note that on this link you will see the original brochure from the factory and it shows the darker finish in brunswicks original catalog image, but they may have had options for different finishes or slight differences for different years just like they still do.

http://www.billiardrestoration.com/Antique-Pool-Tables/anniversary.htm


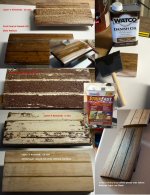
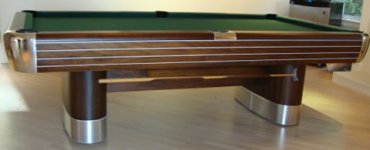
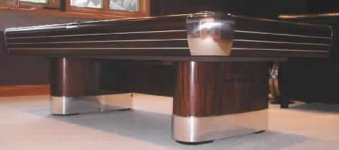
My favorite color and finish from their site are these last pics below, I think the one with a bit of red in the stain is spectacular. Both are obviously slightly darker than the one you showed but more in line with the factory catalog image color shown:

(These pics are starting to make me a little sick that I'm spending all my time refinishing a GC instead of one of those or a centennial... Oh well, maybe I'll get one of them later. I only have the gold crown because it was $150 delivered and desperately needed work, I just need to keep that in mind and remember i'm too broke for the others and stay happy with this one for a while. ) It just would be so much more worth it spending all the time I am on an anniversary with the lower value gold crowns have lately.

Whatever you choose I hope you really take your time and do yours as best you can, those things are still worth $$ when done really nice. Notice how much richer both of these tables look than the factory catalog image? The castings and base don't shine at all in the brochure, it's like the flat factory finish that my gold crown metal had originally, just brushed and completey unpolished and the wood looks cheaper in the catalog image like it could just be plastic laminate from the 70's, but in these restorations they both look way way better than that obviously real wood and super rich. Either of these seriously looks like money to me, the first being more correct to the catalog image, but I absolutely love the 2nd pic with some red in the stain except it seems to be short one stripe.
 

Attachments

  • anniversary-14.jpg
    anniversary-14.jpg
    17.2 KB · Views: 1,540
  • anniversary-4.jpg
    anniversary-4.jpg
    9.4 KB · Views: 2,097
  • anniversary-original-catalog-01.jpg
    anniversary-original-catalog-01.jpg
    42.9 KB · Views: 1,783
Last edited:
but I absolutely love the 2nd pic with some red in the stain except it seems to be short one stripe.

I'm glad you said something about the stripe being missing. It causes me to give even more thought to said stripes. Earlier I mentioned that I was considering leaving them just stained over, or painting them black, maybe burgundy. But whatever I decide, I must ensure that upper stripe is included.
 
I'll trade you a totally done up gold crown for whatever color you do, even baby shit brown scratched up paint with purple vertical stripes and paislies. :)

As long you don't cover it in indoor outdoor green plastic carpet with staples and contact cement like this pic from the hall of shame on billiard restorations site I think you'll be ok.

I don't know if this light almost blonde anniversary was an original color option or not, but it looks pretty sweet. I'm noticing a lot of them are missing a stripe, but you can probably add or change stripes any time, they may have been on top of the clear originally anyway.
 

Attachments

  • damaged-table-01-delray.jpg
    damaged-table-01-delray.jpg
    16.8 KB · Views: 1,731
  • anniversary-15.jpg
    anniversary-15.jpg
    27 KB · Views: 2,250
Last edited:
If that aint the most butt-ugly nuclear waste piece of pool table crap I've ever seen! I started choking as it sucked the oxygen right out of my office!

But looking at that super sweet Anni in light walnut is a breath of fresh air alright. I'd probably choose that cloth color too. That's a magazine cover kind of table!

I guess that abortion of a whatever it is would be a good candidate for "Pimp my Pool Table" ... but oh wait, that show doesn't exist. Maybe Kevin O' Connor can help!
 
What's so sad about the table that made you choke is in the right hands it could have probably looked something like this: Not exactly my style but a little step up from looking like the cookie monsters table.
 

Attachments

  • alexandria-4.jpg
    alexandria-4.jpg
    32.1 KB · Views: 1,518
Last edited:
Nice! Imagine if that had been the same table... I don't think there could be any more significant of a resurrection.

As for mine, I tested the dark walnut Danish Oil on a poplar short skirt, and after the first application, it looks pretty good. I also stripped the other short piece, and will post some photos after I get to work. Seems there were 3 different colors hidden in that baby poop.
 
It wasn't the same table but they are nearly identical and both pics are from the same site. What's sick about all the detail in the stunning one is it's all wood inlay, not just paint either. If that other table had wood inlay and some shmuck stapled it all up and put contact cement all over it.. oh boy...

Your table has poplar too? I didn't realize, that may change things a bit as far as getting the right finish you want and nice and even.
I thought it would have been at least mahogany veneer over the whole thing.

I've been brushing up on staining and looking specifically into poplar too because my base and skirts are just poplar also, and from what I've read it's one of the most difficult woods to stain, it likes to come out the most uneven color wise when you compare knots, heartwood, edges, and outer wood from the tree. You might want to test an area with the most grain variation and color differences between two of the most different looking woods where they are glued together or knotty areas etc. Some of it looks very blonde and some green or naturally darker, and the wrong products can exaggerate that and make it come out looking like cheap pine plywood.

Test for that before you get too far.

If you do have problems or can't get the finish you want then you were right about needing a sealer or conditioner before stain, but all you need is thinned shellac, that is really all those sealers and conditioners are. Also they're saying go with a gel stain for better results on that type of wood rather than an oil based stain or dye.

If your worst piece with the most variation in colors comes out fine with the products you have as a test then I wouldn't worry, go ahead with what you're using, but if you don't like it there are videos on youtube showing thinned shellac as a sealer then water based -dye- then -gel- stain giving both more even color and extra depth to the finish over a single stain or dye or untreated wood.
Your rails at least should be actual mahogany, those should be no problem, shouldn't need a sealer on them first but poplar is another story.

I have all my skirts stripped and sanded and ready now and sure enough the last piece I stripped has a lot of variation between the boards that make up that skirt, I think I'm going to have trouble with at least that piece. It's a shame too because the rest looked so even and perfect it almost could have been too easy. I almost managed to sand out all 47 years worth of dings and scratches, maybe three total were too deep is all, I'm pretty suprised really that it all came out so good so far.

The only things I have left to strip and sand are the legs and stretcher, and the ball box if I decide to use it.

I might just make another flat piece like the skirt on the head rail and leave the ball box out, I think that looks cleaner but I haven't decided. Either way I'm almost there... So close to done...
 
Last edited:
Anni wood refinishing

Shown is a collage of [experimental] stripping/staining. There is more work to be done. I discovered against-the-grain scratches after sanding the whiteish layer off. Odd that the white whatever it was (primer??? or bleach???) would not bubble up like the two different stains did. I have to do some more sanding. I'm liking the color of the stained piece. It is not buffed or clear coated in this state, just one good coat of stain. Watco's Danish oil is stain with a varnish mixed in, so that must be why this stain will buff to a shine according to another forum poster. I still plan to put Watco's Wax finish over this once I get the stain the way I want it.
 

Attachments

  • Collage2.jpg
    Collage2.jpg
    100.4 KB · Views: 1,558
Back
Top