3 piece slate steel plate joined and leveling system added as well.

realkingcobra

Well-known member
Silver Member
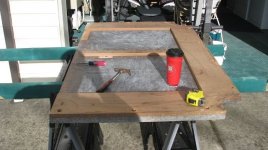
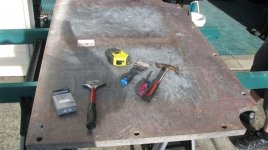
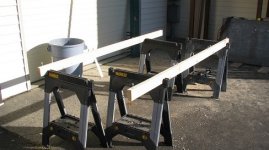
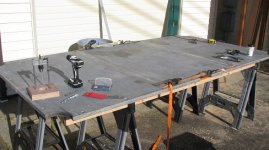
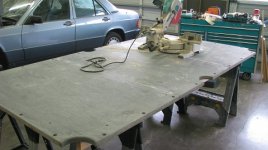
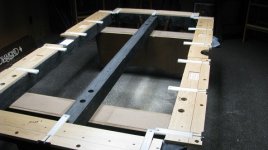
This is an older Diamond Professional 9ft, with a standard 30mm 3 piece slate and no leveling system. I've taken pictures of the complete process of converting it to a steel plate joined set of slates that no longer require being mounted to the frame of the table with slate screws like all 3 piece slates are mounted. First thing that has to be done is to remove the slate backing, in this case....all the MDF on the back side of the slates, which is used to provide some place to put staples to install the bed cloth....but, not anymore on this table;)
 

Attachments

  • A (1).JPG
    A (1).JPG
    85.8 KB · Views: 1,465
  • A (2).JPG
    A (2).JPG
    88.8 KB · Views: 1,466
Laying out the slates to be drilled out.
 

Attachments

  • B (1).JPG
    B (1).JPG
    66.8 KB · Views: 1,435
  • B (2).JPG
    B (2).JPG
    69.7 KB · Views: 1,449
  • B (5).JPG
    B (5).JPG
    39.1 KB · Views: 1,448
Home made drill press, and a pile of steel plates.
 

Attachments

  • B (3).JPG
    B (3).JPG
    56.1 KB · Views: 1,442
  • B (6).JPG
    B (6).JPG
    63.2 KB · Views: 1,432
  • B (7).JPG
    B (7).JPG
    59 KB · Views: 1,439
This is all 3 slates steel plate joined together, sitting on saw horses, and just as level as they'd be on the table.
 

Attachments

  • IMG_0032.JPG
    IMG_0032.JPG
    61.6 KB · Views: 1,429
Now to add the frame work for the slates to sit on when they're set on the frame of the table, and to have somewhere to mount the wedge leveling system. In doing this, you build it on top of the slates to match them perfect, then transfer everything to the frame of the table afterwards.
 

Attachments

  • C.JPG
    C.JPG
    53.5 KB · Views: 1,442
  • C1.JPG
    C1.JPG
    52.1 KB · Views: 1,436
  • C2 (1).JPG
    C2 (1).JPG
    51.8 KB · Views: 1,437
  • C2 (3).JPG
    C2 (3).JPG
    53.3 KB · Views: 1,435
  • C2 (4).JPG
    C2 (4).JPG
    48.4 KB · Views: 1,452
Adding the leveling system.
 

Attachments

  • D (1).JPG
    D (1).JPG
    54.3 KB · Views: 1,440
  • D (2).JPG
    D (2).JPG
    43.5 KB · Views: 1,431
  • D (3).JPG
    D (3).JPG
    39.9 KB · Views: 1,433
Now, transfering everything to the table frame.
 

Attachments

  • D (4).JPG
    D (4).JPG
    63.2 KB · Views: 1,437
  • D (5).JPG
    D (5).JPG
    57.5 KB · Views: 1,439
Time to take the slates apart, turn them over and profile the pocket plates, then transfer them to the frame of the table.
 

Attachments

  • IMG_0032.JPG
    IMG_0032.JPG
    61.6 KB · Views: 1,401
  • IMG_0042.JPG
    IMG_0042.JPG
    43.4 KB · Views: 1,410
  • IMG_0049.JPG
    IMG_0049.JPG
    54.3 KB · Views: 1,401
  • IMG_0046.JPG
    IMG_0046.JPG
    48.8 KB · Views: 1,411
  • IMG_0045.JPG
    IMG_0045.JPG
    46.5 KB · Views: 1,424
With the slates in place, now you bolt down the rails and dry level the slates just as you would if you were leveling the table with the cloth already installed.
 

Attachments

  • IMG_0053.JPG
    IMG_0053.JPG
    46.6 KB · Views: 1,416
Here's what the pockets look like when finished, not a single staple has been used to install the bed cloth, not even in the pockets.
 

Attachments

  • IMG_0060.JPG
    IMG_0060.JPG
    56.3 KB · Views: 1,424
So, now to answer anyone's questions about should they get a Diamond with a 3 piece slate instead of a one piece, feeling that the one piece slate may be a better slate...it don't matter anymore, the 3 piece steel plate joined slates are what Diamond now offers because it works great. The steel plate joined 3 piece slates can even be installed in a ProAm or Smart Table, fliped up into a cart, transported and installed...and the seams will never come apart...until someone takes them apart, because they'll never come apart on their own, not even if you climb up on the table to hang a light...and walk all over the playing surface while you're doing it;)
 
So how does the cloth get held in place and stretched?

The cloth is stretched into the pockets, and under the pocket shelf, then glued in place with the FB10 I use, then the pocket plates are bolted in place to finish off the pockets, and to provide the drop pockets a place to be attached, as well as providing additional support to hold the pocket flaps tightly in place.
 
Glen, Do you shim the center support beam, or are the slates ridged enough that that isn't needed?
 
Back
Top