Gold Crown installation.

trentfromtoledo

8onthebreaktoledo
Silver Member
Moved this out of someone elses Thread out of respect. That guy had some issues and happy to hear his table got together and is satisfied.


I install Gold Crowns as the manual states to. I cannot imagine going back to trying to install 1's and 2's without building the top upside down, with that silly old extrusion system they used on the aprons for those models. I was happy to read the 4 of 5 Gold Crown Service Manuals I found online. Gold Crown 2 is the only PDF I don't have.


Trent from Toledo

picture.php
 
Last edited:
Table

Moved this out of someone elses Thread out of respect. That guy had some issues and happy to hear his table got together and is satisfied.


I install Gold Crowns as the manual states to. I cannot imagine going back to trying to install 1's and 2's without building the top upside down, with that silly old extrusion system they used on the aprons for those models. I was happy to read the 4 of 5 Gold Crown Service Manuals I found online. Gold Crown 2 is the only PDF I don't have.


Trent from Toledo

picture.php
-

The GC can be easy for some and a pain for others, once you assemble and disassemble the GC's you'll find some models are easier than others.
If you get snookered on the GC 1&2 apron alignment and are riding solo you can assemble it upside down, use painters tape to make alignment marks on the rails/aprons, cut the tape for disassembly and line the tape back up to go together on the spot.
Obliviously you'll have to put it together upside down on top of the table then take it part to put it together piece by piece in proper place. Good learning experience for you and makes you use your thinking cap.
You'll know your doing something when you setup a GC solo.

Ever recover the rails with out removing the aprons or disassembling the rail and casting assembly?


Rob.M
 
Last edited:
Trent.....Glen and I gave you free and good advice on how to assemble GC tables....but I guess by starting this thread....you don't get it.
Your new to all pool tables.....your refinishing...installing....doing all different table work...and you've been around tables less than a year...or more maybe.
Just because the manufacture of tables wants the table assembled according to a manual...don't mean that mechanics that have been doing table work for years and years....don't know better ways of assembling that table in a way that makes the table line up better.
When you have put enough time in doing tables and learning more and more about them....you going to start doing things in different ways than the way the manual says.

We don't just do things on tables cause we want to do things our way......we found better ways to make tables play better.
The manufacture is in the business of selling tables.....not making sure all the parts fit perfectly.....every table has some kind of issue with one thing or another.
It's up to the mechanic to make the table go together right and play well.......some care...and some just assemble the table the way they receive it and that's good for them.
Glen and other top mechanics on here will tell you just how many times they had to modify new tables and old tables.
People want to build the top and flip it on...why....cause it's fast.

Mark Gregory
 
Last edited:
Not having any issues...

I have not had any issues with rails not lining up or castings for that matter. I reposted this out of the other persons thread to get other peoples opinions. Rob posted something other than trying to point out the obvious part about my time in this business. I never said I was having problems with what you stated was "the right way" :) I simply stated what works for me and where I got the information from. So to carry on and answer Robs question: No I have not recovered rails in that fashion and I would appreciate it if you would describe how it is done. Thanks!

Trent from Toledo
 
Is that how they are supposed to be put together? I bolted rails to table then put blinds on, it kinda sucks but it is do-able. The toughest thing to install for me was the plastic gully blinds, I see why there are so many GCs that do not have them. There just seems to be no easy way to get to the screws, I had to have my wife put the corner screws in cause my hands are too big to fit them in.

I noticed when putting my GC together that the rails could be moved around on the table with the bolts started but not tight. I assumed that meant it would be a good idea to get the rails straight and square before tightening them down. Can you still do this if you assemble the rails upside down and still have all the holes line up?
 
yes

Firstly I must say this to be honest an straight forward in my opinions: Brunswick Gold Crown Pool Tables are in my opinion the finest series of tables ever made. Now having said that:

I have no problems getting the holes to line up. I think it is because if you have the castings in the proper place , everything just lines up. Never have had an issue lining up. Not saying it does not happen to tables that are flawed or in terrible condition, but, I am saying it does not happen to me as I try very hard to only buy quality tables to customize. I have installed 15 Gold Crowns in the last 13 months(started my business May of 2012 to be very exact). I struggled VERY hard on Gold Crown 2's and then read the manual for the 1 & 3 (can't find GC2 PDF anywhere!!) and determined that the table must be built upside down and I tried it!!! Now they are no trouble at all. 3's & 4's are a breeze comparably and this is due to the extrusion apron system being replaced. If you rush on this part on any GC models I have noticed that that the rails and castings will not be correct and you have to start over. So I have found in my short experience that if you rush you are just wasting your time. My installs generally take about 8 hours on a GC w/ ball return system. If really depends on how much my clients like to talk!!! That can take up to an extra 2 hours!!! lol


Trent from Toledo
 
Is that how they are supposed to be put together? I bolted rails to table then put blinds on, it kinda sucks but it is do-able. The toughest thing to install for me was the plastic gully blinds, I see why there are so many GCs that do not have them. There just seems to be no easy way to get to the screws, I had to have my wife put the corner screws in cause my hands are too big to fit them in.

I noticed when putting my GC together that the rails could be moved around on the table with the bolts started but not tight. I assumed that meant it would be a good idea to get the rails straight and square before tightening them down. Can you still do this if you assemble the rails upside down and still have all the holes line up?


I have never used the upside down method but have installed and re-installed the two GCs ( I & now a II) I have owned over the past 30 years always with success. But, one thing I have come to learn is that lining up the rails before tightening down both the rail bolts and pocket casting bolts is the proper method. The size of the rail bolt holes in the slates allows for considerable adjustment when positioning the rail system. Remember to go down the line tightening each bolt a bit at a time much like one would torque wheel bolts on a car. Separately, I have never seen a GCII installation manual either. Perhaps Brunswick never printed one and instead continued to use the GCI edition. When I purchased used my old GCI, I wrote to Brunswick and they actually sent me a brand new installation manual free of charge. I let it go when I sold the table, something I have regretted to this day.....
 
Gold Crown 2 manual

http://www.chicagobilliardmuseum.org/files/

Towards end of page( alphabetical ) and the Gold Crown Manuals 1,3,4, & 5 PDF'S are there, GREAT resource.

The GC3 manual shows the build entire top method and so does the Gold Crown 4. So I can see where some people do it one way and others do it the latter Service Manual way. So long as the rails and castings line up: I say what ever works for you with success is the route to go! :)

http://www.classicbilliards.net/html/AntiquePoolTablePartsProducts.cfm?img=ServiceManualGoldCrown2.jpg&item=SM/03&price=$14.95&Shipping=$3.00&Desc=Gold%20Crown%202%20Service%20Manual%20(1974)
You can buy GC2 Service manual right there :)
 
Last edited:
Table

I have not had any issues with rails not lining up or castings for that matter. I reposted this out of the other persons thread to get other peoples opinions. Rob posted something other than trying to point out the obvious part about my time in this business. I never said I was having problems with what you stated was "the right way" :) I simply stated what works for me and where I got the information from. So to carry on and answer Robs question: No I have not recovered rails in that fashion and I would appreciate it if you would describe how it is done. Thanks!

Trent from Toledo

-
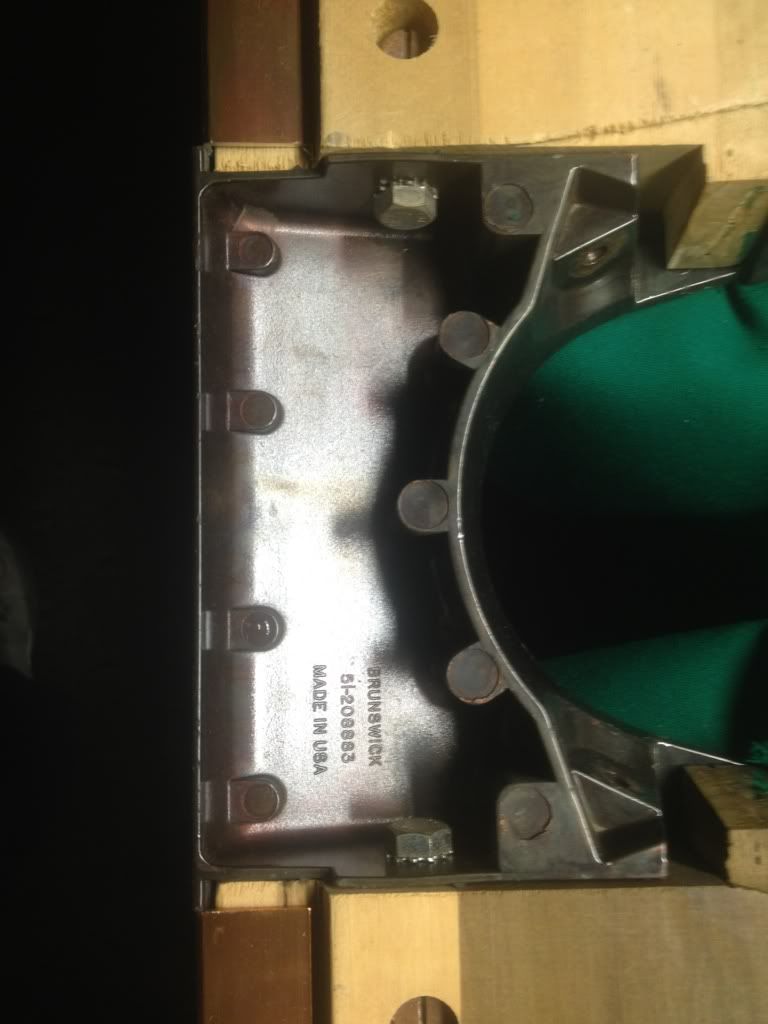
The mounting of the rails to the castings is where the rails can come out of alignment, you'll soon find and I find it hard to believe that all the GC's and similar builds over the years you've not found a casting with broken or bent castings. On the GC4 as you pictured the side pocket castings are notorious for bending the bolt hole tabs when tightened or mishandled, in turn puts stress and could even cause the wood on the end of the rails to rip out.- there is only one bolt holding the GC4 side pocket casting to rail-
Your relying on the aprons to hold it all together? Don't count on it; that hardware will fail you.
Once those tabs of the GC4 castings make there mark on the ends of the rails it's kinda like dye and the cast. The alignment notch or "cleat" is what makes the side pocket casting bolt attachment tap bend because it creates a gap in which is drawin close to bending it then causes the side pockets to pitch in out of alignment.

If any of the hardware has fallen out or come loose and you show up to recover the table and take the rail bolts out and the ball box off and go to flip the box without checking to make sure all the harware is in place and tightened you could do some serious damage if that assembly comes apart as your flipping the top assembly as one. I don't know if you've ever thought about tightening and making sure everything is in place before attempting flipping or removing anything. There is a lot of things that can be done or not done to prevent damaged equipment and head ache.
If a rail apron assembly is flipped in place on the table ready for bolts and has the side pockets are pitching in at the side pocket castings of both side, the quick and easy fix is to tighten the end rails then tug on the casting to get it straight then quickly tighten the rail bolt to keep it in place but with out loosing the casting bolt you've bent the attachment tab even more. So now you have got a bent tab, that's fine it was already bent a little from who ever the last guys that over tightened it... All good till that's happened a few times and it's cracked or broken off.
So loosening all the side castings and apron bolts to align would of been the best way but a real pain turning the bolt unless you have ratchet wrenches or completely remove that apron...... Which in turn if you would of just took your time and built it piece by piece you'd be a lot happier and less possibility of head aches and or damage to the equipment.
Don't get me wrong the top can be done that way you do but know what your up against, you one day you will find a table that you are be dam happy that you checked the harware on before removing the top assembly as one, so I just saved your ass'. Ship the fiddy!

And for how to recover the rails with out taking the assembly apart that will be another fiddy'
Your getting off cheap.


Rob.M
 
Last edited:
WOW, what a response.

First, I want to thank you for such a detailed response Rob!!! AND for saving my ass on checking the hardware up front for future reference!

I see your points and appreciate your attention to detail. I have noticed some bent GC4 Castings and understand what you are talking about!! The rails are not to be picked up when attached by the side pocket casting!!!!

I make sure to tighten all hardware properly before we move the top of the table and if you do not it is more than obvious because the castings don't line up correctly and must start over! So now will also make sure to check all hardware before I remove any tops of tables! I am also going to try it the way Mark and Glen have suggested on GC 3's & 4's !!!

I like the way this thread went! Thanks

Trent from Toledo

I am gonna get that recovering rails thing out of ya at some point!!
 
First, I want to thank you for such a detailed response Rob!!! AND for saving my ass on checking the hardware up front for future reference!

I see your points and appreciate your attention to detail. I have noticed some bent GC4 Castings and understand what you are talking about!! The rails are not to be picked up when attached by the side pocket casting!!!!

I make sure to tighten all hardware properly before we move the top of the table and if you do not it is more than obvious because the castings don't line up correctly and must start over! So now will also make sure to check all hardware before I remove any tops of tables! I am also going to try it the way Mark and Glen have suggested on GC 3's & 4's !!!

I like the way this thread went! Thanks


Trent from Toledo

I am gonna get that recovering rails thing out of ya at some point!!

How do you build the 1's and 2's upside down? They have a fiberglass skirt that prevents them from being put over the slate. I am curious because you are correct that the channels on the 1's and 2's can be a ***** to attach the aprons.
 
http://www.chicagobilliardmuseum.org/files/
Go to that link and download the PDF for the Gold Crown 1 and 3 (almost to bottom of page and everything is alphabetical) and that should make it pretty clear?

Trent from Toledo

p.s. you put those on last! I don't find a lot of tables with those!!!


I just took a careful look at my skirts. Installing after the aprons are in place would be very difficult. The way the skirts wrap inward (the bottom edges are almost parallel to the floor when installed) leaves but a couple of inches lest interference from the frame rails. Consequently, this limited access space creates nearly "blind work" and would result in a tight, awkward screwdriver position in order to reach each of the many skirt screws (no power driver could be used). The head rail skirt would be particularly frustrating because the base frame pedestal imposes additional access limitation. If one has the plastic skirting, hanging the rails and aprons with skirting attached seems the best approach. IOW, the aprons (with skirts) are best installed as per the GC-I manual.
 
Last edited:
I just took a careful look at my skirts. Installing after the aprons are in place would be very difficult. The way the skirts wrap inward (the bottom edges are almost parallel to the floor when installed) leaves but a couple of inches lest interference from the frame rails. Consequently, this limited access space creates nearly "blind work" and would result in a tight, awkward screwdriver position in order to reach each of the many skirt screws (no power driver could be used). The head rail skirt would be particularly frustrating because the base frame pedestal imposes additional access limitation. If one has the plastic skirting, hanging the rails and aprons with skirting attached seems the best approach. IOW, the aprons (with skirts) are best installed as per the GC-I manual.

The plastic skirting is attached first, and has nothing to do with lining up the rails the rails, rail skirts, or ball box. Which is why I said the rails and pocket castings mount and are lined up first.
 
gc1

Yes, Rikdee with those skirts it is the way to go!!! I think it was the GC3 that they did away with those and made the aprons a bit longer to cover the ball return system or drop pockets. I like the look of the old ones with the skirts in all original condition, but, for custom tables I like them without. The pic attached is of the one I "cleaned up" literally! It was in such good condition when I bought it, all I really did was give the thing a bath from all the cigarette smoke, new rubber and cloth and it came out beautiful! We had to put the aprons on the GC 1 Service Manual method due to the skirting.

picture.php


So, I have learned much from this thread!! I have determined this about how I handle GC's in the future: 1's & 2's with no skirts= Build top first like I mentioned because the extrusion system is super tough! I am going to try the rails on first method for 3's, 4's because the apron system is super easy in comparison to the latter. and a GC 5 one day when I get my hands on one!!!! I think that what ever work and produces the proper result is what I will do from now forth. I appreciate everyone's input!

Trent from Toledo
 
Last edited:
Back
Top