You are using an out of date browser. It may not display this or other websites correctly.
You should upgrade or use an alternative browser.
You should upgrade or use an alternative browser.
Gold Crown Barn Find
- Thread starter rexus31
- Start date


Thanks to some help from Rexus I was able to pull this off using a buffer and some polishing compound (to say I'm thrilled would be putting it lightly):
Before A:
View attachment 529893
After A:
View attachment 529894
Before B:
View attachment 529896
After B:
View attachment 529895
Looks good, man! Glad I could help.

Scott, good job so far. Please invite Dave and me to your "Man Cave" when you are finished. I restored a GC 1 many years ago and I used a local Body and Fender shop for the paint job. I had them paint it black with an oil based lacquer which may not be available now in Cali due to emission standards. Lastly I have unused sets of pockets for GC 1,2s and 3s if you need some assuming it has a ball return system. All you need now is the accompanying original chairs with that were locked together with a drink and food holder. I saw one on AZBillards a few years ago. Very cool indeed. Keep it going my friend.
Scott, good job so far. Please invite Dave and me to your "Man Cave" when you are finished. I restored a GC 1 many years ago and I used a local Body and Fender shop for the paint job. I had them paint it black with an oil based lacquer which may not be available now in Cali due to emission standards. Lastly I have unused sets of pockets for GC 1,2s and 3s if you need some assuming it has a ball return system. All you need now is the accompanying original chairs with that were locked together with a drink and food holder. I saw one on AZBillards a few years ago. Very cool indeed. Keep it going my friend.
Thanks, Jerry! I will most certainly have you and Dave over once completed. I am not going the auto paint route but a very durable paint nevertheless. As you know, oil is hard to come by in CA nowadays. I'm using Sherwin Williams Emerald Urethane Enamel which the tout as a hybrid; low VOC, water clean up, dries as hard as oil. I can attest to that as my pedestals, runner, ball box and skirts all have a very hard finish which should be very durable. My painter has used this paint in high traffic areas and he reports it has held up nicely. I'm having difficulty laying down the blue on the aprons though so he will spray the final couple coats for me because after 4 attempts, I've run out of patience and simply want it down. It's rather annoying considering I got a great finish on the white pieces but the blue doesn't want to lay down smooth. Oh, well.
Thanks for the offer on the pockets but my table doesn't have ball return.
Last edited:
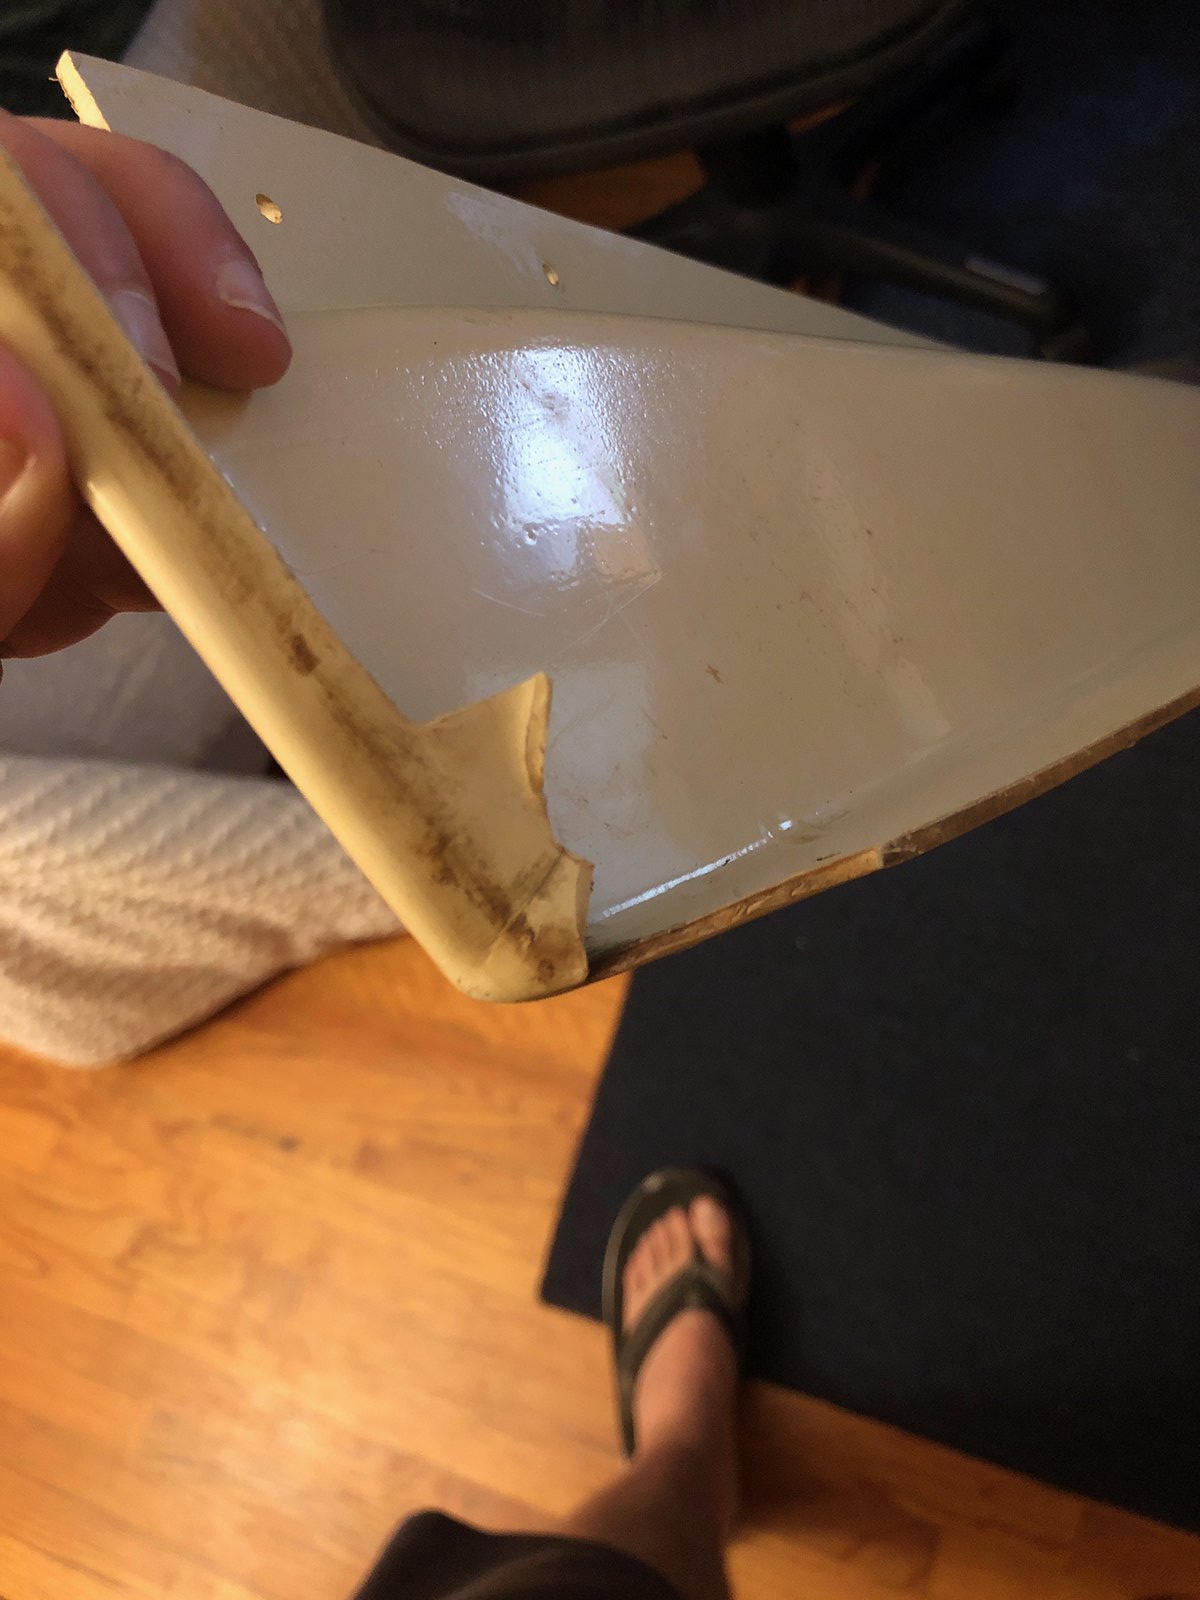
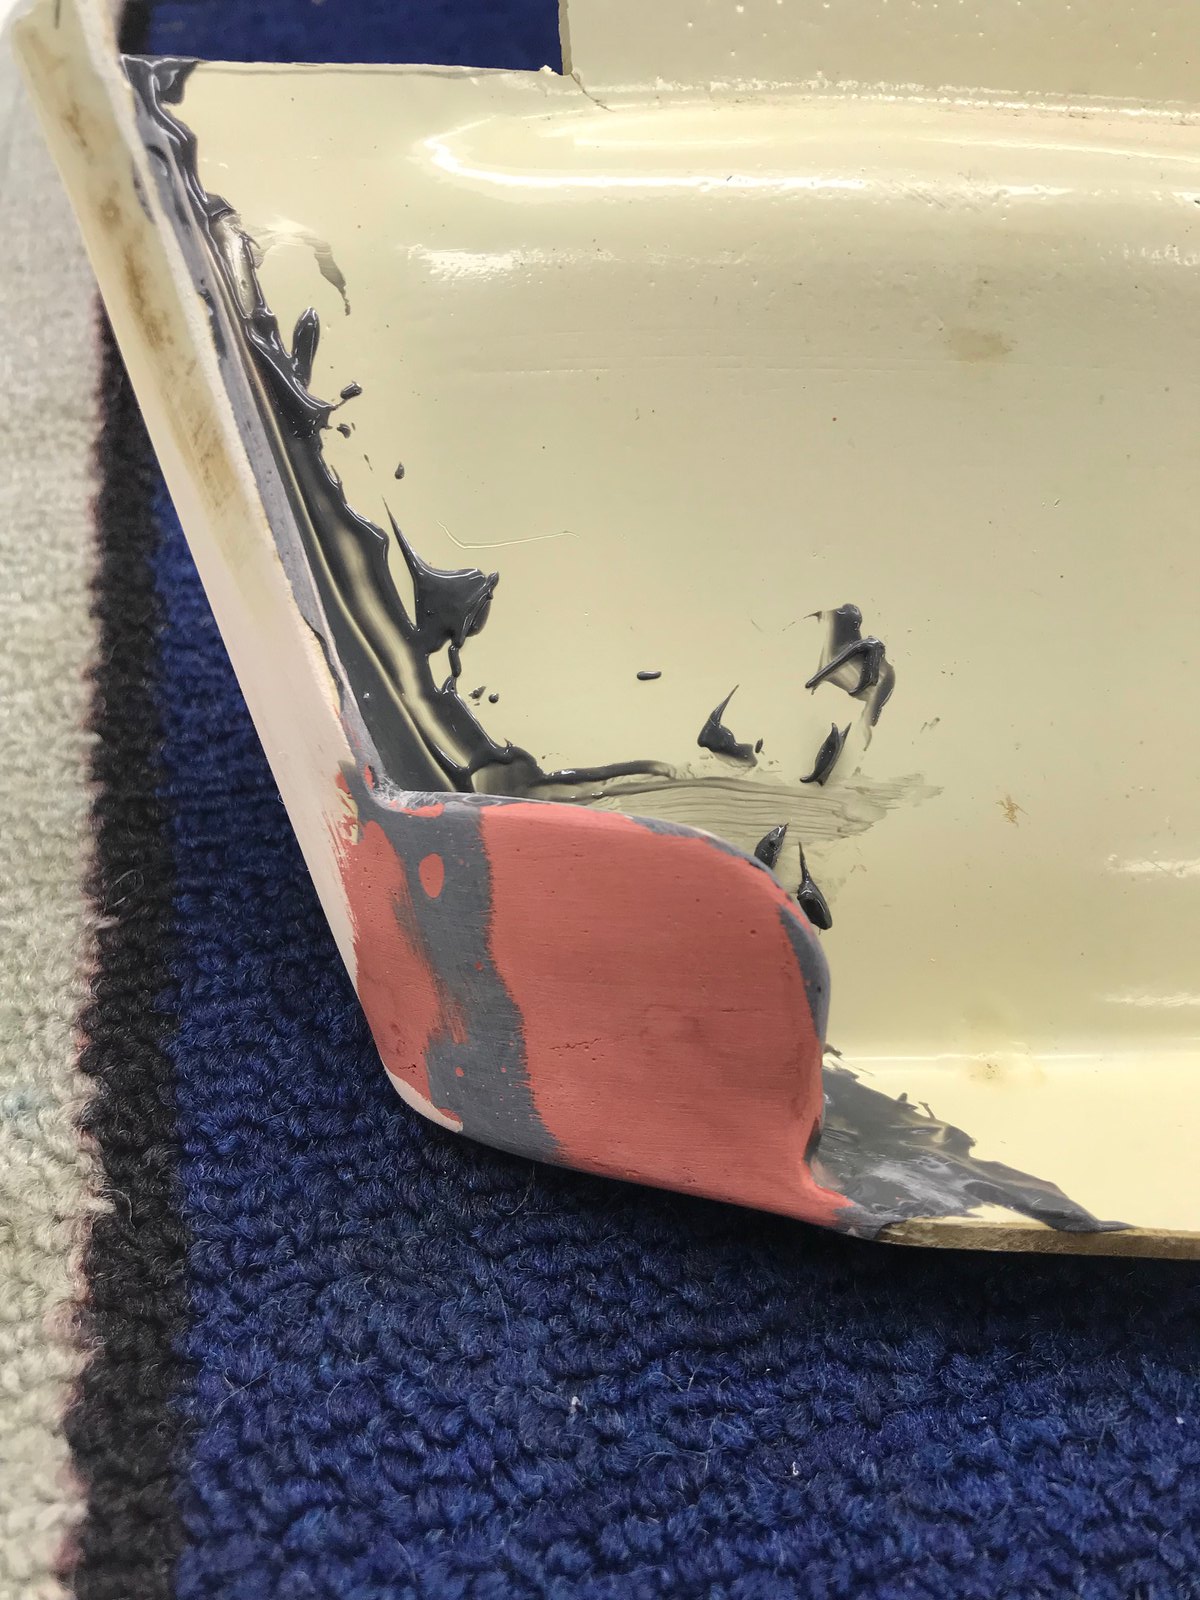
The other table my buddy (@pocket) got was missing the skirts but he was able to source a set however, a couple of the long pieces were missing the mounting tabs; most likely broken due to improper removal. I helped him out and recreated them using a template made from thin cardboard traced from one of my skirts. Once the template was properly positioned on the skirt(s), I sandwiched it between layers of JB Weld then finished it up with some Bondo putty. I think they came out good. I'm waiting for the mating pieces to drill the holes so he can use hardware or RKC's clip method. These are very solid and should hold up well.
Piece 1 Before:
Piece 1 After:

Piece 2 Before:

Piece 2 After:


Piece 1 Before:
Piece 1 After:
Piece 2 Before:
Piece 2 After:
Last edited:
The other table my buddy (@pocket) got was missing the skirts but he was able to source a set however, a couple of the long pieces were missing the mounting tabs; most likely broken due to improper removal. I helped him out and recreated them using a template traced from one of my skirts onto a thin piece of cardboard. Once positioned on his skirt(s), I sandwiched it between layers of JB Weld then finished it up with some Bondo puddy. I think they came out good. I'm waiting for the mating pieces to drill the holes so he can use hardware or RKC's clip method. These are very solid and should hold up well.
Piece 1 Before:
Piece 1 After:
https://live.staticflickr.com/65535/48770499263_bc9f8dd560_h.jpg[/img
Piece 2 Before:
[img]https://live.staticflickr.com/65535/48770499583_363f0be15b_h.jpg
Piece 2 After:
Fiberglass mesh, and resin works wonders

In keeping with the skirts theme, I decided to test fit my skirts to the aprons. I'm glad I did. The joint on the skirts for the head apron were overlapping by at least 1/4". Some patience, Blue Painter's Tape, a Dremel tool and a file fixed that. The joint is now very nice. Sorry, I forgot to snap a pic before.
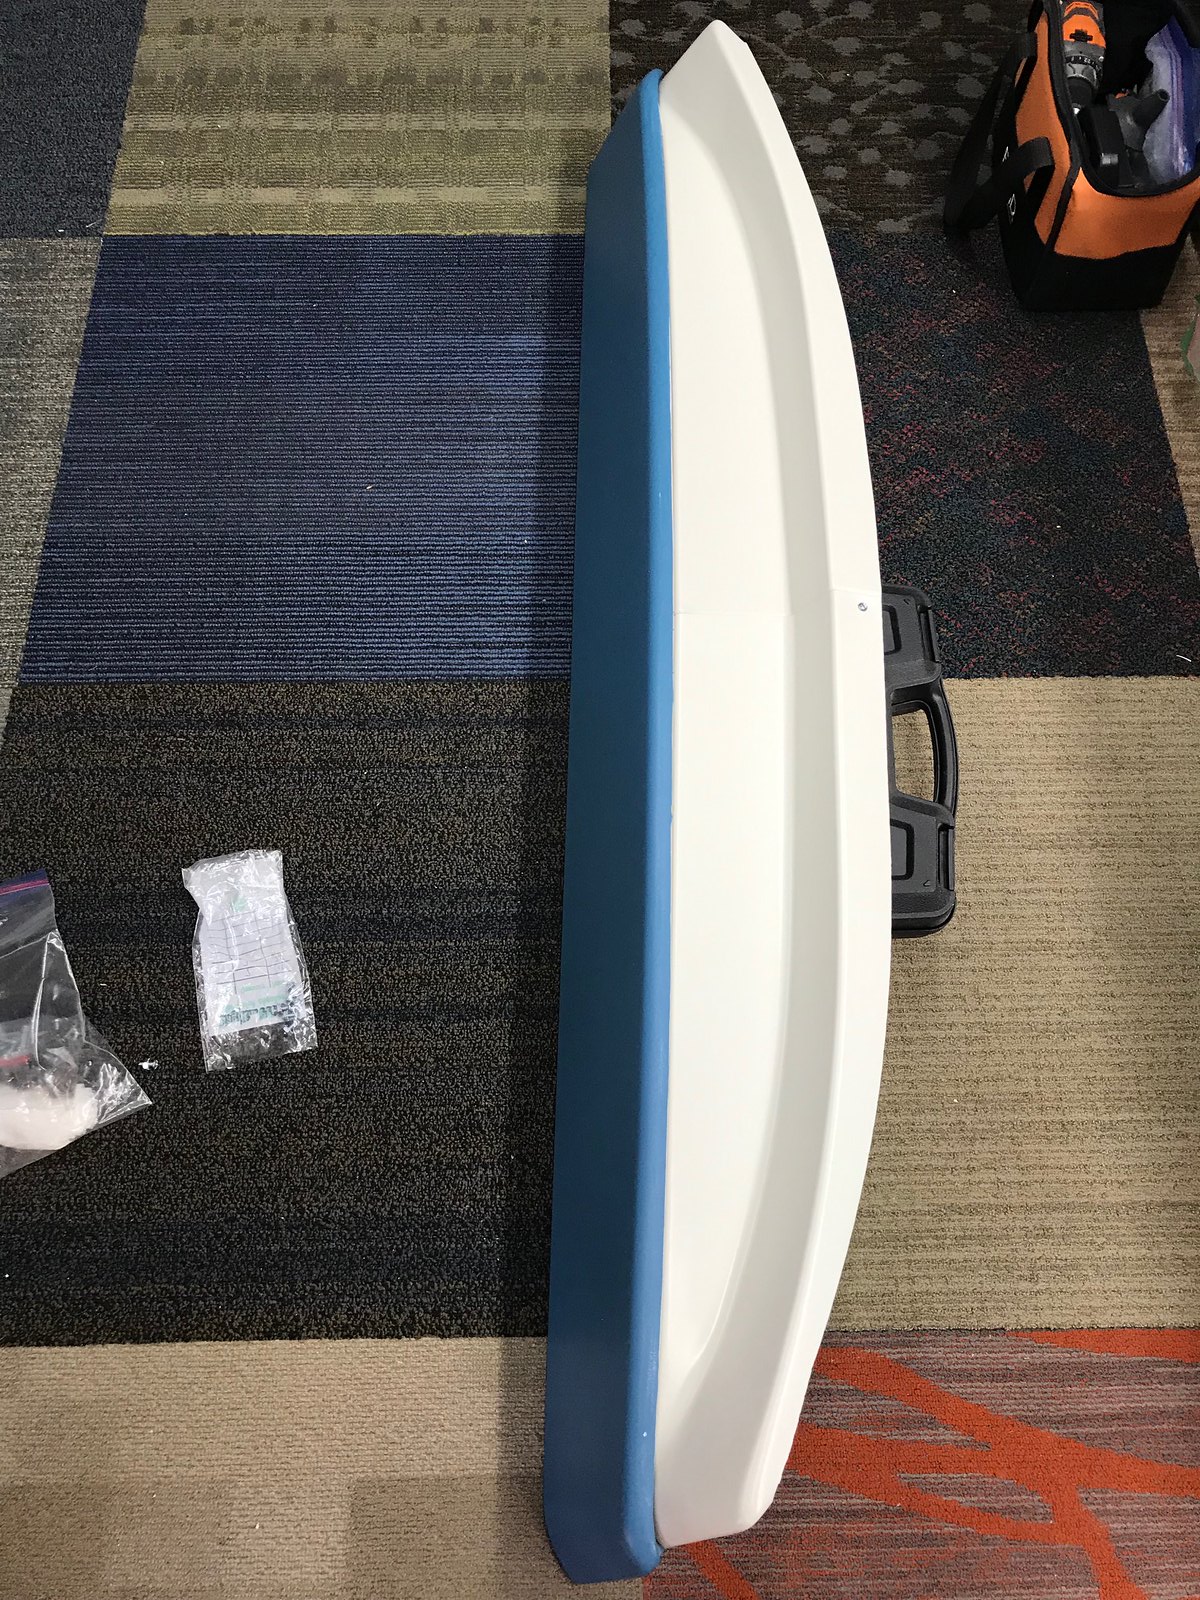


The long apron skirts all fit very nicely but I did discover they are side specific; screw holes are exclusive to each panel.
The long apron skirts all fit very nicely but I did discover they are side specific; screw holes are exclusive to each panel.
Last edited:
Thanks to some help from Rexus I was able to pull this off using a buffer and some polishing compound (to say I'm thrilled would be putting it lightly):
Before A:
View attachment 529893
After A:
View attachment 529894
Before B:
View attachment 529896
After B:
View attachment 529895
Looks great Raffster!!!
Lexus... you should talk to Donny about doing your rails... I am pretty sure that is who RKC subs out all his rail work to anyways...
Lexus... you should talk to Donny about doing your rails... I am pretty sure that is who RKC subs out all his rail work to anyways...
LMAO!!! I'm patiently waiting for Steve.
Fiberglass mesh, and resin works wonders
As does perforated cardboard and JB Weld! LOL.
As does perforated cardboard and JB Weld! LOL.
Sure glad they don't use that method to do body repair on corvettes....LOL
Sure glad they don't use that method to do body repair on corvettes....LOL
Glen, it's a plastic piece on a pool table that stays inside and gets no wear and tear. Next time a thread is started to rebuild a Corvette your comment will be very helpful.
Scott, looks great, thanks for sharing the process.
Sure glad they don't use that method to do body repair on corvettes....LOL
Apples to oranges but thanks for your input.
Glen, it's a plastic piece on a pool table that stays inside and gets no wear and tear. Next time a thread is started to rebuild a Corvette your comment will be very helpful.
Scott, looks great, thanks for sharing the process.
Thanks, Ian. I'm glad I was able help out a buddy in need. Although not "correct" to some, the repair is VERY sturdy and will perform nicely for the intended use. The sturdiness of the thin (think business card) cardboard allows the shape to take and stay in place. Using fiberglass mesh and resin would have made the repair more difficult, IMO.
Last edited:
Glen, it's a plastic piece on a pool table that stays inside and gets no wear and tear. Next time a thread is started to rebuild a Corvette your comment will be very helpful.
Scott, looks great, thanks for sharing the process.
You know what, it's kind of like the person who spray paints his Gold Crown high gloss automotive black, then sits back looking at it thinking how beautiful it looks. Only thing is, in just a few years all that high gloss automotive black finish is going to look like shit because the paint is brittle, and won't support bonding to a structural surface that expands and contracts, so it develops spiderweb cracks all through the finish, and eventually starts peeling off. Whereas if a latex paint was used, it stretches with the wood surface, and contracts with it as well, so it never shows the same signs of the instability of an oil based paint. But, I suppose you're right, there's many ways of fixing things, I just prefer the best possible methods available so as to insure the best possible outcome.
Thanks, Ian. I'm glad I was able help out a buddy in need. Although not "correct" to some, the repair is VERY sturdy and will perform nicely for the intended use. The sturdiness of the thin (think business card) cardboard allows the shape to take and stay in place. Using fiberglass mesh and resin would have made the repair more difficult, IMO.
That's why I use the fiberglass mesh to first start building out the missing area, then when its stable, cut back the excess. When done right, it's as strong as the original material, and can't ever tell it's been repaired.
You know what, it's kind of like the person who spray paints his Gold Crown high gloss automotive black, then sits back looking at it thinking how beautiful it looks. Only thing is, in just a few years all that high gloss automotive black finish is going to look like shit because the paint is brittle, and won't support bonding to a structural surface that expands and contracts, so it develops spiderweb cracks all through the finish, and eventually starts peeling off. Whereas if a latex paint was used, it stretches with the wood surface, and contracts with it as well, so it never shows the same signs of the instability of an oil based paint. But, I suppose you're right, there's many ways of fixing things, I just prefer the best possible methods available so as to insure the best possible outcome.
You are the best. :thumbup: