1st threaded ferrule

Dave38

theemperorhasnoclotheson
Silver Member
If you are going to be doing tips and repairs, I highly recommend investing in a dial indicator and a magnetic mount such as these from harbor Freight. If you look thru their flyers sometimes they have coupons for even cheaper. These make it a breeze to setup a shaft, and joints to run true. A set of calipers too.
 

muskyed

AzB Silver Member
Silver Member
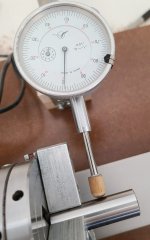
Actually have been using a dial indicator since about my 2nd or third tip. Makes it so much easier trimming tips flush with the ferrule, as I don't have the nerve to use an exacto blade by hand, . Would like to try one of those one sided knives, but haven't gotten around to buying one yet. I also have all sizes of brass shim stock in sizes of .001 and up, in half thousandths, that I can use in the jaws to help center the shaft or ferrule. And this brings me to the next thing I tried the other day. I do like to tinker, and if something is off, it will bug me till I hopefully correct it. When I received the lathe, it had a couple thousandths of runout, and I tried to fix it by taking off one of the jaws and sanding the inner curve where the jaw grabs, a little bit at a time. That Idea didn't go so well. Every time I took the jaw on and off it would be slightly different by a few thousandths, and I finally quit trying, and ended up with a worse runout than when I started. Ended up at .0045 runout. Just decided to live with it and shim jaws as needed, but it was driving me nuts as I knew it could be made better. Called Midamerica and explained my situation, and he said to order a boring bit, and sent me an instruction sheet on how to correct it. Didn't want to wait for a bit to be sent, and as I had some new unground spare HHS stock that I use for my hollowing rigs in woodturning, decided to try and make my own bit instead of waiting. It really was quite simple as I already had great sharpening setups for my woodturning. Was quite simple to true, and jaws cut like butter. Was told to take about a .002 cut at a time, then a .001 final cut. Didn't want problems, so took a few.001 cuts, then about a half thousandths final cut. Attached pic is total runout now, I'm pretty impressed for an inexpensive lathe. Even though shafts and ferrules will probably still have to be shimmed, it's nice knowing it's not because of the lathe. Also figured out the cutter height first time using it, slight shim with that also. Calipers and all that stuff have also, not much I don't have actually.
 

Attachments

  • dial a.jpg
    dial a.jpg
    120.9 KB · Views: 129
Last edited:

Kim Bye

AzB Silver Member
Silver Member
One other tip I forgot to mention....if the cutting tool height is off slightly, you will have a small 'nipple' in the center, so small you may not see it but it will cause the tip to rock slightly. If it happens, just rub the edge of a blade across the center of ferrule and should remove it, then re-adjust your tool height.
I bought the lathe tool centering thing from Edge technology, costs about $30 very handy tool to have
 

PariahZero

Member
Is there any particular advantage in an analog dial indicator vs digital?

I ask as I have two digital dial indicators, and zero analog style, and they’ve worked for me so far.
 

Dave38

theemperorhasnoclotheson
Silver Member
In my opinion, digital verses analog, only difference is $$. Either one works great. I only have analog as those were cheaper and I had Harbor Freight coupons...lol
 

Chili Palmer

AzB Silver Member
Silver Member
If you are going to be doing tips and repairs, I highly recommend investing in a dial indicator and a magnetic mount such as these from harbor Freight. If you look thru their flyers sometimes they have coupons for even cheaper. These make it a breeze to setup a shaft, and joints to run true. A set of calipers too.

I do have a dial indicator and usually have it hooked up but if it's not close I just use a bit in the tool post. You can get it perfect using that as well.
 

Kim Bye

AzB Silver Member
Silver Member
Is there any particular advantage in an analog dial indicator vs digital?

I ask as I have two digital dial indicators, and zero analog style, and they’ve worked for me so far.
I find analog indicators easier to work with. As with any tool, you get what you pay for. I have a few Mitutoyo and Starrett dial indicators, The Starrett ones you can mount all kinds of conntact points on, very handy for testing runout on screws for instance. I have two test dial indicators, both are Tesa Tast with ruby stylus, one in 0.01mm and one in 0.002mm. All my mag bases are from Noga, I have a few of the mini ones, and a few of the FAT/FAB ones (The DG6160 is perfect for what we do) with the dual fine adjust. I've used them for years and they work just as good as the day I bought them.
 

Chili Palmer

AzB Silver Member
Silver Member
In my opinion, digital verses analog, only difference is $$. Either one works great. I only have analog as those were cheaper and I had Harbor Freight coupons...lol

Ditto. I've setup many gears in cars using a HF dial indicator and I've never had one come back.
 

PariahZero

Member
Ditto. I've setup many gears in cars using a HF dial indicator and I've never had one come back.

The one issue I’m discovering with the HF Digital dial indicator: it’s not easy to zero it consistently. Pushing the zero button has enough slop to change the measurement.

FWIW, I have a Mitutoyo Micrometer & Caliper, as well as some decent gauge blocks (also Mitutoyo).

The Mitutoyo calipers & micrometer are perfectly in spec vs the gauge blocks. That’s no surprise.

However, I had a couple of older HF calipers, and I gave them a test as well. The HF calipers also measured within spec - to within +/- 0.5 mil.

A far wiser machinist told me his take on it: HF’s instruments will work just fine for occasional use in a nonprofessional environment. They’d fall flat when used & abused in an active machine shop every day for a decade, but that’s what the professional grade tools are for.
 

Dave38

theemperorhasnoclotheson
Silver Member
The one issue I’m discovering with the HF Digital dial indicator: it’s not easy to zero it consistently. Pushing the zero button has enough slop to change the measurement.

FWIW, I have a Mitutoyo Micrometer & Caliper, as well as some decent gauge blocks (also Mitutoyo).

The Mitutoyo calipers & micrometer are perfectly in spec vs the gauge blocks. That’s no surprise.

However, I had a couple of older HF calipers, and I gave them a test as well. The HF calipers also measured within spec - to within +/- 0.5 mil.

A far wiser machinist told me his take on it: HF’s instruments will work just fine for occasional use in a nonprofessional environment. They’d fall flat when used & abused in an active machine shop every day for a decade, but that’s what the professional grade tools are for.
I have about 8-10 of the HF digital calipers (can never find one when I need it so I buy more) and every so often I use my Ground rod and check the measurements of all of them. Not often that I have to ditch one as being out of spec. But I understand that in a real world shop they would not likely last a week.
 

Chili Palmer

AzB Silver Member
Silver Member
The one issue I’m discovering with the HF Digital dial indicator: it’s not easy to zero it consistently. Pushing the zero button has enough slop to change the measurement.

FWIW, I have a Mitutoyo Micrometer & Caliper, as well as some decent gauge blocks (also Mitutoyo).

The Mitutoyo calipers & micrometer are perfectly in spec vs the gauge blocks. That’s no surprise.

However, I had a couple of older HF calipers, and I gave them a test as well. The HF calipers also measured within spec - to within +/- 0.5 mil.

A far wiser machinist told me his take on it: HF’s instruments will work just fine for occasional use in a nonprofessional environment. They’d fall flat when used & abused in an active machine shop every day for a decade, but that’s what the professional grade tools are for.

Agreed. Mine is about 10 years old now and it's time for a new one as just like you say, the zeroing gets a little sloppy. That being said, I'm not really trying to zero it when doing this, only watching the needle move and how far. If it doesn't move it doesn't matter if it's off :)
 

WilleeCue

The Barefoot Cuemaker
Silver Member
If you are measuring static points then there is not much advantage for the analog over the digital indicator.
The digital will have a higher resolution than the analog.
When the part is moving you can see the direction and amount on an analog indicator.
You only see flickering digits on a digital.
 

cueman

AzB Gold Member
Gold Member
Silver Member
Let's go back to keeping break tips on. They are by far the hardest to get to stay on various ferrules. Those Asian cues with the soft oily white plastic are the hardest. The tenon method mentioned should work and is not as bad of an idea as some seem to think. But I do think the cistomer should have that explained to them so the next repairman does not just face it off. Another once posted to just cut a short tenon on the end of the ferrule. Both should help hold to those types of ferrules. My solution has been to change the ferrule to a linen based ferrule that is stronger and holds tip glues better. All three methods are good. Let's all remember the rules of civility and just state what we feel is the best way and not turn things into attacks.
 

Dave38

theemperorhasnoclotheson
Silver Member
I was using CA40 from 3M especially for those types of ferrules, but the cost and shorter life span of the bottles was an issue. Never had one come off. I now use (thanks to Joey) DAP Rapid Fuse for all tips and so far, have not had any come off. have done about 45-50 white diamonds on all types of ferrules with it. BIG KEY is everything MUST be flat
 

Hits 'em Hard

AzB Silver Member
Silver Member
I was using CA40 from 3M especially for those types of ferrules, but the cost and shorter life span of the bottles was an issue. Never had one come off. I now use (thanks to Joey) DAP Rapid Fuse for all tips and so far, have not had any come off. have done about 45-50 white diamonds on all types of ferrules with it. BIG KEY is everything MUST be flat
I don’t care how perfectly flat I can get a ferrule. If it’s just going to deform under the stress from a miscued break shot. Then it’s a garbage ferrule material. I’ve witnessed at least five different people(who I put tips on for) miscue while attempting to ‘power’ break. All of those miscues were done with a cheap ass break cue, with a cheap ass ferrule. All of those ferrules were deformed to the point no tip would sit flat without at least 1mm removed to face it. Along with the egg shaping it did to the ferrule. I’ve gone to warning people outright, and making sure I have witnesses. Tired of material inadequacies making me look bad.

No method, tricks, or different glue is going to prevent a tip from popping off of the cheap thermoform plastic ferrules. It’s always a matter of ‘when’. Even Juma, Tomahawk, (insert thermoform of choice), will fail. They just aren’t strong enough to start with.
 

Dave38

theemperorhasnoclotheson
Silver Member
All of those miscues were done with a cheap ass break cue, with a cheap ass ferrule. All of those ferrules were deformed to the point no tip would sit flat without at least 1mm removed to face it.
Really? 1 MM at least? I have been doing this for about 22 plus yrs and have NEVER needed to remove that much to get a ferrule of any material flat faced. A Bit of an overstatement on your part maybe? That amounts to .039". Even on the ones that people have used for breaking, I never had to remove that much. I have had deformed ferrules, and on the cheap cues with the chinese high temp plastic ferrules, I have had quite a few come off until I spent a lot of time assessing and asking. Funny thing is that the tip they come from the factory with always seems to be solidly attached, usually. So, if the factory can do it, why can't we? When it comes to break cues with the high temp plastic ferrule, I inform the customer that I use the best adhesive for this, but it may pop off after I put a tip on, and if it does, give me the tip, and I will replace the ferrule with a phenolic one at a fee just for the ferrule. I used to do it for free, and found I was losing $$$ so I talked to the 3M guys and found CA40 which works amazing, but as stated above....costly. Now I use DAP rapid fuse. Good research, and practices plus adhesives designed for the job is the answer, but sometimes (rarely lately) even changing the ferrule is needed, not drilling, adding tenons, plugs etc. IMO, that is hack work. My belief is if the factory can do it right, so can I if I put in the right effort and research. Ever notice that when removing the original tip, they don't let go when you are machining them off? You have to machine it all the way off....that tells me that they use a glue that bonds well, so stands to reason, we need to know what it is, not come up with work arounds that may even compromise the ferrule or tenon integrity overall. I also don't leave a break tip at a tall height, The taller the tip, the more a miscue will be amplified in relation to shear force (side force) I cut the tip down about a 3rd, then shape. A white diamond will last for yrs at that height but by doing this, it lessens the chance of a tip flying off due to a miscue.
 
Last edited:

Hits 'em Hard

AzB Silver Member
Silver Member
Really? 1 MM at least? I have been doing this for about 22 plus yrs and have NEVER needed to remove that much to get a ferrule of any material flat faced. A Bit of an overstatement on your part maybe? That amounts to .039". Even on the ones that people have used for breaking, I never had to remove that much. I have had deformed ferrules, and on the cheap cues with the chinese high temp plastic ferrules, I have had quite a few come off until I spent a lot of time assessing and asking. Funny thing is that the tip they come from the factory with always seems to be solidly attached, usually. So, if the factory can do it, why can't we? When it comes to break cues with the high temp plastic ferrule, I inform the customer that I use the best adhesive for this, but it may pop off after I put a tip on, and if it does, give me the tip, and I will replace the ferrule with a phenolic one at a fee just for the ferrule. I used to do it for free, and found I was losing $$$ so I talked to the 3M guys and found CA40 which works amazing, but as stated above....costly. Now I use DAP rapid fuse. Good research, and practices plus adhesives designed for the job is the answer, but sometimes (rarely lately) even changing the ferrule is needed, not drilling, adding tenons, plugs etc. IMO, that is hack work. My belief is if the factory can do it right, so can I if I put in the right effort and research. Ever notice that when removing the original tip, they don't let go when you are machining them off? You have to machine it all the way off....that tells me that they use a glue that bonds well, so stands to reason, we need to know what it is, not come up with work arounds that may even compromise the ferrule or tenon integrity overall. I also don't leave a break tip at a tall height, The taller the tip, the more a miscue will be amplified in relation to shear force (side force) I cut the tip down about a 3rd, then shape. A white diamond will last for yrs at that height but by doing this, it lessens the chance of a tip flying off due to a miscue.

Yes, 1mm on some. Don’t go getting your panties in a bunch because you don’t believe it. And before you go getting out of control on your soap box, I’m not having trouble getting the tips to stick. My problem is when installing a break tip that literally has zero flex, there is no glue in the world that will hold when the ferrule no longer is faced flat. I don’t ever recall a break tip popping off that I installed on a thermoset plastic ferrule. They’ve all been on thermoform plastics that can flex and deform.
 

Dave38

theemperorhasnoclotheson
Silver Member
Yes, 1mm on some. Don’t go getting your panties in a bunch because you don’t believe it. And before you go getting out of control on your soap box, I’m not having trouble getting the tips to stick. My problem is when installing a break tip that literally has zero flex, there is no glue in the world that will hold when the ferrule no longer is faced flat. I don’t ever recall a break tip popping off that I installed on a thermoset plastic ferrule. They’ve all been on thermoform plastics that can flex and deform.
First, I go commando...so no panties or thongs, or undies getting bunched....second, I have bad balance so no standing on any boxes, especially soapy ones, I only try to stand on solid ground. That being said, If both tip and ferrule were flat at installation time, and the bond is strong, on a fully capped ferrule, usually the tip stays put on the ferrule cap even if the ferrule has deformed....to a point. Usually the tip stays attached and follows the ferrule direction. Ferrules that deform wasn't the discussion though, it was about making a tip stay on a ferrule material that is not compatible with the glues we normally use, and the 'work around's' that people do when they don't understand the basic concepts involved and do the research for the right adhesive for the materials they are gluing together. Drilling holes into ferrule or tips and using a tenon is insane, factories can glue to the ferrules just fine, why can't the repair guys???? Hope this clarifies.....
 

WilleeCue

The Barefoot Cuemaker
Silver Member
Let's go back to keeping break tips on. They are by far the hardest to get to stay on various ferrules. Those Asian cues with the soft oily white plastic are the hardest. The tenon method mentioned should work and is not as bad of an idea as some seem to think. But I do think the cistomer should have that explained to them so the next repairman does not just face it off. Another once posted to just cut a short tenon on the end of the ferrule. Both should help hold to those types of ferrules. My solution has been to change the ferrule to a linen based ferrule that is stronger and holds tip glues better. All three methods are good. Let's all remember the rules of civility and just state what we feel is the best way and not turn things into attacks.
I agree with Chris that a small tenon will work fine.
I use that method with White Diamond tips to help stand up to any side force from a miscue on the break.
The extra strength of that shoulder makes a difference.

When replacing the tip how would you go about it knowing there was a small tenon there.
Would you not face it off flat and redo the tenon?
If you installed a new tip flat faced would it make any difference that there was a tenon on the last tip?

I have been using the Lexan clear plastic for a break tip and find the hit very much like a White Diamond.
 
Top