A couple of questions

Oliver

San Francisco
Silver Member
I finally have some time to play around with my mid size cuesmith that I purchased from Chris last year. I am trying to learn as I go and experiment with things. I've got a couple of beginners questions :D
Hope others who might be starting to learn like me would find this thread useful too, as I plan to update this thread and keep track as I learn..

So to start:

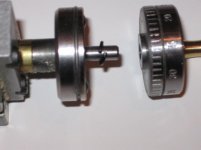
Why do people use different sized revolving centers? I've got a small live centre that I cut into the back of and drilled a hole through to match the butt of the drill chuck that came with the mid size. Now I can attach the drill handle to it and fix and release a piece of wood between centers easily. Do I need a 60 degree center for thicker pieces of wood? why? :confused:

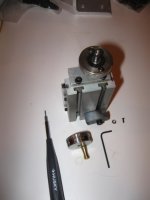
One more: The cross slide that holds the toolbit has a little wheel with a handle to move the cutting bit across to cut the wood. It is very loose and sometimes if i release the handle in a position like this: -o the handle turns/drops down by its own weight and moves the cutting bit deeper into a piece of wood. I was finishing a ferrule the other day and ruined it like that :( I can't seem to figure out how to tighten the movement of the wheel.

Sorry if I have not used the correct terminology for some of the things. Hope you can help.
 
On the backside (tailstock side) of your cross slide there are 3 set screws. Tighten the middle set screw slightly and it will make the cross slide harder to move, which will help prevent the handle from falling down, which should help prevent what you described happening on your ferrule install. You'll need to find a happy medium between turning too hard and turning too easy.
 
I can answer the first question. I use different live centers because each cue I work on is different, thus needing different sizes of centers to hold them. Not every cue will have a nice 60 degree chamfer.
 
On the backside (tailstock side) of your cross slide there are 3 set screws. Tighten the middle set screw slightly and it will make the cross slide harder to move, which will help prevent the handle from falling down, which should help prevent what you described happening on your ferrule install. You'll need to find a happy medium between turning too hard and turning too easy.

Thanks, I played around with those little screws & got it to tighten up.

But i realized the problem was somewhat different: Every time i turn the wheel forward and back, I have to turn the wheel about 50 degrees before the thread of the moving screw "bites". and this 50 degree turn is what I noticed with the handle 'dropping'. The screw or the bit does not actually move during this little turn, apart from a little bit at the very end when the screw can move from the inertia force of the drop. No matter how much I tighten the screws, this quarter turn will always be totally loose.

Any ideas or do I just have to live with it?
 
Last edited:
There was a thread about that a few months ago. I know I won't explain it correct, so I would just look for that thread.
 
.... Every time i turn the wheel forward and back, I have to turn the wheel about 50 degrees before the thread of the moving screw "bites". and this 50 degree turn is what I noticed with the handle 'dropping'. .... No matter how much I tighten the screws, this quarter turn will always be totally loose.

Any ideas or do I just have to live with it?

This is called "backlash", and it a charactoristic of mechanical linkages. Google "lathe cross slide backlash" and you'll find much discussion on the topic.

Newall says "all lathes have backlash, get a DRO" :thumbup:

http://www.newall.com/PDFs/Why_your_lathe_needs_a_Newall_DRO.pdf

Dave <-- lives with the backlash
 
Thats a nice link Dave. Up until the past discussion on backlash in the machinery forum when a member described it, I had no idea what back lash was and I was experiencing the same as the guy who started this thread.

I do tighten the set screw a bit so the cross slide screw is harder to move.
Once I get my cutting depth, I keep my thumb on the wheel and move the carriage across the piece that I'm cutting whether its a ferulle, joint collar or butt cap.
Shut the lathe off, measure and dial in my next cut. Maybe I'm not doing it right, but on a mini lathe it seems to work ok and so far haven't messed anything up.

If I'm using the router, after I dial in the depth of cut, I completely tighten the set screw, let go of the dial. The dial will drop because of its weight and backlash, but it won't cut in any further.

I'm going to keep my eye on this thread as well because theres bound to be a better way than I might be doing it.
 
Reducing cross slide backlash on Taig based lathes

If you unscrew the cross slide all the way and remove it from the carriage. You will find a split brass nut under the cross slide that the cross slide lead screw threads through.

It's item 100-25 in this diagram

http://www.cartertools.com/sclatheexp.jpg

Take a pair of pliers and "crimp" the nut closed just "slightly". This will tighten the fit of the threads on the lead screw and reduce the amount of backlash. If you crimp it too much it may be extremely tight. In that case you may need to insert a fine blade screwdriver (or something similar) in the split of the nut to "open it back up". You may have to play with it a little, but you can remove "most" of the backlash this way.
 
Last edited:
If you unscrew the cross slide all the way and remove it from the carriage. You will find a split brass nut under the cross slide that the cross slide lead screw threads through.

It's item 100-25 in this diagram

http://www.cartertools.com/sclatheexp.jpg

Take a pair of pliers and "crimp" the nut closed just "slightly". This will tighten the fit of the threads on the lead screw and reduce the amount of backlash. If you crimp it too much it may be extremely tight. In that case you may need to insert a fine blade screwdriver (or something similar) in the split of the nut to "open it back up". You may have to play with it a little, but you can remove "most" of the backlash this way.

That is a great idea! It's also possible you simply need a new split brass nut - they do wear and are supposed to - but you said you bought the lathe last year and haven't used it until now, so maybe not.

The thing I did on mine was to preload the cross-slide by inserting a small stiff spring washer in between the cross-slide dial and the bearing block spacer. To remove the cross-slide dial, you'll have to remove the little washer on the end of the cross-slide dial (use a very small torx driver) and there is also a setscrew to loosen (use a 5/64 allen wrench). Slide the dial off, insert the spring washer and then reassemble. When you tighten down the setscrew, you will need to squeeze the dial onto the shaft to set the tension. Finally, reattach the washer on the end of the dial.

I've attached a couple of pictures showing the cross-slide dial removed and the small washer like I used. One shows the washer just sitting on the side to give a better idea of the kind of split/spring washer that I'm talking about. The other shows the washer on the shaft as you will install it.

It's really easier than it sounds and it helped my setup tremendously.

My 2 cents,

Gary
 

Attachments

  • IMG_0439.JPG
    IMG_0439.JPG
    93.4 KB · Views: 421
  • IMG_0440.JPG
    IMG_0440.JPG
    90.4 KB · Views: 443
Last edited:
Thats pretty cool. Is the spring washer (cupped) you're talking about, the one thats sitting between the cross slide and the little screw at the bottom?
If so then I know what kind of washer you're talking about.
 
Neat idea!

I like the spring washer idea! I still think it's best to adjust the split nut if the play is excessive, but the spring washer would eliminate any remaining backlash.

Kudos to Gary!
 
Thats pretty cool. Is the spring washer (cupped) you're talking about, the one thats sitting between the cross slide and the little screw at the bottom?
If so then I know what kind of washer you're talking about.

The washer at the bottom of the picture is cupped, yes, but it goes on the end of the cross-slide dial - it is held on by the tiny Torx screw that goes into the end of the lead screw.

The one I've added is split, not cupped. It was hard to get a good picture of it since it is black. But, it's like you snipped one side of a thin washer with diagonal cutters and then twisted the two ends so they spring apart. Except these seem to be made of spring steel, so they retain their springy-ness.

Does that help?

Gary

I added a picture which I think will show what I'm talking about.
 

Attachments

  • IMG_0445.jpg
    IMG_0445.jpg
    37.8 KB · Views: 339
Last edited:
I like the spring washer idea! I still think it's best to adjust the split nut if the play is excessive, but the spring washer would eliminate any remaining backlash.

Kudos to Gary!

Bill,

Thanks a lot! I've learned SOOO much from you guys here, so it's nice to be able to contribute back.

Gary
 
Hey thats great, looks like quite a few people learnt some new tricks.

How about this one:

IMG_0668.jpg


This bit came screwed on top of the headstock. I'm guessing it's got something to do with fixing the chuck in place? Anyway i took it off :D

Who knows? :)


Hey thats great, looks like quite a few people learnt some new tricks.

How about this one:

IMG_0668.jpg


This bit came screwed on top of the headstock. I'm guessing it's got something to do with fixing the chuck in place? Anyway i took it off :D

Who knows? :)


I know EXACTLY what that is for!! It's the stop pin for the Indexing plate on your headstock pulley.

Too bad you're in London - London, England, correct?

I have a need for one of those, if the dimensions are the same as mine.

Let me know if you want to go through the bother of selling it. I could make one, but never seem to find the time.

Thanks

Gary
 
Last edited:
Thanks, I played around with those little screws & got it to tighten up.

But i realized the problem was somewhat different: Every time i turn the wheel forward and back, I have to turn the wheel about 50 degrees before the thread of the moving screw "bites". and this 50 degree turn is what I noticed with the handle 'dropping'. The screw or the bit does not actually move during this little turn, apart from a little bit at the very end when the screw can move from the inertia force of the drop. No matter how much I tighten the screws, this quarter turn will always be totally loose.

Any ideas or do I just have to live with it?
Normal backlash in a cross slide screw and nut is about .005 to .010" and it sounds like you are within that range. So there is not much to do about it. You just have to remember to always set your cutting depth turning the same direction.
 
Hey thats great, looks like quite a few people learnt some new tricks.

How about this one:

IMG_0668.jpg


This bit came screwed on top of the headstock. I'm guessing it's got something to do with fixing the chuck in place? Anyway i took it off :D

Who knows? :)


That is your indexing pin that is used to lock your headstock in place using the 24 indexing holes in your pulley. The screw and square nut go into the center hole and slide back into the back T-slot on top of the headstock. Then line the pointed indexing pin over the top of the indexing holes and lock it down.
 
Back
Top