Anyone use epoxy for rings?

Chili Palmer

Give or take an 1"
Silver Member
Anyone ever make rings out of epoxy? I have two bar cues I'm converting to 2 piece cues and I have very specific colors I'm after. I've looked at all types of material and the only way I can get close is to spend well over $100 on two pieces of material for two cues, I'd rather not do that. During my searches epoxy pigment kept coming up so I bought some and mixed up two colors that are exactly what I want and am going to move forward with it but, I'm curious what sort of issues will come up, either during assembly, finishing, long-term, etc.

I have done extensive research and I haven't found anyone who has ever done this. That could be a good thing or a bad thing so I'm looking for input.

I will add, if it doesn't work out I can always throw it back on the lathe and remove them, not worried about that, just looking for hints/tricks/ideas.

Thanks.
I find this idea interesting, Curious how you would use the pigmented epoxy.

Would you fill a mold of some sort to create the desired thickness?
Or maybe fill a tube so you can slice it up into multiple rings. Maybe something like a toilet paper sleeve? Getting all the air bubbles out might be a problem though.

Fascinating for sure, my head is spinning with ideas. Hopefully someone has some insight on the durability of using epoxy this way. Either way let us know how it goes if you give it a try.

Robert

Actually, I was messing with the colors and was just mixing them in plastic cups then I looked at it and realized I could just drill a hole in the center of the bottom and tap it and use a shaft maintenance bit and chuck it up in the lathe.

However; if I make any more of them I will simply use pvc pipe. Cap the bottom, pour the epoxy and stick it in my vaccuum chamber. Then, you can just chuck the whole thing up and run some passes to get rid of the PVC and voila, you have a round blank ;)

One issue I found is that it chips pretty bad sometimes and I'm afraid when I'm doing a final pass that it might chip.

It opens up a ton of options if it works.


IMG_2771.JPG
IMG_2768.JPG
IMG_2769.JPG
IMG_2770.JPG
 
cool idea. if you keep the rings thick they should be ok, however I feel that thin rings would crack fairly easily. have you considered dying fabric and make a sort of home made micarta (like knife makers do). after the fabric is dyed you would soak it in clear epoxy or fiberglass resin and put it in a press. this would also help eliminate possible air bubbles.
 
cool idea. if you keep the rings thick they should be ok, however I feel that thin rings would crack fairly easily. have you considered dying fabric and make a sort of home made micarta (like knife makers do). after the fabric is dyed you would soak it in clear epoxy or fiberglass resin and put it in a press. this would also help eliminate possible air bubbles.

Agreed that keeping them thick will help but I am going to try making a couple of thing rings for the joint, we'll see what happens.

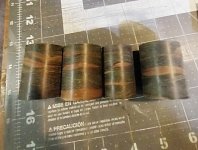
I have thought about using fabric. Below is a pic of the item that started me down this road. It's going on a bocote or mexican rosewood house cue, not sure exactly what wood it is but it's pretty dark and has some awesome black grains running through it and the white stripes in this block just doesn't work well with it. I do like that it's transparent, that's really what I was after. The parts above were just a test but I like the way they look. I could try to do it again and add some black fabric, that's what I was looking for, but nobody sells it, hence I went down this road.

IMG_2772.JPG
IMG_2773.JPG
IMG_2774.JPG
IMG_2775.JPG


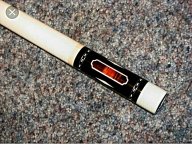
The cue(s) in question are #11 in this thread. The one the left is getting the red, and the one on the right is getting green.


And here's a couple of quick close-ups with my crappy phone. The Valley (friends cue and on the right below) is perfect as is, weight/taper/balance/etc, so I'm not touching the finish, the Jay Orner (mine) is way too thick and way too heavy so I'm going to re-taper the whole thing to match my current player. I'm hoping the weight will come out where I want it, if not I can hopefully adjust as needed.

IMG_2777.JPG
IMG_2778.JPG
 
I like where you're going with it.
Wonder if there's a flex agent that can be added to the epoxy like auto paint for painting plastic parts.

Maybe if it's a bit oversized when you do your glue up and it's sandwiched between layers it will be less likely to chip. Maybe cut your slices with the pvc attached and then trim off the pvc and flush with the rest.

It will open up some cool options if you figure it out. Keep us posted please.
 
Agreed that keeping them thick will help but I am going to try making a couple of thing rings for the joint, we'll see what happens.

I have thought about using fabric. Below is a pic of the item that started me down this road. It's going on a bocote or mexican rosewood house cue, not sure exactly what wood it is but it's pretty dark and has some awesome black grains running through it and the white stripes in this block just doesn't work well with it. I do like that it's transparent, that's really what I was after. The parts above were just a test but I like the way they look. I could try to do it again and add some black fabric, that's what I was looking for, but nobody sells it, hence I went down this road.

View attachment 762908View attachment 762909View attachment 762914View attachment 762911

The cue(s) in question are #11 in this thread. The one the left is getting the red, and the one on the right is

Agreed that keeping them thick will help but I am going to try making a couple of thing rings for the joint, we'll see what happens.

I have thought about using fabric. Below is a pic of the item that started me down this road. It's going on a bocote or mexican rosewood house cue, not sure exactly what wood it is but it's pretty dark and has some awesome black grains running through it and the white stripes in this block just doesn't work well with it. I do like that it's transparent, that's really what I was after. The parts above were just a test but I like the way they look. I could try to do it again and add some black fabric, that's what I was looking for, but nobody sells it, hence I went down this road.

View attachment 762908View attachment 762909View attachment 762914View attachment 762911

The cue(s) in question are #11 in this thread. The one the left is getting the red, and the one on the right is getting green.

Great ideas, hope it works.
Below
Spalted Alder resin impregnated for the red.
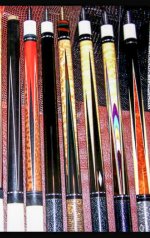
Forearms, 4th from the left, the joint. Camouflage phenolic.
 

Attachments

  • IMG_20161014_191249.jpg
    IMG_20161014_191249.jpg
    227.3 KB · Views: 90
  • PSX_20160927_010438.jpg
    PSX_20160927_010438.jpg
    251.3 KB · Views: 126
Below
Spalted Alder resin impregnated for the red.
Forearms, 4th from the left, the joint. Camouflage phenolic.

I'm assuming the resin is an epoxy resin? I ask that because the block I purchased (pic above) is acrylic so I wanted to make that but I can't find a small DIY kit to try it out, epoxy always shows up.

What sort of phenolic? Epoxy resin (assuming) and what material?

Thanks for the input.

I feel it will not be durable enough over time

I'm fairly certain the epoxy will hold up over time. Here's one link I found in my research that outlines the differences between acrylic and epoxy.


I'm fairly certain it can handle the abuse, but for acrylic it specifically mentions it's UV resistent but not the epoxy, that's why I wanted to try acrylic first. There are other traits that are different also but I'm confident it will be strong enough. When I mentioned cracking above, I was really talking about drilling into it.
 
I like where you're going with it.
Wonder if there's a flex agent that can be added to the epoxy like auto paint for painting plastic parts.

Maybe if it's a bit oversized when you do your glue up and it's sandwiched between layers it will be less likely to chip. Maybe cut your slices with the pvc attached and then trim off the pvc and flush with the rest.

It will open up some cool options if you figure it out. Keep us posted please.

Hmm, I'll have to look into flex agents, thanks.

I liked the idea of leaving the pvc on until the end but after some thought, what happens if you get it all together and once the PVC is gone there's a big air bubble? I need to do some research on bit speed and feed rates, that would probably solve the issue of chipping when drilling it.
True, maybe in addition to the vacuum chamber there's a little vibration to help quicken the bubbles to rise. Sort of like they do with a concrete pour but out side the form.
 
I'm assuming the resin is an epoxy resin? I ask that because the block I purchased (pic above) is acrylic so I wanted to make that but I can't find a small DIY kit to try it out, epoxy always shows up.

What sort of phenolic? Epoxy resin (assuming) and what material?

Thanks for the input.


I'm fairly certain the epoxy will hold up over time. Here's one link I found in my research that outlines the differences between acrylic and epoxy.


I'm fairly certain it can handle the abuse, but for acrylic it specifically mentions it's UV resistent but not the epoxy, that's why I wanted to try acrylic first. There are other traits that are different also but I'm confident it will be strong enough. When I mentioned cracking above, I was really talking about drilling into it.
Atlas carried the phenolic long ago.
The Spalted alder was done by wild woods. Had a customer who wanted flame veneers with curly Koa he bought while in Hawaii,
The alder made him think of volcanos and lava.
Worked out well.
 

Attachments

  • IMG_20240616_124747.jpg
    IMG_20240616_124747.jpg
    92.7 KB · Views: 103
I feel it will not be durable enough over time
I think it might be more durable than Bakelite. Which is something I routinely buy for cue rings.

Just bought these not long ago and they seem to be solid and machine well.

I’ve seen a ton of vintage cues(Think Rico Cervantes) with this stuff both broken and intact. Figuring it’s mostly about how you care for your cue.

I could be wrong but I think OP’s idea might be structurally stronger.

1718762738419.png
 
I need to do some research on bit speed and feed rates,

What kind of drill bits are you using?
Have you tried regrinding the points & stoning the lands perfectly flat at the tip so the initial cut is a scraping cut?
I find the angle is not all that critical, but the flats are.

(by hand) individually spin the point to grind in one smooth sweep, alternating sides until it looks right.
If you have not done this before, it is easy, but don't start with too small of a drill.
When you turn it slowly in your hand looking at the end, the land passing by you will look longer, then it will appear shorter and the other one passes in front will now look longer. At that point, they will be pretty much the same length. Or you can use a drill bit gage.

Do the flats with a thin flat india hand stone.

1718764991902.png
1718764972444.png


Last edited:
I think it might be more durable than Bakelite.

That was my immediate thought as well.
When people started gussying up :) cues with plastics, they all seemed to use some bakelite because of all the cool effects it could once be had in.
First nice cue someone gave me in the 70's was finished with it. Part of the reason he gave it to me was because i fixed in once for him. The next time he said "just keep it".
 
I think it might be more durable than Bakelite. Which is something I routinely buy for cue rings.

Just bought these not long ago and they seem to be solid and machine well.

I’ve seen a ton of vintage cues(Think Rico Cervantes) with this stuff both broken and intact. Figuring it’s mostly about how you care for your cue.

I could be wrong but I think OP’s idea might be structurally stronger.

View attachment 763427

I think you're probably right. After a bit of research, ABS has a tensile PSI strength of 7,000 - at a possible max (I read 29.8 - 43 MPa and converted that's around 6900 PSI max, don't remember exact number). Epoxy begins at 10,000. I don't know if that applies to all epoxy but for fun, I just took the red circle I posted above and threw it in the air and let it land on the concrete garage floor - 5 or 6 times, just a few minor marks. It will absolutely take more abuse than a lot of other rings I've messed with. And it will definitely handle it better than the wood.

I'm sold.

That being said, a few things came to mind:

  • How will various finishes work with epoxy. An epoxy coating would clearly adhere the best but, what about CA, automotive finishes, Solarez, etc.
  • What about expansion and contraction. A quick search tells me it could be an issue so I'll have to do some more research. I did read though, that getting the microscopic bubbles out helps a lot as they expand more than the epoxy with heat. Which won't be an issue as I have a vacuum pump, I just need to build the chamber. This might actually prevent me from using the current epoxy as it was not placed in a vacuum. That's OK, forces me to build my vacuum chamber.
  • Sanding. It is MUCH harder than the surrounding wood, I would imagine if you did much hand sanding near the epoxy it would stand proud if you're not careful. Of course a carbide sanding collet and a proper sanding jig, that wouldn't/shouldn't be too much of an issue.


What kind of drill bits are you using?
Have you tried regrinding the points & stoning the lands perfectly flat at the tip so the initial cut is a scraping cut?
I find the angle is not all that critical, but the flats are.

(by hand) individually spin the point to grind in one smooth sweep, alternating sides until it looks right.
If you have not done this before, it is easy, but don't start with too small of a drill.
When you turn it slowly in your hand looking at the end, the land passing by you will look longer, then it will appear shorter and the other one passes in front will now look longer. At that point, they will be pretty much the same length. Or you can use a drill bit gage.

Do the flats with a thin flat india hand stone.

View attachment 763440View attachment 763439


Ironically, yesterday, I remembered watching a video on drilling plastic a few years ago and you are spot on. A twist bit will grab the plastic and break it, it needs to, essentially, scraped to size, then the twist part simply evacuates the material.

Regarding sharpening a bit, here's a funny story. When I was working for a panel shop (think big industrial control panels), one of other guys was complaining about not having a drill bit sharpener so I said - use a flap disc. Let's just say he didn't believe me so I grabbed a grinder and flap disc, spent about 10 seconds on the bit and gave it back. He drilled right through the panel and said, not bad ;) Point being, I have no issues attempting to screw up a drill bit, once in a while I get lucky :)
 
I think you're probably right. After a bit of research, ABS has a tensile PSI strength of 7,000 - at a possible max (I read 29.8 - 43 MPa and converted that's around 6900 PSI max, don't remember exact number). Epoxy begins at 10,000. I don't know if that applies to all epoxy but for fun, I just took the red circle I posted above and threw it in the air and let it land on the concrete garage floor - 5 or 6 times, just a few minor marks. It will absolutely take more abuse than a lot of other rings I've messed with. And it will definitely handle it better than the wood.

I'm sold.

That being said, a few things came to mind:

  • How will various finishes work with epoxy. An epoxy coating would clearly adhere the best but, what about CA, automotive finishes, Solarez, etc.
  • What about expansion and contraction. A quick search tells me it could be an issue so I'll have to do some more research. I did read though, that getting the microscopic bubbles out helps a lot as they expand more than the epoxy with heat. Which won't be an issue as I have a vacuum pump, I just need to build the chamber. This might actually prevent me from using the current epoxy as it was not placed in a vacuum. That's OK, forces me to build my vacuum chamber.
  • Sanding. It is MUCH harder than the surrounding wood, I would imagine if you did much hand sanding near the epoxy it would stand proud if you're not careful. Of course a carbide sanding collet and a proper sanding jig, that wouldn't/shouldn't be too much of an issue.


Ironically, yesterday, I remembered watching a video on drilling plastic a few years ago and you are spot on. A twist bit will grab the plastic and break it, it needs to, essentially, scraped to size, then the twist part simply evacuates the material.

Regarding sharpening a bit, here's a funny story. When I was working for a panel shop (think big industrial control panels), one of other guys was complaining about not having a drill bit sharpener so I said - use a flap disc. Let's just say he didn't believe me so I grabbed a grinder and flap disc, spent about 10 seconds on the bit and gave it back. He drilled right through the panel and said, not bad ;) Point being, I have no issues attempting to screw up a drill bit, once in a while I get lucky :)
If you start making billets or rings let me know. I’ll buy some.

We need some innovation and creativity.

I’ll try anything.

You can get a chamber from woodcraft. I’d do that before winging it.
 
If you start making billets or rings let me know. I’ll buy some.

We need some innovation and creativity.

I’ll try anything.

You can get a chamber from woodcraft. I’d do that before winging it.

When I went down this path I went to the local Woodraft and inquired about vacuum chambers for epoxy, all they did was point me to $300+ pressurized chambers, which is a whole different animal. Since I was in the process of replacing the entire A/C system on my Jeep I already had a vacuum pump on my mind. I chose vacuum over pressure and purchased a vacuum pump a little while ago. Given that, I have two stainless steel containers for vacuum chambers, I just need to figure out the lids, technically, I only need to figure out a sight glass for the lids. I should start a thread on that...

While at Woodcraft I purchased a 2" x 2" x 6" mold and while messing around I found that filling the bottom inch or two of a solo cup requires much less epoxy for color testing. And during that process I found that a square blank has much more excess material (to clean up and deal with in general) than a round blank, that's why I thought of PVC pipe. Its cheap, round, and has minimal waste. Also, since the solo cup is round I put it on the band saw and the scraps can be put on the CNC machine and "milled" flat to your desired thickness.

Name a color or two, I'd be willing to have a little fun with it just for the experience.
 
SsDiver2112 mentions using "solorez air release" to control bubbles in his finish. Its the next thread or two right now, "white dots in finish" that might be easier than the vac chamber. I'm needing to try the stuff myself.

If you are going to build a vac chamber, how about converting a pressure cooker, it has a locking lid, aluminum so easy to drill, but not sure how air tight they are and if you could find one with a glass lid. Maybe you'll have to experiment with time instead of view.
Just some thoughts.
 
When I went down this path I went to the local Woodraft and inquired about vacuum chambers for epoxy, all they did was point me to $300+ pressurized chambers, which is a whole different animal. Since I was in the process of replacing the entire A/C system on my Jeep I already had a vacuum pump on my mind. I chose vacuum over pressure and purchased a vacuum pump a little while ago. Given that, I have two stainless steel containers for vacuum chambers, I just need to figure out the lids, technically, I only need to figure out a sight glass for the lids. I should start a thread on that...

While at Woodcraft I purchased a 2" x 2" x 6" mold and while messing around I found that filling the bottom inch or two of a solo cup requires much less epoxy for color testing. And during that process I found that a square blank has much more excess material (to clean up and deal with in general) than a round blank, that's why I thought of PVC pipe. Its cheap, round, and has minimal waste. Also, since the solo cup is round I put it on the band saw and the scraps can be put on the CNC machine and "milled" flat to your desired thickness.

Name a color or two, I'd be willing to have a little fun with it just for the experience.
Have you looked at TurnTex? They have dyes and chambers as well. That’s where I bought my stuff.

However your DIY might be easiest. Seems you’re basically set.

With that lid you definitely want some kind of relief valve. Probably a quick disconnect too.
 
Back
Top