Converting antique Brunswick from Snooker to Pool

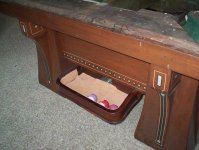
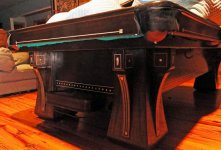
On the snooker table the thin pearl trim facing out on the corbels is a closed rectangle.
On the 9' it doesn't close on the bottom but extends down to legs.

that's interesting ...maybe it was custom ...

here is a 5x10 on ebay with closed rectangle...

http://cgi.ebay.com/Vintage-Antique...669?pt=LH_DefaultDomain_0&hash=item1c1b339545

and another in 4 leg....

arcade.2.s.jpg


so I bet the unclosed rectangle was special...and i guess this one has special rail skirts ...
 
IMO they made some subtle cosmetic changes over the years.
The one you referenced on eBay has a different ball storage box then the table I posted which had
a 2 tier ball rack that mounted in the recess between the legs. Owner opted to leave it off.

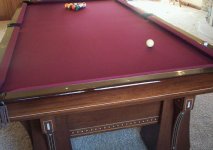
Here's the 2 tables where the corbel inlay difference is obvious and the last pic you can see the difference in the skirt design.

arcade4.jpg

arcade.2.s.jpg

finish3.jpg
 
IMO they made some subtle cosmetic changes over the years.
The one you referenced on eBay has a different ball storage box then the table I posted which had
a 2 tier ball rack that mounted in the recess between the legs. Owner opted to leave it off.

Here's the 2 tables where the corbel inlay difference is obvious and the last pic you can see the difference in the skirt design.

I am also noticing that the sights are circular not diamonds ....the two arcades on ebay the 6 leg has circular the 4 leg diamonds ....

i think the ultimate would be kling that had the arches on the legs ...like a hybrid kling/arcade ....i wonder if they made one of those.
 
Last edited:
...
i think the ultimate would be kling that had the arches on the legs ...like a hybrid kling/arcade ....i wonder if they made one of those.

I think any table mfg, especially in those days, was/is capable of producing some one-offs that never made it to a catalog.
 
Well, today is the today!

...I pick up the table in a couple of hours. I have blankets and straps, and a big box truck, but not much else.

Common sense tells me that 1.5" thick pieces of slate that probably weigh 400+ lbs each would be fine laying flat and blanket wrapped, but common sense has failed me before.

So I ask for the final ruling: how is best to transport this? Before you flame me, please realize I have searched, and for whatever reason, have seen it recommended both ways. Thanks!
 
You can lay the slate flat and stacked, preferably not directly over an axle.
Put a piece of cardboard or a blanket between the pieces and you should be fine
however try to arrange them so the stack doesn't move/slide. You can use the
table frame as a blocker. Watch for potholes driving.
 
Love those tables good luck with your project. If it were me I would keep it snooker and find someone to play snooker with.
 
Well, today is the today!

...I pick up the table in a couple of hours. I have blankets and straps, and a big box truck, but not much else.

Common sense tells me that 1.5" thick pieces of slate that probably weigh 400+ lbs each would be fine laying flat and blanket wrapped, but common sense has failed me before.

So I ask for the final ruling: how is best to transport this? Before you flame me, please realize I have searched, and for whatever reason, have seen it recommended both ways. Thanks!

no flaming ....just make sure you have a lot of help and breath a lot when moving the slate .....couldn't move for a few days after moving my slate ....and i only have a 9footer .....I came close to passing out a couple of times ....but I only had one other person helping and I had to move it through hallways etc. shifting it to the side and then flat etc....

most of the guys on here have a slate dolly that makes it easier


make sure to take pics and post em up....

good luck
 
What I wouldn't have given for a slate dolly last night...would've been worth a slab's weight in gold. I swear, those 1.5" slabs must've weighed over 400 lbs a pop. At least 350. I hurt. A lot.

This table will definitely be a 'project'...more than I was hoping. I will create a restoration thread, or continue this one (is the the proper section for such?)

For $500 ($620 after gas) I knew it was gonna be rough going in; I knew all of the mohagony veneer is shot and would need replacing. All the flat panels are in about this shape:
Snooker10.jpg

Snooker11.jpg

Snooker12.jpg


...but I was of the understanding that the legs were in good shape. Unfortunately, they show their 80 years on the corners pretty clearly, and one has a pretty significant gouge:
Snooker4.jpg

Snooker3.jpg

Snooker5.jpg

Snooker6.jpg

Snooker7.jpg


Luckily, all of the birds eye medallons are in fine shape except one blemish, and the inlay trim only has one spot that needs repair:
Snooker8.jpg

Snooker13.jpg
 
Snooker14.jpg


The blind rails are pretty rouh, but easy enough to replace, I guess:
Snooker15.jpg


...but I knew most of this, no biggie. It's what I couldn't see before a 2 hr drive that's annoying. Notice that blind rail by itself? All are like that. They appear to originally have been glued to the rest of the rail/cap...is this correct? Unfortunately, at some point it appears somebody got sick of working around them...they were attached with drywall screws:
Snooker16.jpg


...at least they were consistent, 3 screws to a rail. The rail caps were in the expected rough shape, and it's a damn good thing I planned on chopping them up, because they're pretty mutilated on the ends:
Snooker9.jpg


...In all fairness, that's the worst one. At least the sockets for the pocket iron sockets are intact on the rest. Gotta love the felt job. :rolleyes: However, the rails seemed nice and straight and the snooker rubber didn't feel dead, for what it's worth.

I haven't peeled the felt yet, but the rails measured dead on 1.75" tall with my eye. If it changes when held against the wood, I wouldn't believe it could be more than 1/16th of an inch. I mention this because RKC did elude that it'd probably be shorter. Considering the blind rails are rough, and the caps aren't much better, I think the rails will probably end up being replaced in their entirety, as many already suggested may be the best option.

The slate itself is a sore spot. While there were no through cracks, this, unfortunately, is what's left of the liners:
Snooker.jpg


...Sometime in the last 80 years somebody decided to unscrew the liner, and glue it instead. I don't know if those boards are the original liner, but judging how decrepit they are, it very well could be.

I unfortunately learned of this while carrying the slate. The glue came loose and the tongue and groove split...luckily I saved the slab from disaster with my leg. More pain ensues. Slate dolly woulda been nice.

After that we pretty much just pulled it all off so nobody ended up with a broken leg...considering how well attached it was, it was the best option. I will probably be able to use it all as a template and cut new pieces.

The slabs themselves have a good number of smaller chips, and one big one by a pocket that has been rebuilt reasonably with bondo. There were some well repaired scratches and such...some work to do, but not too bad.
The pocket shelves were not wood, they're all slate. You'll notice the ONLY piece of slate backer that didn't come loose with a tug:
Snooker2.jpg

Snooker17.jpg

Snooker18.jpg


...I read about the T-rails and how he have no hole in the top side of the slate. Well, this one does. Lots. Evidently, somebody decided that 1100-1200 lbs wouldn't hold itself steady, so they drilled over a dozen holes around the edges to attach it to the base. They almost could've passed for stock, except the were all completely different angles, none of them were perpedicular. Not a big deal, but annoying.
 
So...now what to do with it...
Some people might call my ideas an atrocity. Some already consider it one that I am converting it to begin with. However, that coupled with it's current state means originality is going to have to be thrown out the window anyway. I don't plan on selling it, and I want it to be something I enjoy.

I appreciate the classic deco styling, and love the overall shape, but my decor is very modern. The mohagony is nice, and if the table was in good condition, I'd leave it well enough alone. But since all the main veneer needs replacing, I considered doing a two-tone, using a black-dyed heavy-figure quilted maple or pomele sapele veneer on the main panels, leaving the inlay intact and the legs original. This is an example of the style I mean, very popular on guitar finishes--Maple:
100301a__14619.jpg

Pomele:
pomele_sapele.jpg

...I couldn't find it in black, but just to show, the figures are very similar.
This would have been with black felt.

I REALLY love the color-over black maple, like these:
ct6ml-deepredquilt-86862.jpg

ct6m-deeppurplequilt-85513.jpg

ct6c-deepgreenquilt-98198.jpg

ct6t-dtsbluequilt-84794.jpg


...but had immediately discounted the idea, since any vivid color would clash with the mohagony and bird's eye. Although the legs can be patched, they are still rough, and it would be arguably be as difficult to repair as they would to re-veneer completely. And if I re-veneer the legs, I can add more matching inlay trim to put some 'stripes' down the legs like the Arcade or Kling I love so much.

So, try to salvage/fix the mohagony with a touch of black, or wholesale re-veneer? If I re-do completely, the legs and blind rails would be the black shown above with additional inlay, and the main panels would be one of those colors above, with matching felt, and I would dye the bird's eye medallions to match as well.

I don't really like the idea of keeping essentially only the inlay as the original wood on this once beautiful table, but let's face it...it's the only part still intact and 'presentable'...I bought it for the bones anyway. I knew it was gonna need new skin. I think I'll try cleaning up a leg first and see how it goes.

Did I mention I don't have any woodworking experience? If you want to learn to swim, jump in the water! What's the worst that will happen? I'll ruin the finish? :rolleyes:
 
Wow. Lot of work ahead.
Since you state you have no woodworking experience IMO you're best to find a woodshop that is experienced in repair/refinishing antique furniture. Altho this could become pricey it's smart to leave this sort of work to an expert to get the best results. Went thru this with a customer a few years back and the table was in the woodshop for something like 6 months getting done. Worst part was the legs as they had been chewed up by a dog. If you look at that table pic I posted earlier you'll see the cosmetics and finish of the table came out great.

The cloth needs to come off the rails so we can see what shape they're in and you may as well remove the cushions since they would be replaced anyway if converting to pool (post pics). The pockets don't look original. Wouldn't worry about the slate liners right now until you figure out adjustment to the pocket radius on the slates. Would like to see some pics of the frame.

Seems this will be a long project. Breaking it down to parts (railwork, finish work, slate work, etc) may help make it more manageable if you're not in a rush to slap it all together.
 
Veneer

I am a bit of an audiophile. There is a website audiokarma.org that you should check out. A lot of guys there have had some pretty good luck veneering speaker cabinets. I have never done this myself but suspect it is more like an art.
My table is not perfect cosmetically but was never going to be. There would have been way too much effort and expense to fix absolutly everything. If you take a collectible coin and polish it the coin looses value. For the sake of the table restore it to it's original form. If there are a few dents and dings that is character. Just IMO...
 
I am in zero rush to to put it all together. I am only going to put it together as completed, so the body and finish work first, then slate work, then the rails. Hence why I am looking for opinions on the veneer and finish, since it's first to attack. I also reason that since the veneer is cheap, it will give me a lot to do (read: take a while) and by time I am done, I should have enough $$ to start working on the rails/pockets and buy some simonis.

I realize the refinishing is best done by the pros, but I have been meaning to learn anyway, and I really do learn best the hard way. I learned how to rebuild pinball machines and circuit boards by buying a trashed one and going to town, I don't expect this will be any different.

Also, I have to keep this cheap, I want to get out of this project for $1500 or less, and that will require me to get my hands dirty every step of the way. If I try to salvage the legs I may take those in and do the rest. I feel confident I could re-veneer whole pieces, but patchwork repair a pro could undoubtedly do much better. I just really question if the damage I showed to those legs is past the point of veneer 'repair' or not...the only nice thing is that I will have lots of matching pieces available to use from the main body. What is your opinion? Think the legs are salvageable?

I will pull the cloth and cushions, and get you guys some pics and measurements, hopefully this evening. I really figured I'd be building new ones since the caps are rough (but refinish-able) and the blind rails are bad too. Mueller's has new rail liners for ~$100 set, I am leaning toward the idea that might be easier than trying to re-angle what I have...considering the rest of this table, I don't expect it to be pretty.

Dartman, you say "the pockets don't look original"...do you mean the rail ends themselves? I will take more pics of all the rail ends as well when I pull one apart to get measurements.

I can't rally get you pics of the "frame" unless I put it together. It really is just the tops of the body panels, which are dowel'd together with these huge ~2" dowels, with all the legs bolted in with huge through-bolts, and then some ~2.5"x4.5" cross members slot into the "frame"...not much to see. I'll see if I can't draw it up or something to help explain.

As far as the pocket shelves on the slate, they could definitely use a little bit of evening out the edges, but I am still unclear as to if they really need enlarging...they looked too big on the snooker table to start with, and the only person (Mitchorama) that has chimed in that has made the conversion on one of these said he didn't touch his and it was a non-issue. Do you feel like it will be a problem? I can throw a measuring tape on the slate, what size should I be looking for the raidus to be?

Also, what's your opinion on the finish(es) I am considering? You can tell me it will look like ass, my feelings won't be hurt. ;)
 

...I read about the T-rails and how he have no hole in the top side of the slate. Well, this one does. Lots. Evidently, somebody decided that 1100-1200 lbs wouldn't hold itself steady, so they drilled over a dozen holes around the edges to attach it to the base. They almost could've passed for stock, except the were all completely different angles, none of them were perpedicular. Not a big deal, but annoying.[/QUOTE]

um ...no there are holes on the top of the slate. These holes /screws hold on the slate backing and also attach the slate to the frame. They are normal and should be there. I don't know why they are not perpendicular..they may have been over drilled at angle to allow tightening of the slate pieces. As you sink the screws in when attaching the slate you supposed to try to attain a slight angle so that it pulls the slate pieces towards the center.

anyway you are far from that point so it's not really important right now.

you do have to make sure that none of the rail bolts have stripped out

here are some pics of kling restoration ...from the ground up ....so basically this is what you need to do....

[url]http://www.carlopool.com/KlingProject.htm[/url]

good luck
 
I did a lot of mock ups setting the rails on the slates before deciding how deep to make my pocket shelf, pocket angles etc. from there I jigged up the rails measured, marked and cut. You eat an elephant one bite at a time. BTW I am not a table mech. by profession.
 
Last edited:
um ...no there are holes on the top of the slate. These holes /screws hold on the slate backing and also attach the slate to the frame. They are normal and should be there. I don't know why they are not perpendicular..they may have been over drilled at angle to allow tightening of the slate pieces. As you sink the screws in when attaching the slate you supposed to try to attain a slight angle so that it pulls the slate pieces towards the center.

anyway you are far from that point so it's not really important right now.

you do have to make sure that none of the rail bolts have stripped out

here are some pics of kling restoration ...from the ground up ....so basically this is what you need to do....

http://www.carlopool.com/KlingProject.htm

good luck

That's an awesome table, I don't know if I'm more in awe of the table, or the workshop. Now that I saw your pictures, it all makes sense now. The large holes with the plugs I figure were to cap the screws for the backer, and that they had just been removed. Now it dawns on me that those were for the sockets for the main t-bolts...that explains it, there were no screws holding the backer on at all....no wonder it all came off!
 
I have been considering what to do about the legs...most of the damages are at the bottom. If I am to stick to the original plan they have to be addressed. I can't afford to have them professionally re-done, and any repair I could do to preserve the original finish would not be up to snuff.

I made up a couple mock-ups to help me visualize.
The original re-veneer idea was simply this:
blackbody.jpg


...but it doesn't address the ratty legs. So I could just replace the affected areas on the legts, tying it into the rest, like so:
blackleg.jpg

blackbodylegs.jpg


...what do you guys think?
 
I


...what do you guys think?

I like to keep things original as possible ....but that's just me and it's your table ....

I used some wood putty and a stain pen that they make for wood repair and it worked quite well .....to hide some fairly significant defects at the bottom of the legs.....doesn't hurt to try as the stuff is pretty easy to remove if you need too....

as for the large missing sections ....i don't know ....maybe you can find a scrap antique where they could be cut from ....

but I see where you are going ....making it a bit deco-modern
 
For the legs, I have plenty of material...the rest of the table lol

The problem is, I am concerned with it looking frankenstein'd if I try to patchwork repair the legs...which I understand is rather difficult to make look right, even for people who know what they're doing, and I really can't afford to pay them anyway.

I figure the 'boots' on the legs would be easy enough, they are all straight cuts that I think I could handle.
 
Back
Top